










The data-queue APIs are among the oldest and most used APIs on the system. Two of these APIs, Send to a Data Queue (QSNDDTAQ) and Receive Data Queue (QRCVDTAQ), actually predate the System i—they were originally introduced on the IBM System/38.
By Bruce Vining
Editor's Note: This article is excerpted from chapter 6 of IBM System i APIs at Work, from MC Press.
The age of some of the data-queue APIs should not mislead you into thinking they should be avoided. The age of these APIs is more an indication of their importance!
Queuing Your Data
A data queue is a fast method of passing data between programs that are often running in different jobs. This data is often referred to as a message or a data-queue entry. (We use these two terms interchangeably.) You use tools on the system to put the data on the queue, and one or more jobs can take data off the data queue via the Receive Data Queue API (QRCVDTAQ) or Retrieve Data Queue Message API (QMHRDQM). You can use a variety of methods to put data on the queue, as you will see a little later. Reading data from a data queue usually involves one or more jobs that continually monitor the data queue and take data off it. The information may be retrieved either as it arrives or later.
Now for the standard question, “Data-queue APIs: What can you do with them?” This is a great question to ask of any API, but it is especially pertinent regarding data queues because for most RPG shops, the data queue is a bit of an enigma, yet is also one of the first objects that cause programmers to turn to APIs. It is one of those objects on the system that is designed to enhance program communications.
For starters, you can use a data queue to communicate between two programs in different jobs. For instance, suppose you have an order-entry program that allows the user to press a function key to print out a bill on demand. Conventional wisdom would dictate that the print function be a separate program that gets called when the function key is pressed.
However, is there really a good reason to generate a report at the priority of the interac-tive job or to tie up the order-entry operator while generating the report when he or she could be entering the next order? A better approach in this case might be to have the print program running all the time, waiting on a data queue. When the user presses the function key, instead of calling the print program, the data-entry program puts data on the data queue using the Send Data Queue API (QSNDDTAQ). As soon as data is put on the queue, the print program running in a different job wakes up and prints the information while the order-entry operator is off entering the next order.
Let’s extend this idea a bit. What if we have various order-entry clerks entering phone orders, and the function key, rather than printing a bill, actually causes the order to be processed? This processing may involve multiple steps with various degrees of complexity, depending on the size and type of order. We might have ten order-entry clerks, all entering orders that go to one common data queue (that is, there is not a separate data queue per clerk). In the background, we might have 20 batch jobs reading data from a single data queue and processing the orders, while the clerks are entering the next orders.
This approach can provide significant flexibility to our operation! If one of the clerks has just entered a complex order that might take quite a bit of time to process, we have not stopped him or her from receiving the next phone order. If we need to hire additional order-entry clerks, we can simply hire and train them, without changing the system envi-ronment. We don’t have to create new data queues for the new clerks, as all orders go through a common queue. If we notice that our processing of orders is getting a bit behind (there are APIs to determine how many orders are on a data queue waiting to be processed), we can simply start up more batch jobs to process the orders until we catch up. If the order processing needs to be temporarily stopped for some reason, the order-entry clerks simply continue taking new orders, as the processing is not being done within their jobs. The new orders simply get queued up until we can resume processing in the background jobs.
Another good use for data queues involves passing data from one system to another. Using the remote data-queue feature, you can create a data queue with one end sitting on one system and the other end on another. You write to the data queue from one system and read the data off the queue from the other. This method is another example of how data queues can be used to enhance program-to-program communications. In chapter 12, you will learn how to use remote data queues to send passwords (encrypted, of course!) from one system to another, so that passwords can be synchronized across systems.
Using remote data queues, we can do this without having to know how to write commu-nications programs. And even better, your program that is reading and writing to the data queue does not know if the data queue is local or remote.
The preceding scenarios involve user-written programs that write data to the data queue. You can, however, also associate data queues with various objects on your system, and the system will write information onto the queue for you. For instance, if you attach a data queue to an output queue, the system will write information to the data queue every time a spooled file goes to Ready status. This might be useful, for example, in a server program that automatically moves spooled files among a select group of printers. It would allow you to design print servers that would balance the load across printers and improve the overall throughput of the system.
The documentation for the data-queue APIs can be found in the Information Center under the category “Object,” and the subcategory “Data Queue APIs.”
Using Data Queues for Job-Related Information
You know that data queues are all about communication, and that data queues can be associated with many i5/OS objects. Data queues can also be associated with exit points within i5/OS. This capability allows you to find out whenever a job is started, ended, or submitted to a job queue. In other words, it lets you monitor jobs on the system.
When would this ability be useful? Just use your imagination. How about a chance to get even with that guy on the loading docks who had the audacity to talk bad about your system and your favorite sports team? Want to know whenever he signs on? Want to change the run priority of his jobs to 90 each time? Better yet, randomly change his priority! Of course, you could also make more constructive use of this ability, like being notified every time QSECOFR signs on your system.
In any case, that’s the initial example we’re going to show about using data queues: how to set up the system so that any time a job is started or submitted to a job queue for later processing, the job name is written to a data queue. (We’ll leave the decision as to what action to take for a particular user up to you.)
To find the documentation for the job-notification support of i5/OS we will be using, go to the Information Center. Under “Programming,” select “APIs,” and then “APIs by category.” Within the category list you will see “Work Management.” Since jobs are controlled by work management, select that category. Paging to the bottom of the category, you’ll find work-management exit programs, including job notification. This exit point logs notifica-tion messages to data queues when an i5/OS job starts, ends, or is placed on a job queue.
The documentation says that a QSYSINC header file is provided with the member name EJOBNTFY. It also mentions that you can register data queue names and libraries that you want to associate with subsystems on the system. The subsystem will then send messages to these registered data queues when jobs start, end, or are placed on a job queue. The data queues need to be created with the Create Data Queue (CRTDTAQ) command, with an entry length of 144 bytes or greater, keyed, and a key length of four. The key values that can be used are as follows:
- 0001 for a job-start notification message
- 0002 for a job-end notification message
- 0004 for a job-queue notification message
Let’s start by creating an appropriate data queue. Enter the command in Figure 6.1 to create the data queue FIG6_1. For the purposes of this example, the data queue must be a keyed data queue with a key length of four bytes and a minimum entry length of at least 144. (An entry length of 200 is used in this example.)

Figure 6.1: The command to create a data queue.
Having created the data queue, you need to tell the system that you want job-notification information put on the data queue. This technique is called using a job-notification exit point. So, the first thing you have to do to make it work is to register the data queue with the system exit point. You register job-notification exit points using the Add Exit Program (ADDEXITPGM) command, as shown in Figure 6.2. Of course, you must have adequate authority to run this command.

Figure 6.2: Registering an exit program/data queue with the system exit point QIBM_QWT_JOBNOTIFY.
The EXITPNT parameter identifies which exit point we are registering. The name QIBM_QWT_JOBNOTIFY is taken directly from the API documentation. Similarly, the FORMAT parameter value of NTFY0100 is provided in the documentation. PGMNBR is not used by this exit point, and we use the value *LOW, as that allows i5/OS to determine what value to use. PGM specifies the qualified name of the data queue we are registering. The parameter keyword pgm is a bit misleading, as we are not using a *PGM in this example. The exit points historically (and most often) work through calling a user program, so the command keyword is oriented toward *PGM objects. Obviously, the system is flexible enough to allow exit points to work with other object types!
The contents of the last parameter, PGMDTA, will be defined by the exit point we are registering with. In the case of QIBM_QWT_JOBNOTIFY, it allows us to further define exactly when we want this data queue to be used. The PGMDTA parameter is comprised of three elements. The first element is the CCSID associated with the program data. For QIBM_QWT_JOBNOTIFY, we can use the default value of *JOB. The next element is the length of the data being provided in the third element. The third element is used to define what type of information we want logged to the data queue. Table 6.1 shows how this third element is documented for the QIBM_QWT_JOBNOTIFY exit point.
From the API documentation, we see that 0007, used in Figure 6.2, means we want job-start, job-end, and job-queue notifications. The first *any indicates we are interested in job activity from any subsystem, and the second indicates that the subsystem can be associated with any library.
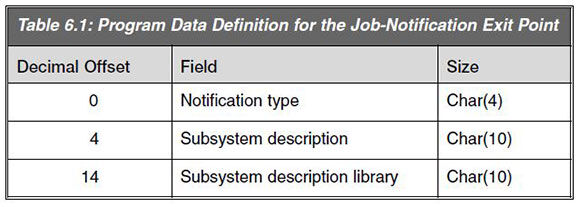
Table 6.1
From the exit point documentation, we also note that messages will not start being sent to the data queue until the subsystem is started (or restarted, in the case of an already active subsystem). If we want to start logging messages to the FIG6_1 data queue, then we need to start a subsystem on our system.
We have finally come to the point where we want to write a program to read data-queue messages. In our case, these are messages related to job starts, job ends, and job-queue activity.
Using the Receive Data Queue API (QRCVDTAQ)
The Receive Data Queue API (QRCVDTAQ) is used to read the data-queue entry. Table 6.2 has the parameters for this API.
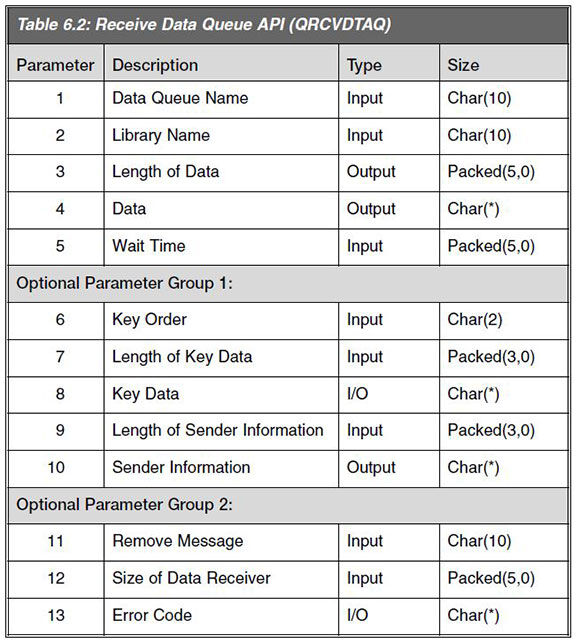
Table 6.2
Despite its initial appearance, this API is not very complicated. Many of the parameters, however, do not follow the style used with most of the system APIs in this book. As mentioned at the beginning of this chapter, some of the data-queue APIs pre-date the standards currently used for the development of APIs. We will point out the major differ-ences as we encounter them.
The first parameter, Data Queue Name, is the name of the data queue from which to read a message.
The second parameter, Library Name, is the library in which the data queue specified by the first parameter is to be found. The special values *CURLIB and *LIBL are supported.
You might already notice one difference between this API and most system APIs. Generally object names are passed as one parameter, so you would normally expect to pass a parameter named “Qualified Data Queue Name.” For QRCVDTAQ, however, the data queue name is passed as two separate parameters.
The third parameter, Length of Data, returns the length of the data associated with the message received from the data queue. An important word of warning is warranted here: It is very easy to be fooled by this parameter, especially when you become well acquainted with API standards for retrieving information.
On most APIs, the Length of Data parameter is an input value, where you specify how large your receiver variable is. (If necessary, refer to chapter 2 to review this standard.) The QRCVDTAQ API pre-dates the standards followed by most i5/OS APIs, however. It uses the Length of Data parameter to tell you how much data was returned or associated with the message received. The API assumes that you have already allocated a suffi-ciently large receiver variable to accommodate the message received. As data queues can hold messages up to 64,512 bytes in size, this may or may not be a good assumption! If you only use the first five parameters when calling this API and the returned value for parameter 3 is greater than the allocated size of parameter 4, you can be sure the API has overwritten storage associated with your program. You might now start experiencing the bizarre behaviors warned about in chapter 1 in the section “Size Is Critical.”
Additional parameters have been added to this API to provide it with more consistency when working with other i5/OS APIs. Specifically, optional parameter 12 provides the support more typically found with retrieve/receive APIs—an input parameter where you tell the API how large your receiver parameter is. Optional parameter 13 supports the standard error-code structure found in most APIs. When using the QRCVDTAQ API, you should always use optional parameter group 2. It takes a little bit more coding, but it might save you a lot of grief debugging a problem sometime down the road. If you use the twelfth parameter, Size of Data Receiver, then the value returned for the third parameter, Length of Data, will represent the full size of the message received, but
the data actually returned in the fourth parameter, Data, will be truncated to the size specified by the twelfth parameter.
A less critical, but still important, difference between the third parameter in this API (Length of Data) and most other APIs is the data type of this parameter. Most APIs use Binary(4) values when working with numeric data. This API uses packed decimal, which affects the prototype for this parameter. This is not a large impact to applications using the data-queue APIs, but it is a difference that can be easily overlooked when glancing at the API documentation.
The fourth parameter, Data, is the variable that will receive the data-queue message. If the twelfth parameter, Size of Data Receiver, is not passed on the API call, the API will return the full data-queue message regardless of the size you have allocated for this parameter. If the Size of Data Receiver parameter is passed, the API will truncate the message to the specified size of the data receiver.
The fifth parameter, Wait Time, allows you to specify how long you want the API to wait to receive data on the data queue. If there is no data on the queue, do you want it to wait until data is put on? If so, specify a negative one for this parameter. This special value will cause your program to wait, without consuming any processing cycles, until a message is put on the data queue. At this point, the API will return control to your program with the data-queue entry in parameter 4 and the size of the entry in parameter 3. On the other hand, if you specify zero, the API will not wait at all if there are no messages/entries on the data queue. It will simply return to you with parameter 3 set to a value of zero. Alternatively, you can put the number of seconds you want to wait for a message. If a message is put on the data queue before the number of seconds, you will receive the data-queue entry, and parameter 3 will have a value greater than zero. If no message is put on the data queue within the specified number of seconds, control will be returned back to your program, and parameter 3 will have a value of zero. Note that parameter 5 is defined as packed decimal.
In many cases, the next five parameters are not necessary for a given application, but they are passed on the API call because we want to use optional parameter group 2, as discussed above. As you learned in chapter 1, if you want to use a given optional parameter group, you must also use all preceding optional parameter groups. Having said this, though, our example program does use optional parameter group 1. The sixth, seventh, and eighth parameters support keyed data queues. That is the type of queue you must use to track a job’s starting and ending, as you might recall from Figure 6.1.
The sixth parameter, Key Order, specifies the type of comparison being done on the key. You can specify the following values:
- GT—Greater than
- LT—Less than
- NE—Not equal
- EQ—Equal
- GE—Greater than or equal
- LE—Less than or equal
The seventh parameter, Length of Key Data, is the length of the data-queue message key you are comparing. Note that this parameter is defined as packed decimal.
The eighth parameter, Key Data, is defined as an input and output parameter. When calling the API, you provide the actual comparison data you want used in order to find a particular message. The example program uses a key of hex’00’s (*LOVAL), a key length of four, and a key order of GE. This combination essentially says we want any message that happens to be on the data queue. The eighth parameter is also defined as an output parameter. When the API returns to your application program, this parameter will be set to the actual key value found for the received message. This returned value can be quite handy when working with key orders such as GT, LT, or NE.
The ninth parameter, Length of Sender Information, is the length you have allocated for the tenth parameter. A value of zero is supported in case you do not care what job sent the message you just received. Note that this parameter is defined as packed decimal.
The tenth parameter, Sender Information, provides information about the sender of the data-queue message. This information includes the full job name and the current user profile for the job when the message was sent. Note that this information is only available if the SENDERID parameter of the CRTDTAQ command was set to *YES.
The eleventh parameter, Remove Message, allows you to control whether or not the message that you retrieve from the data queue is removed from the data queue or retained so that it can be read again. In general, you only want to process a particular entry once, so you would remove the entry from the data queue. This is the default behavior.
The twelfth parameter, Size of Data Receiver, is where you can provide the size of your fourth parameter (where the received data-queue message is returned). You should always specify this parameter to avoid problems down the road with the overwriting of program variables. When your program is reading data, and you have the ability to specify the maximum amount of data your program is prepared to handle, always take advantage of that capability. This parameter is that capability. It avoids future problems
where the system might try to give your program more data than it was written to handle. Note that this parameter is defined as packed decimal.
The thirteenth parameter is the standard error-code structure that you have already seen many times.
Despite outward appearances, this API is relatively simple. As a matter of fact, so is the program that uses it. You simply set up a loop to continually call the Receive Data Queue API (QRCVDTAQ) until the key read from the queue is STOP. The exit point will not send this STOP value; instead, we will have a user program send this message key to cause the example program to end when we want to shut it down. The API will wait on the call to QRCVDTAQ until there is some data to get. It will then bring that data into the variable Receiver, where you can parse it to get the user of the job. Sending STOP to the data queue terminates the program at the end of the day. Another program, shown in Figure 6.5, uses the Send Data Queue API (QSNDDTAQ) to send this STOP message.
Note that sending and receiving the STOP message key does not stop the subsystem from sending additional messages to the data queue. Only ending the subsystem will do that. The STOP message key simply causes our example program to end. Additional job activity in the subsystem will continue to cause messages to be queued in the data queue for later processing when our example program is restarted. To stop the queuing of job-related messages, we need to deregister the FIG6_1 data queue from the QIBM_QWT_JOBNOTIFY exit point. This deregistration process is discussed later in this chapter. The program to monitor for job activity is shown in Figure 6.3.
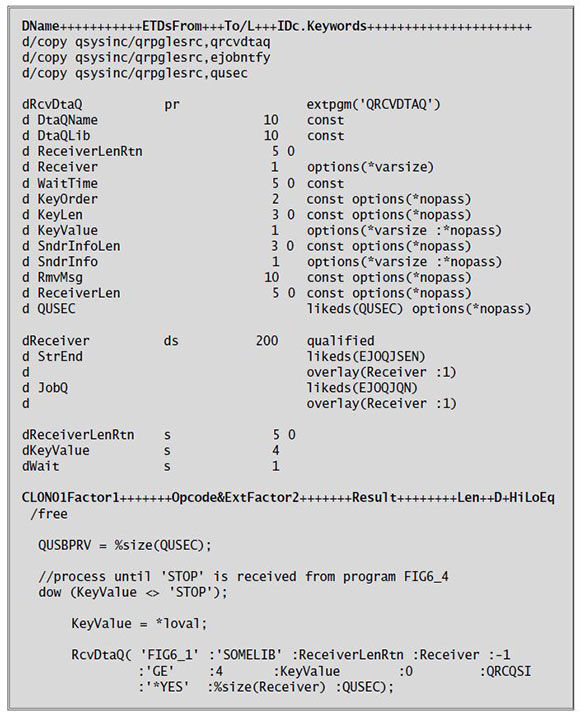
Figure 6.3: The job-monitoring program uses the QRCVDTAQ API (part 1 of 2).
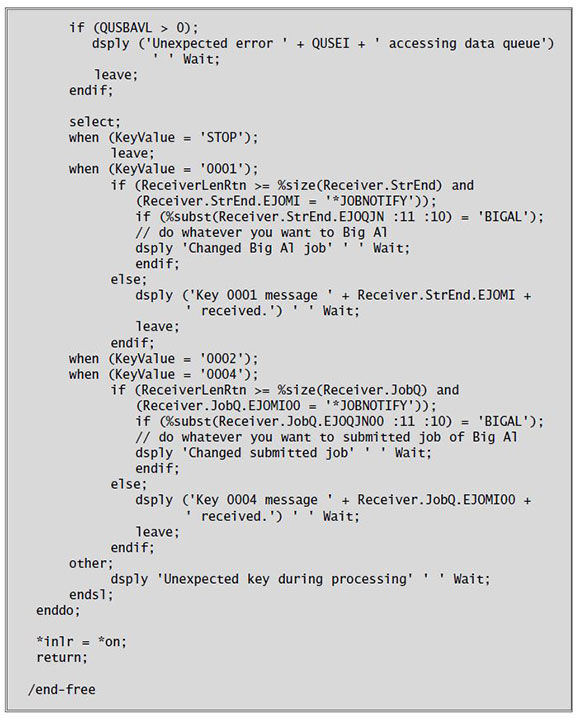
Figure 6.3: The job-monitoring program uses the QRCVDTAQ API (part 2 of 2).
The program in Figure 6.3 processes all job-notification messages from the FIG6_1 data queue. (Figure 6.4 shows the QSYSINC-supplied definitions that are being used.)
If the KeyValue is 0001 (start) or 0004 (job queue), the program further examines the received message. First, FIG6_3 verifies that the message is of the minimum expected length and is associated with the QIBM_QWT_JOBNOTIFY exit point. If it isn’t, the program DSPLYs appropriate error text and exits. Note that it is not necessarily an error if the message received is larger than the message expected. This could happen if IBM were, in a future release, to add additional information to the job-notification data queue message. In this situation, FIG6_3 is “protected” from the larger message, because the twelfth parameter, Size of Data Receiver, limits the amount of data received to the size of the defined receiver variable (the fourth parameter, Data).
If a supported message was received, FIG6_3 looks at the qualified job name (Receiver.StrEnd.EJOQJN or Reciever.JobQ.EJOQJN00, respectively) to determine if the user profile name (at positions 11 through 20 of these fields) is equal to BIGAL. When the user profile of the qualified job name is BIGAL, the program does additional processing. (The additional processing is not shown, but think of it as being to set the job’s run prior-ity to 90 based on our earlier scenario.) It then DSPLYs a message to show that the job has been changed. If you have read chapter 4, you should easily be able to add the appropri-ate CHGJOB command to FIG6_3 to accomplish this! The program also checks to see if any unexpected KeyValue values are received. If so, it DSPLYs “Unexpected key during processing.”
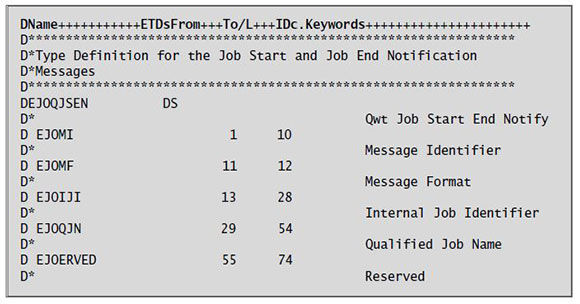
Figure 6.4: Definitions from EJOBNTFY in QSYSINC/QRPGLESRC (part 1 of 2).
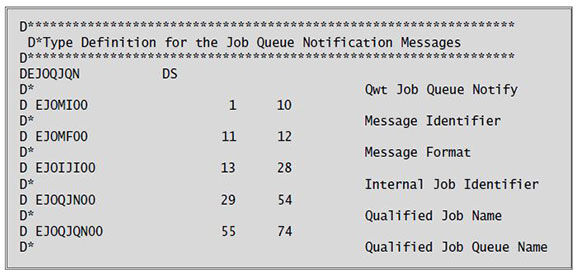
Figure 6.4: Definitions from EJOBNTFY in QSYSINC/QRPGLESRC (part 2 of 2).
We have now laid all the necessary groundwork, and if you have been working through the example, you are ready to submit the program shown in Figure 6.3. However, you might want to first review and create the program in Figure 6.5. This is the program that “STOPs” FIG6_3. Before calling program FIG6_3, consider submitting it to a job queue, as the program is going to wait forever on the data queue (because parameter 5 is set to negative one). If called interactively, your terminal might be tied up for a long time so having a second interactive session available is advisable. If submitting FIG6_3, you should also submit it to a queue where other jobs are not going to stack up behind it.
For testing purposes, you might want to run FIG6_3 interactively, so you can easily see the displayed messages (or look for the messages in QSYSOPR, since batch job DSPLY operations go to QSYSOPR). In a production environment, you will, of course, want to remove the DSPLY operations. For testing, simply create a user profile named BIGAL, start a subsystem with some workstation entries (after registering your data queue as shown in Figure 6.2), sign onto the system as BIGAL, and use TFRJOB to transfer your BIGAL job to the new subsystem. You should see messages being sent for KeyValue 0004 and then 0001. Use TFRJOB to transfer a job signed on with a user profile other than BIGAL. You shouldn’t see any message related to this non-BIGAL job DSPLYed (although job-notification messages are being sent to the FIG6_1 data queue). When you’re done testing, call the program shown in Figure 6.5 (FIG6_5) to stop the FIG6_3 program, end the test subsystem, and remove the data queue FIG6_1 from the job-notification exit point.
You can remove the FIG6_1 data queue from the job-notification exit point by using the Work with Registration Information (WRKREGINF) command, scrolling down to the entry for QIBM_QWM_JOBNOTIFY (the exit point we registered the data queue to in Figure 6.2), taking option 8 to work with exit programs, and then using option 4 to remove the data queue. There is also the Remove Exit Program (RMVEXITPGM) command, which could be used to remove the data queue, but we want to make you aware of WRKREGINF so that you can see many of the exit points that are available to you. Job notification is only one of many doors that are opening to you as you become familiar with APIs!
Using the Send Data Queue API (QSNDDTAQ)
Now that you have the monitoring program running in the background, you’ll need a way to end it. The answer is the program in Figure 6.5. This program uses the Send Data Queue API (QSNDDTAQ) to write an entry with a key value of STOP. The monitoring program in Figure 6.3 is coded to end itself when it reads an entry with this key.
Table 6.3 shows the parameters for QSNDDTAQ.
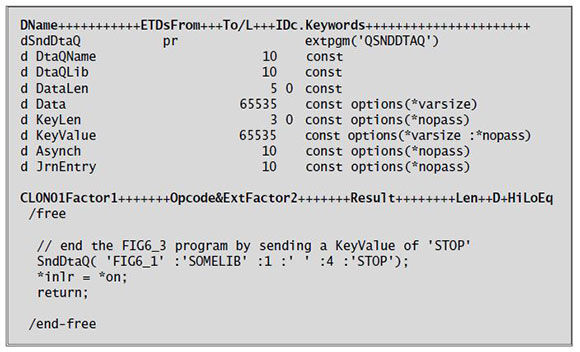
Figure 6.5: Use the QSNDDTAQ API to end the monitoring program.
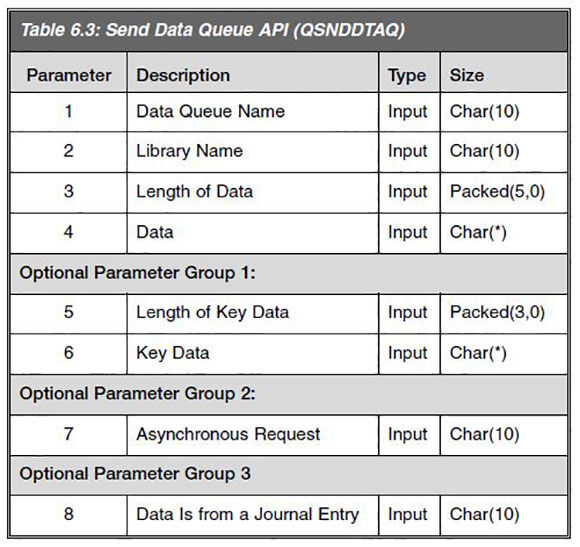
Table 6.3
The first six parameters for this API are essentially the same as for the QRCVDTAQ API, so we won’t go over them again. The seventh parameter, Asynchronous Request, is related to how messages should be processed when a distributed data-management queue is being used. Distributed data-management data queues provide the support to be able to send a message to a data queue that resides on a different system. We will be working with distributed data-management data queues in chapter 12, which deals with security APIs. This parameter is not used by the example program here.
The eighth parameter, Data Is from a Journal Entry, relates to the recovering of messages in a data queue from a journal. This parameter is also not used by the example program.
Using the Retrieve Data Queue Description API
(QMHQRDQD)
Want more? Look for our next excerpt from Bruce's book. Can't wait? Buy IBM System i APIs at Work, at the MC Press Bookstore today!

Bruce Vining is president and co-founder of Bruce Vining Services, LLC, a firm providing contract programming and consulting services to the System i community. He began his career in 1979 as an IBM Systems Engineer in St. Louis, Missouri, and then transferred to Rochester, Minnesota, in 1985, where he continues to reside. From 1992 until leaving IBM in 2007, Bruce was a member of the System Design Control Group responsible for OS/400 and i5/OS areas such as System APIs, Globalization, and Software Serviceability. He is also the designer of Control Language for Files (CLF).A frequent speaker and writer, Bruce can be reached at
MC Press books written by Bruce Vining available now on the MC Press Bookstore.
 |
||
 |
|
IBM System i APIs at Work Leverage the power of APIs with this definitive resource. List Price $89.95 Now On Sale
|

 Business users want new applications now. Market and regulatory pressures require faster application updates and delivery into production. Your IBM i developers may be approaching retirement, and you see no sure way to fill their positions with experienced developers. In addition, you may be caught between maintaining your existing applications and the uncertainty of moving to something new.
 IT managers hoping to find new IBM i talent are discovering that the pool of experienced RPG programmers and operators or administrators with intimate knowledge of the operating system and the applications that run on it is small. This begs the question: How will you manage the platform that supports such a big part of your business? This guide offers strategies and software suggestions to help you plan IT staffing and resources and smooth the transition after your AS/400 talent retires. Read on to learn:
LATEST COMMENTS
MC Press Online