Installing the Db2 Software. Learn about setting up the application development environment in the first article.
Editor's Note: This article is excerpted from chapter 5 of QuickStart Guide to Db2 Development with Python, by Roger Sanders.
Once the required Linux shared library files have been installed and the tarball containing the Db2 software has been downloaded, you need to extract the software from the tarball, and then use the installation program provided (db2setup) to install and configure Db2. This can be done by performing the following steps:
1. Open a terminal window (if you don’t already have one open).
2. Log in as the root user by executing the following command:
su - root
When the Password: prompt appears, provide the appropriate password for the root user. (Again, the command line prompt should change from $ to #.)
3. Create a directory named “software” in the /home directory and make the directory accessible to everyone by executing the following commands:
mkdir /home/software
chmod 777 /home/software
4. Move the Db2 Community tarball file that was downloaded earlier to the directory created in the previous step by executing a command that looks something like this:
mv /DownloadDir/v11*.gz /home/software
(where DownloadDir is the name of the directory the tarball file was stored in).
In my case, the Db2 Community tarball file is usually stored in the directory /home/ibm_admin/Downloads, so I execute a command that looks like this:
mv /home/ibm_admin/Downloads/v11*.gz /home/software
5. Go to the /home/software directory and execute the following commands to unzip, and then untar the file that was just copied there:
cd /home/software gunzip v11*.gz
tar -xvf v11.1_linuxx64_dec.tar
When these commands are executed, a subdirectory named server_dec is created in the /home/software directory, and the files that are used to install Db2 are extracted and stored there.
6. Rename the subdirectory that was created in the previous step (server_ dec) to ibm-db2 and make it accessible to everyone by executing the following commands:
mv server_dec ibm-db2
chmod -R 777 ibm-db2
At this point, you can delete the .tar file that was created earlier since it’s no longer needed; to remove the file, execute the following command:
rm -f v11*.tar
7. Move to the /home/software/ibm-db2 directory and verify that the server has everything necessary to install and run Db2 by executing the following commands:
cd ibm-db2
./db2prereqcheck -i -v 11.1.4.4
Several messages will be generated as different prerequisites for Db2 are checked, and when all checks are completed, you should see the message: DBT3533I The db2prereqcheck utility has confirmed that all installation prerequisites were met. If you do not see this message, review the output of the db2prereqcheck utility and resolve any problems identified.
8. Start the Db2 Setup/Installation program by executing the following command:
./db2setup
When an IBM DB2 Welcome window like the one shown in Figure 5.3 appears, click New Install.
Figure 5.3: IBM Db2 Welcome window
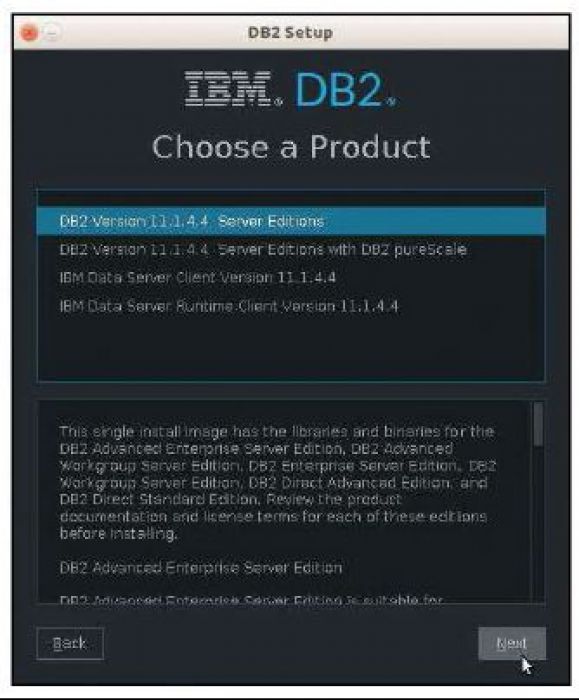
9. A Choose a Product window will appear (Figure 5.4). Select DB2 Version 1.4.4 Server Editions, then click Next. This launches the Db2 Setup/Install Wizard.
Figure 5.4: IBM Db2 Setup program product selection window
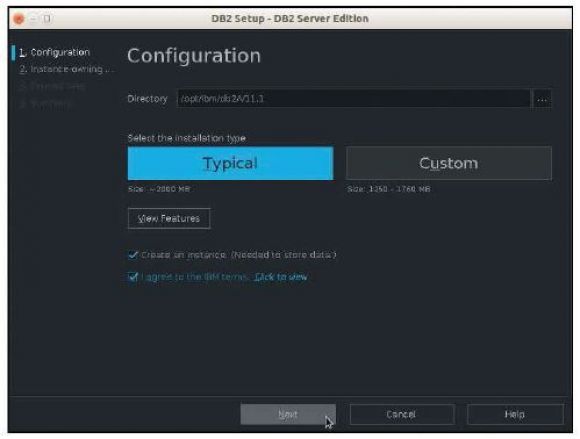
10. On the Configuration window of the Db2 Setup/Install Wizard, (Figure 5.5), click on the Click to view link to see the IBM terms and conditions for using Db2. Then, check the I agree to the IBM terms Finally, click Next.
Figure 5.5: IBM Db2 Setup/Install Wizard Configuration window
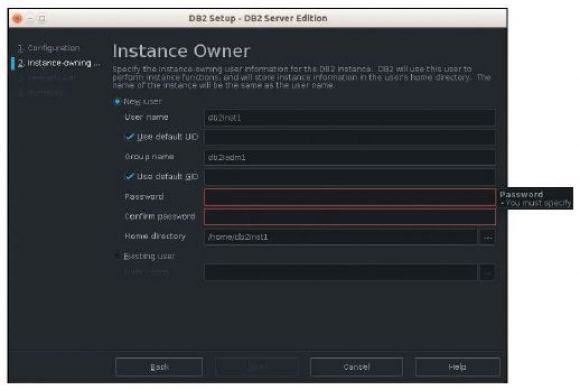
11. On the Instance Owner window (Figure 5.6), enter a password for the Db2 instance owner (whose name is db2inst1, by default) in the Password field. Then, enter the password again in the Confirm Password field. (The instance owner username and password provided here is the user ID and password you will use to work with Db2). When finished, click Next.
Figure 5.6: IBM Db2 Setup/Install Wizard Instance Owner window
12. On the Fenced User window (Figure 5.7), enter a password for the Db2 fenced user (whose name is db2fenc1, by default) in the Password field. Then, enter the password again in the Confirm Password field. (The fenced user is used to run user-defined functions and stored procedures outside of the address space that is used by a Db2 database). When finished, click Next.
Figure 5.7: IBM Db2 Setup/Install Wizard Fenced User window
13. On the Response File and Summary window (Figure 5.8), verify that the Install DB2 Server Edition on this computer and save my settings in a response file radio button is selected. Then click Finish to close the IBM Db2 Setup/Install Wizard and start the Db2 installation
Figure 5.8: IBM Db2 Setup/Install Wizard Response File and Summary window
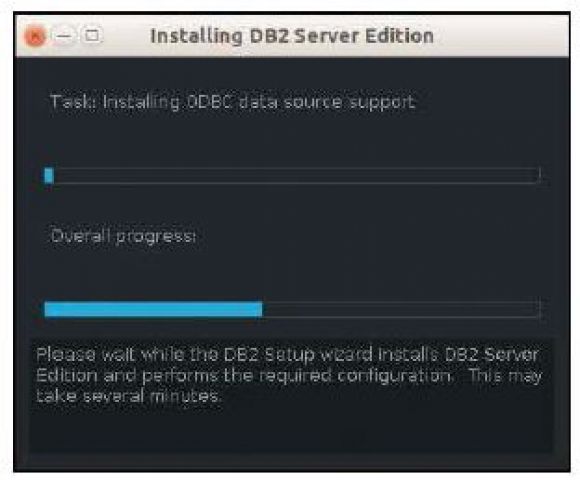
14. The Installing DB2 Server Edition window should appear (Figure 9). This window contains two status bars, which show the progress of individual tasks and the overall progress of the installation.
Figure 5.9: IBM Db2 Setup/Installation program window
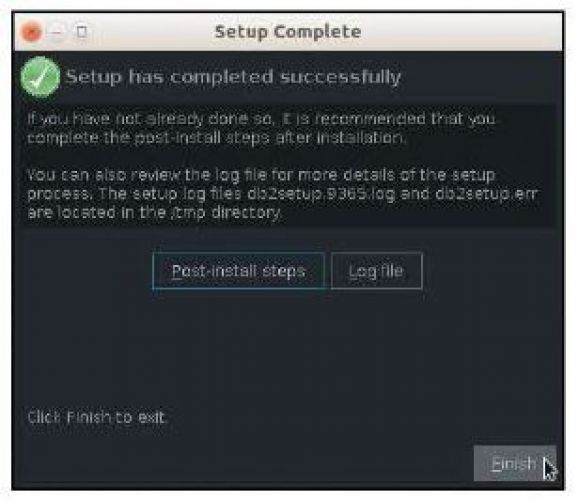
15. When the Db2 installation process has finished, a Setup Complete window like the one shown in Figure 5.10 will appear.
Figure 5.10: IBM Db2 Setup/Installation Program Setup Complete window
16. If you would like to see some recommended actions to take now that Db2 has been installed, click the Post-install steps button (refer to Figure 5.10). This will cause a separate Post-install steps window to appear; information shown in this window will tell you how to:
- Verify that the Db2 software was installed
- View your Db2 license
- Start using
- Access the online Db2
(After reviewing the information provided, click Close to return to the Setup Complete window.)
17. If you would like to review the contents of the log file that was generated during the Db2 installation process, click Log file. This will open a separate Log file window that contains log file information; when you have finished reviewing this information in this window, click Close (to return to the Setup Complete window )
Installation program by clicking Finish (see Figure 5.10).






 Business users want new applications now. Market and regulatory pressures require faster application updates and delivery into production. Your IBM i developers may be approaching retirement, and you see no sure way to fill their positions with experienced developers. In addition, you may be caught between maintaining your existing applications and the uncertainty of moving to something new.
 IT managers hoping to find new IBM i talent are discovering that the pool of experienced RPG programmers and operators or administrators with intimate knowledge of the operating system and the applications that run on it is small. This begs the question: How will you manage the platform that supports such a big part of your business? This guide offers strategies and software suggestions to help you plan IT staffing and resources and smooth the transition after your AS/400 talent retires. Read on to learn:
LATEST COMMENTS
MC Press Online