The process of setting up an application development environment is frequently overlooked because the environment used is often dictated by the company a developer works for.
By Roger Sanders
Editor's Note: This article is excerpted from chapter 5 of QuickStart Guide to Db2 Development with Python, by Roger Sanders.
Even developers who don’t work with an environment that is governed by their company may not have to do much to get started; they may only need to install their integrated development environment (IDE) of choice (such as Xcode or Visual Studio Code). But creating a new development environment from the ground up can be frustrating because not everybody’s computer is the same. Consequently, a setup tutorial for one computer—or a process used by one developer—may not work for another.
For this reason, this chapter does not cover the exact links and clicks that are required to set up a computer for application development—the right Google searches can help you with that. Instead, it focuses on how to get Db2 up and running on a Linux server (Linux was chosen because I
find it to be an easy operating system to use for Python development), how to create a populated database to work with, and how to install the libraries necessary to build Python applications that can interact with Db2.
A Word About My Development Platform: the UDOO X86
Before we look at the development environment setup process, I want to spend a few moments talking about the hardware and software I have been using over the past two years to create application development environments: a UDOO X86 Ultra single-board computer (SBC) running Windows 10, Red Hat Enterprise Linux (RHEL7.5), and Ubuntu Linux 18.04, together with Db2 Developer-C (now Db2 Community).
On June 22, 2017, with the release of Db2 v11.1.2.2 (Version 11.1, Modification Pack 2, Fix Pack 2), IBM introduced a new, free, full-featured version of Db2 known as Db2 Developer-C Edition. Before that, a free version of Db2 called Db2 Express-C was available, but that offering did not allow users to take advantage of features like range-partitioned tables, high-availability disaster recovery (HADR), and BLU Acceleration (columnar, in-memory tables). Like Db2 Express-C, Db2 Developer-C has some restrictions: no more than 4 cores/CPUs and 16 GB of RAM can be used, and databases cannot exceed 100 GB (compressed) in size. Unlike Db2 Express-C, these restrictions can be lifted simply by applying a new license key.
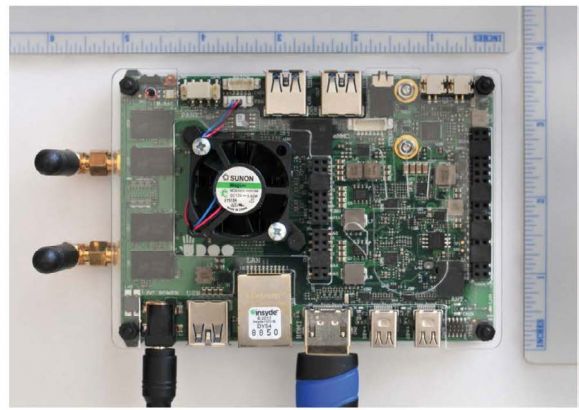
Six weeks before Db2 Developer-C was made generally available, I started looking for an SBC with an x86 CPU I could use to create a simple Internet of Things (IoT) project. The goal was to create something like the IBM TJBot to tempt new developers to try Db2 Developer-C. (I considered using a Raspberry Pi, but needed a platform with a CPU the Db2 software is compiled for.) That’s when I discovered the UDOO X86 (Now the UDOO X86 II - https://www.udoo.org/discover-udoo-x86-ii/). Not only was I able to build something that got everyone’s attention at the 2017 International Db2 Users Group (IDUG) conference in Lisbon, Portugal (where my project was unveiled), but I also discovered what has become, at least to me, the ideal application development platform. With a quad-core Intel® Pentium processor, 8 GB of RAM, Intel dual-band wireless Wi-Fi, Bluetooth, and a 128 GB M.2 Solid State Disk (SSD) drive, my UDOO X86 Ultra is a very powerful computer for its size (which is 4.72” x 3.35” or 120mm x 85mm). I have found that by putting install images for different operating systems on a set of color-coded USB thumb drives, I can quickly reimage this machine in a variety of ways to build/rebuild a variety of development environments. (One nice feature of the UDOO X86 is its built-in 32GB eMMC storage. I keep the install code for Db2 and development tools like Anaconda and Visual Studio Code there so they do not have to be reloaded each time my machine is reimaged.) And, in just a few hours I can create a complex, live-demo platform that can be taken anywhere. The UDOO X86 that was used to create the Python examples referenced throughout the remainder of this book can be seen in Figure 5.1.
Figure 5.1: My UDOO X86 Ultra Db2-Python development platform (Note: I created a custom mount bracket and added the external Wi-Fi antennas; the acrylic case is an add-on accessory.)
Downloading the Db2 Software
It has been my experience that IBM websites are constantly changing, so I’m hesitant to provide the link to a specific URL where the Db2 Community software can be found. At the time of this writing, the easiest way to get the software is to do a Google search for “Db2 Community download”. One of the first links provided in the list returned should take you to the IBM Db2 for Developers Marketplace. Select the link that takes you to the Marketplace website; then, locate and click the push button labeled Download now (or something similar). Follow the instructions provided—ultimately, you want to arrive at a Web page that looks something like the one shown in Figure 5.2 (this was the download page for Db2 Developer-C).
Figure 5.2: IBM Db2 Developer-C for Non-Production Downloads Web page
When you arrive at this page, look for the ↓Download now link located just to the left of text that looks like “IBM® Db2 11.1 for Linux® on AMD64 and Intel® EM64T systems (x64) v11.1_linuxx64_dec.tat.gz (1.43 GB)” (similar to the entry highlighted in Figure 5.2). Left-click this link to download the software, taking note of the location where the software is stored.
Enabling root User Access (Ubuntu Linux Setup Only)
When Ubuntu Linux is installed on a server, root login is disabled by default. But ideally, Db2 should be installed under the root user account. So, to enable root user access on an Ubuntu server, perform the following steps:
- Log in with a user account that has administrative Usually, this is the account that was created during Ubuntu installation. (I typically use the account name ibm_admin.)
- Open a terminal window. (Right-click anywhere on the desktop and select Open Terminal from the menu shown or press Ctrl + Alt + T).
- Execute the following command (from the terminal window):
sudo passwd root
- When the prompt [sudo] password for [AdminUser]: (where AdminUser is the user account used in Step 1) appears, enter the password for the administrative user account and press Enter.
- When the prompt Enter new Unix Password: appears, type a new password for the root user and press Enter.
- When the prompt Retype new Unix Password: appears, type the new password again and press Enter. You should see the message passwd: password updated successfully; if this message does not appear, go through the steps again, making any corrections suggested by the error message(s) returned.
Preparing a Linux Server for Db2 Installation
Before you can successfully install the Db2 software, you need to install several Linux shared library files that Db2 requires. To install these libraries, as well as update the Linux packages that are currently installed on the system (Ubuntu Linux only), perform the following steps:
- Open a terminal (Right-click anywhere on the desktop and select Open Terminal from the menu shown.)
- Log in as the root user by executing the following command:
su - root
When the Password: prompt appears, provide the appropriate password for the root user. The command-line prompt should change from $ to #.
- If you are using Ubuntu Linux, execute the following commands to install the prerequisite packages:
apt-get -y upgrade
apt-get -y install libaio1
apt-get -y install binutils
apt-get -y install zlib1g-dev
apt-get -y install libpam0g:i386
apt-get -y install libstdc++6:i386
apt-get -y install ksh
apt-get -y install liblogger-syslog-perl
apt-get update
If you are using Red Hat Enterprise Linux, execute the following commands instead:
subscription-manager repos –enable rhel-7-server-optional-rpms
yum -y --noplugins install pam-devel.i686
yum -y install libstdc++.so.6 yum
-y install ksh
yum -y install perl-Sys-Syslog
Next time, Installing the Db2 Software...


 Business users want new applications now. Market and regulatory pressures require faster application updates and delivery into production. Your IBM i developers may be approaching retirement, and you see no sure way to fill their positions with experienced developers. In addition, you may be caught between maintaining your existing applications and the uncertainty of moving to something new.
 IT managers hoping to find new IBM i talent are discovering that the pool of experienced RPG programmers and operators or administrators with intimate knowledge of the operating system and the applications that run on it is small. This begs the question: How will you manage the platform that supports such a big part of your business? This guide offers strategies and software suggestions to help you plan IT staffing and resources and smooth the transition after your AS/400 talent retires. Read on to learn:
LATEST COMMENTS
MC Press Online