In Part 3 we look at creating our data source SSIS code structure. Click here to review Part 1 and Part 2.
Editor’s Note: This article is excerpted from chapter 5 of Extract, Transform, and Load with SQL Server Integration Services--with Microsoft SQL Server, Oracle, and IBM DB2, by Thomas Snyder and Vedish Shah.
As our final step, we will prepare our package for reuse by copying the package to a location external to our SSIS solution.
For readers who may not be familiar with Visual Studio, I would like to do a quick review of the structure of the source code in a solution that will help you understand how we will prepare our package for reuse.
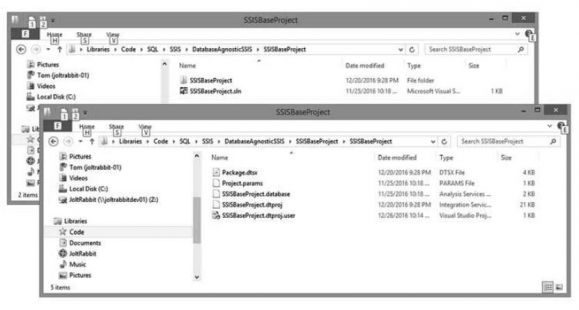
In Windows File Explorer, if you navigate to the location of your project, you will see the parent SSISBaseProject folder with a child SSISBaseProject folder (Figure 5.17).
Figure 17: Visual Studio source code structure
In the parent folder, there is a single file: SSISBaseProject.sln. In the child folder, there are five files:
- dtsx
- params
- database
- dtproj
- dtproj.user
The .sln file is the solution file that Visual Studio uses to define the entire structure of the code used within Visual Studio, which could contain multiple projects.
The .dtsx file is the package file, which is what we will use as the base package for the rest of the projects. This file contains the SSIS code that we have set up so far. This will be the only file that we need to copy for the rest of our projects.
When you add a new or an existing Integration Services project to a solution, SQL Server Data Tools (SSDT) creates the miscellaneous project files.
- The *.dtproj file contains information about project configurations and items such as packages.
- The *.dtproj.user file contains information about your preferences for working with the project.
- The *.database file contains information that SSDT requires to open the Integration Services project.
Preparing for Reuse
In Windows File Explorer, navigate to a location that you would like to use for your future projects and create a new folder called BaseProject or whatever you’d like. This folder is where we will store our project.dtsx file, which we will rename to BaseProject.dtsx.
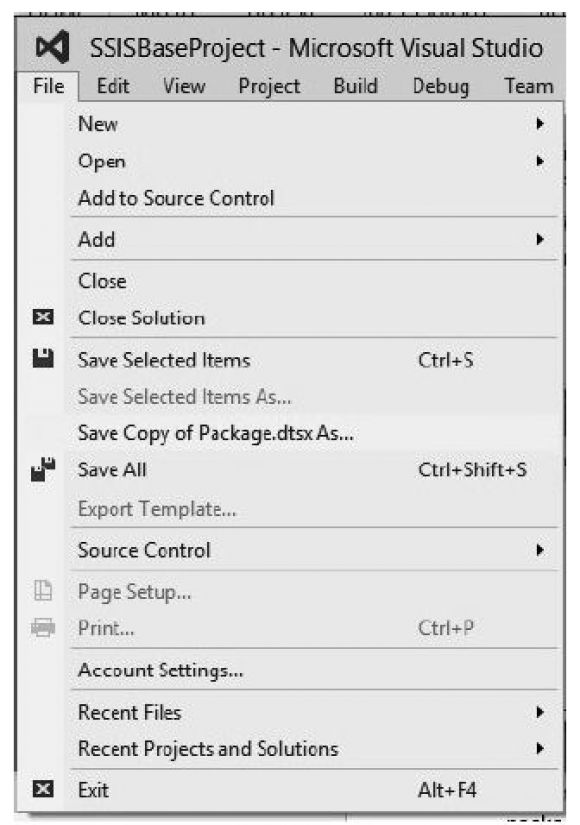
Open the SSISBaseProject in Visual Studio. Then select File > Save Copy of Package.dtsx As…. (Figure 5.18, part 2). Next select the target folder location that we created previously and specify the name as BaseProject.
Figure 5.18: Visual Studio: Save Copy
The result should be that we created a new file called BasePackage.dtsx within the newly created BaseProject folder. The preparation steps simply copied the package.dtsx file from your project folder into a different location, with the only difference being in the VersionGUID. This copied file will be much cleaner to use in future projects because we removed it from all the miscellaneous solution files that we will not be using.
Copy the Base Project
In the following chapters, we will start our SSIS development by creating a new SSIS project that will import the base package. These steps will be repeated as the first step in most of the following chapters.
- Open Visual
- Select File > New Project….
- Select Templates > Business Intelligence > Integration Services Project.
- Enter the name for your project and select the directory location to be
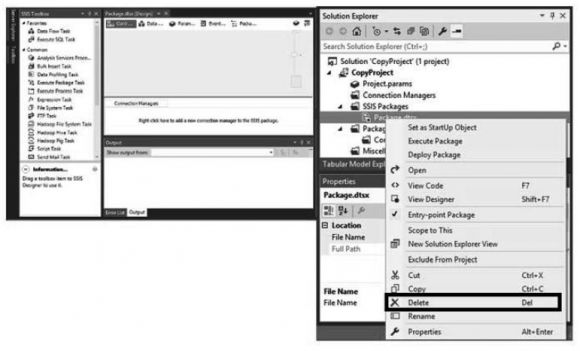
Once the new project is created, we will delete the default SSIS project and import the base project, as shown at the right side of the screen in Figure 5.19.
Figure 5.19: Deleting the default project package
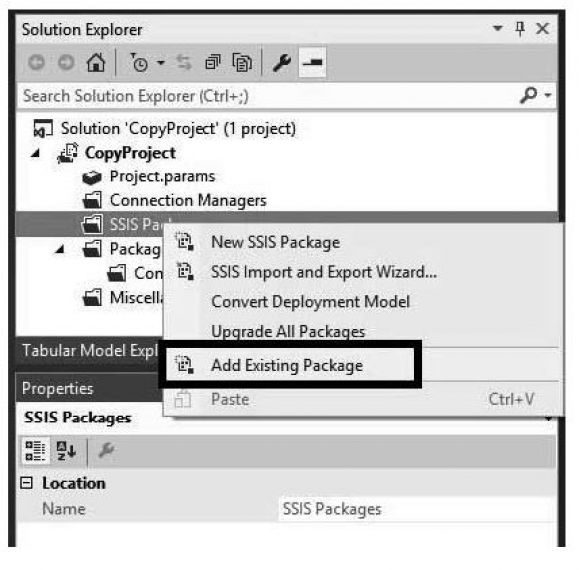
Now that we have deleted the default package, we will now add the base package (Figure 5.20).
Figure 5.20: Adding an existing SSIS package
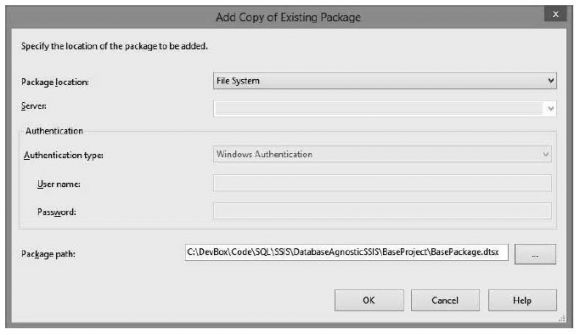
After opting to add the existing package, you will be presented with a screen (Figure 5.21) to select the location of the base package.
Figure 5.21: Selecting an existing SSIS package
Once you click OK after you selected the base project, you will see BasePackage.dtsx under the SSIS Packages in the Solution Explorer (Figure 5.22). This process copied the base package into your new SSIS solution.
Figure 5.22: New SSIS package created from the base package
We now have a new project, ready to go, which contains all the connection managers configured in the base project. If you double-click on the BasePackage.dtsx file you just added, it will open the project and you can see that your connection managers are now available for usage.
Creating a Package Template
The previous steps to copy the base project are completely legitimate, but to take it all the way home, let’s make a package template out of our base project. By creating a package template, you will be able to select your template from the new item menu.
To do this is simple enough: we will simply copy our base package into the SSIS package template folder. But before we do that, let’s rename our template to a user-friendly name (MCPress Database Agnostic Base.dtsx), as that will be what is displayed when you select it (Figure 5.23).
Figure 5.23: Renaming the base template package
Then copy our base template package into the SSIS package template:
C:\Program Files (x86)\Microsoft Visual Studio 14.0\Common7\IDE\PrivateAssemblies\ProjectItems\DataTransformation Project\DataTransformationItems
When you initially create your new SSIS packages, the default package will be blank and can’t be changed. So simply create a new SSIS project as you normally would to start with your empty project (Figure 5.24).
Figure 5.24: Creating a new SSIS project to add a package template
Once the new project is created, right-click on your project in Solution Explorer, select Add, then New item….
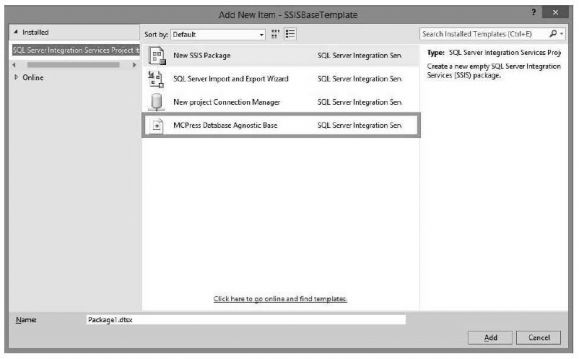
You will now be able to see your custom package template available as an item to add, as shown in Figure 5.25.
Figure 5.25: Selecting your new custom package template
Once you’ve added your package template, you could delete the original project.dtsx and rename the MCPress Database Agnostic Base1.dtsx to match your project. Please note that when you add the package template, it actually copies the .dtsx file into your project, which means that you could update the package without impacting your reusable base package in the Visual Studio SSIS Package location.
I think this is convenient and will make life easier for us in the following chapters, to take advantage of reusing our connection manager efforts in this chapter.
However, if I wanted to be picky, I would have liked to have our custom package template available from the initial creation template menu. It also seems hacky when you manually place files in directories when you’re dealing with a Microsoft windows graphic-intensive tool without an import option for these templates, but that could possibly be a little enhancement in a future release.
Look for more tips from Tom's book in an upcoming issue of MC TNT. Can't wait? Pick up your copy of Tom's book, Extract, Transform, and Load with SQL Server Integration Services at the MC Press Bookstore Today!






 Business users want new applications now. Market and regulatory pressures require faster application updates and delivery into production. Your IBM i developers may be approaching retirement, and you see no sure way to fill their positions with experienced developers. In addition, you may be caught between maintaining your existing applications and the uncertainty of moving to something new.
 IT managers hoping to find new IBM i talent are discovering that the pool of experienced RPG programmers and operators or administrators with intimate knowledge of the operating system and the applications that run on it is small. This begs the question: How will you manage the platform that supports such a big part of your business? This guide offers strategies and software suggestions to help you plan IT staffing and resources and smooth the transition after your AS/400 talent retires. Read on to learn:
LATEST COMMENTS
MC Press Online