In Part 2 we look at creating our data source SSIS base package. Click here to review Part 1.
Editor’s Note: This article is excerpted from chapter 5 of Extract, Transform, and Load with SQL Server Integration Services--with Microsoft SQL Server, Oracle, and IBM DB2, by Thomas Snyder and Vedish Shah.
Finally! We have installed all our software and set up our databases. Now we can start creating our SSIS packages. We will be completing this chapter by creating a new SSIS package that will contain our data sources and could be reused as the starting point for any new SSIS packages. We will walk through the creation to support the project overview; however, now is a great opportunity for you to custom-tailor your data sources so they fit your intended environment setup.
To begin creating our SSIS packages, follow these steps:
- 1. Open Visual
- 2. Select File > New Project….
- 3. Select Templates > Business Intelligence > Integration Services Project.
- 4. Enter the name for your project, then select the directory location to be created (Figure 5.9).
Figure 5.9: Selecting the Integration Services Project as the SSIS project
Once you click OK, your empty SSIS package will be created, and you can now add our connection managers, which will connect to your databases.
DB2 Connection Manager
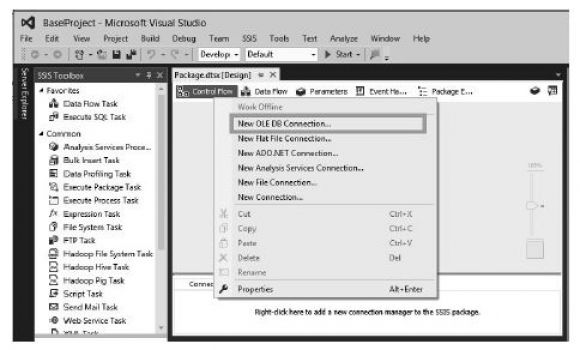
To create our DB2 database connection manager, go to the bottom panel labeled Connection Managers, right-click it, and select New OLE DB Connection…, as shown in Figure 5.10.
Figure 5.10: Creating a new connection for the DB2 source connection
When we installed the OLE DB drivers using the iSeries Access installation, we reviewed the different types of OLE DB drivers that were installed:
- IBMDA400—SQL and record-level access (RLA) support
- IBMDASQL—SQL-only support
- IBMDARLA— RLA-only support
To keep the topics as applicable to as many databases as possible, we will be using the SQL-only driver IBMDASQL. The RLA features will not be used here.
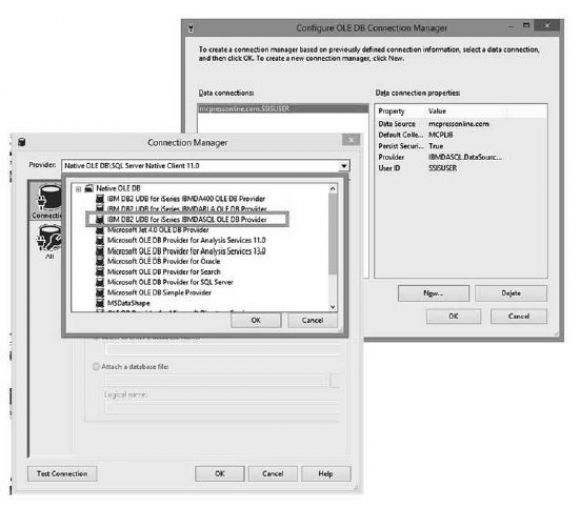
When you select the New OLE DB Connection… option for the first time, the screen in Figure 5.11, Configure OLE DB Connection Manager, will be blank. You’ll need to click the New… button at the bottom of the screen to specify your database information.
Figure 5.11: Creating a new connection for the DB2 source connection
From the provider drop-down, you can see the IBM DB2 OLE DB providers that are available. Please select the IBMDASQL driver.
Set up your connection manager using the settings in Table 5.1, making changes for your machine, if necessary.
|
Table 5.1: Connection Manager Settings for the DB2 database |
|
|
Property |
Value |
|
Provider |
Native OLE DB\IBM DB2 UDB for iSeries |
|
Server Name |
mcpressonline.com (your server name) |
|
User Name |
SSISUSER (your username) |
|
Default Collection |
MCPLIB |
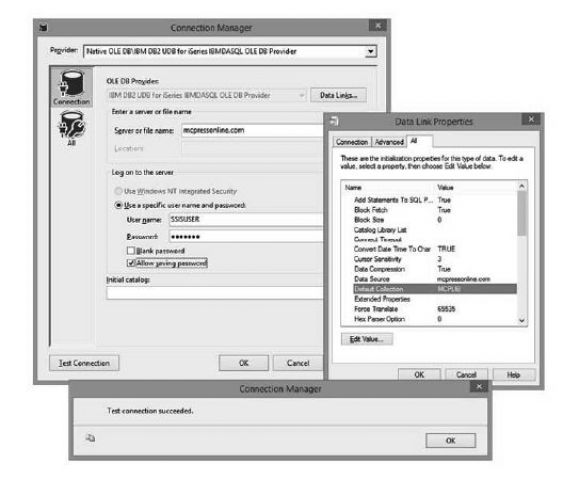
After selecting IBMDASQL OLE DB Provider, you will need to enter the server name and user information. Another useful setting is the default collection, which will likely be the top entry in your library list in IBM lingo, or the catalog in Microsoft land. To set the default collection, click the Data Links… button (Figure 5.12) to assign any additional attributes such as the Default Collection.
Figure 5.12: Connection Manager and Data Link properties with connection test
When you're specifying your database details, it's a good idea to click the Test Connection button to ensure that your information has been entered correctly and that your authentication method is working. This will help you avoid having to troubleshoot your SSIS package when/if you have a connection problem.
SQL Server Database Connection Manager
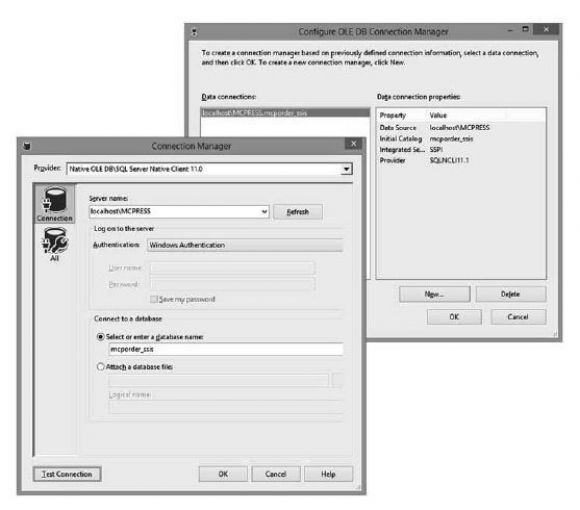
To create our database source connection manager, right-click in the Connection Manager panel again, and select New OLE DB Connection…. After selecting the New OLE DB Connection… option, we will need to configure it. To do so, click the New... button, which will open the Connection Manager screen (Figure 5.13).
Figure 5.13: Providing login information for the SQL Server connection
Set up your connection manager using the settings shown in Table 5.2, making changes for your machine, if necessary.
|
Table 5.2: Connection Manager Settings for the SQL Server database |
|
|
Property |
Value |
|
Provider |
Native OLE DB\SQL Server Native Client 11.0 |
|
Server Name |
localhost\MCPRESS (your server name) |
|
Logon to the server |
Use Windows Authentication |
|
Enter a database name |
mcporder_ssis |
Oracle Database Connection Manager
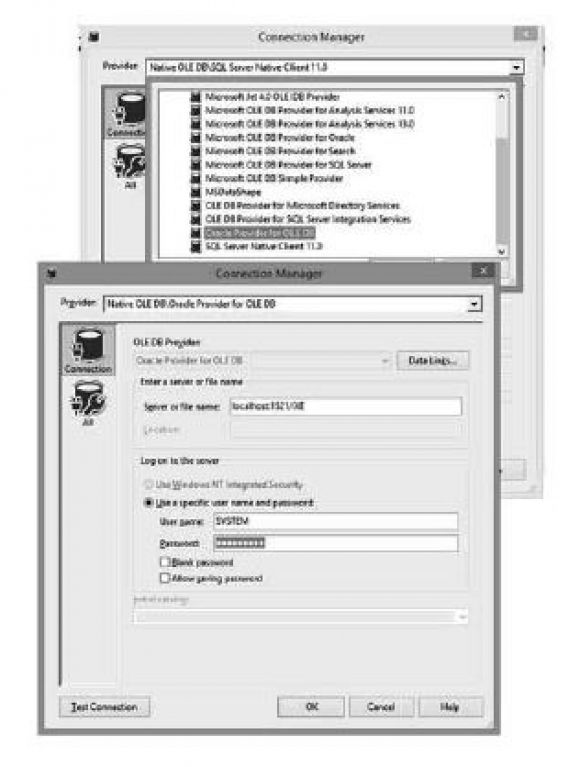
And if you haven’t guessed, for our final connection manager we will be going to the Connection Manager screen to add our final Oracle database connection, by selecting New OLE DB Connection… (Figure 5.14).
Figure 5.14: Providing login information for the Oracle database XX5
You will notice there are two Oracle options: Microsoft OLE DB Provider for Oracle and Oracle Provider for OLE DB. The Microsoft driver already existed prior to the installation and will not work. We will use the Oracle driver that was installed with ODAC.
Click Test Connection to ensure that you have entered everything correctly; you should get a confirmation of success. When you click OK to save, you will receive the following error, shown in Figure 5.15:
The given path's format is not supported.
To resolve this error, simply delete the colon before the port number on the server, which will look like this: localhost1521/XE (notice the colon was removed). Then save it.
Figure 5.15: Bypassing a common Oracle obstacle by saving the port number without a colon
Then return to the properties and update the server to add the colon back in. This is currently a known problem documented on MSDN.
You could also remove the port number altogether, and then the connection will use the default port, but I always like to define the extreme cases to support every scenario—as you may have surmised based on our current endeavor to make SSIS talk to every database known to man.
Base Project
To complete our base project, let’s shed the database qualifications from our data sources by homogenizing them to generically reference our database connections. When you click on each of the connection managers, you can change the name in the properties window that is displayed in the bottom right corner of the visible window. Go through each of your connection managers and rename them ORD, SOR, and DWH, accordingly, as shown in Figure 5.16.
Figure 5.16: Homogenizing connection manager names
Now that we have added all the data sources for our project, you should save your base project and tuck it safely away for future use. At the beginning of each of the following chapters, we will be copying the base project as our starting point for each new project. This free us from the details of setting up our connections and working through any connection details.
Now is the perfect time for you to customize your project to use the databases that you’re interested in. At this point, you could create your base project to have three databases in SQL Server, if you wanted to, and they should work fine for the projects ahead. You could also revisit Appendix A for details about MySQL or PostgreSQL, so you can use one of those databases in your base project. Simply rename your database connections to ORD, SOR, and DWH, and everything else should look the same. The only exceptions will come in database-specific syntax nuances that we’ll try to point out when applicable.
SSIS is really about the implementation of design patterns in a literal sense for SQL software development. This is much like how high-level languages (HLLs) such as Java and C# use object-oriented concepts with the literal usage of objects and inheritance.
Look for TechTip: Data Source Base Project, Part 3: SSIS Code Structure from Tom's book in an upcoming issue of MC TNT. Can't wait? Pick up your copy of Tom's book, Extract, Transform, and Load with SQL Server Integration Services at the MC Press Bookstore Today!




 Business users want new applications now. Market and regulatory pressures require faster application updates and delivery into production. Your IBM i developers may be approaching retirement, and you see no sure way to fill their positions with experienced developers. In addition, you may be caught between maintaining your existing applications and the uncertainty of moving to something new.
 IT managers hoping to find new IBM i talent are discovering that the pool of experienced RPG programmers and operators or administrators with intimate knowledge of the operating system and the applications that run on it is small. This begs the question: How will you manage the platform that supports such a big part of your business? This guide offers strategies and software suggestions to help you plan IT staffing and resources and smooth the transition after your AS/400 talent retires. Read on to learn:
LATEST COMMENTS
MC Press Online