In this excerpt, we will begin building a base project that can be used as the starting point for the rest of the chapters in this book. If you followed the installation instructions exactly as specified in the previous chapter, you should be able to use the base project with minimal changes.
By Tom Snyder
Editor’s Note: This article is excerpted from chapter 5 of Extract, Transform, and Load with SQL Server Integration Services--with Microsoft SQL Server, Oracle, and IBM DB2, by Thomas Snyder and Vedish Shah.
In the previous chapter we established our database organization as follows:
- IBM DB2 database
- Our member and billing maintenance
- Microsoft SQL Server database
- Order entry application
- Web service
- Oracle database
- Data warehouse
We will be creating the base project to connect to three different database sources: SQL Server, DB2, and Oracle. You can alter the base project to suit your needs and use it throughout the chapters. If you prefer to use MySQL or PostgreSQL, we have provided details in Appendix A that will help you to set them up.
Throughout the following chapters, we will be reviewing the components of SSIS and how to utilize configurations and handle exceptions. After we get through the basics, we will learn while solving specific problems, such as populating a data warehouse, creating Excel spreadsheets for users, creating XML files for feeding external sources, and sending updates to your website via Web services.
Installing the OLE DB Drivers
Before we can get into our development environment to start building our SSIS packages, we need to install the OLE DB drivers to communicate with the databases we intend to use.
Microsoft SQL Server OLE DB Driver Installation
We’ll start with the easy one. For SQL Server, we will simply use the Microsoft- provided OLE DB drivers that are typically already available on your Windows development machine. No additional installations should be required for SQL Server at this time.
You can confirm that your drivers exist by looking at the 32-bit ODBC drivers. 32-bit ODBC drivers are accessible through your Windows Administrative Tools.
IBM DB2 for i ODBC Driver Installation
The IBM DB2 for i OLE DB driver installation is currently not available out of the box with Microsoft SQL Server as of the time this book was written, so we’ll need to install this driver manually.
To access your data, we'll set up an OLE DB connection to your DB2 database. That requires an installation unless you already have it. OLE DB is an optional component to install with iSeries Access.
To install OLE DB, start up your installation media for IBM i Access—CD- ROM, DVD, media share, or something else, and perform a custom installation to select the OLE DB Provider component, as shown in Figure 5.1.
Figure 5.1: OLE DB/ODBC component selection
When you complete the installation of the DB2 for IBM i OLE DB providers from your iSeries Access custom installation, you will have the following OLE DB drivers installed:
- IBMDA400—SQL and record-level access (RLA) support
- IBMDASQL—SQL-only support
- IBMDARLA— RLA-only support
RLA will not be used in this book, so you are free to use either the IBMDASQL or IBMDA400 providers. We will be using IBMDASQL because we only care about the SQL part.
Oracle OLE DB Driver Installation
The Oracle ODBC/OLE DB driver installation is currently not available out of the box with Microsoft as of the time this book was written, so we’ll need to install it manually. There is a Microsoft Oracle database driver, but if you attempt to use it, you will see the message shown in Figure 5.2 (page 78).
Figure 5.2: Connection Manager Error on Microsoft Oracle driver
To access your data, we'll set up an OLE DB connection to your Oracle database. That requires an installation unless you already have it. OLE DB is available in the Oracle Data Access Components (ODAC). You can download the latest version at http://www.oracle.com/technetwork/developer-tools/visual-studio/downloads/index.html.
ODAC (Figure 5.3) contains several components. We are interested in the following components:
- Oracle Provider for OLE DB 1.0.2.0
- Oracle ODBC Driver 1.0.2.0
Figure 5.3: Oracle ODAC download
When you download ODAC, it will contain both 32-bit and 64-bit versions. Make sure that your bit specification (32-bit or 64-bit) matches your Oracle database installation. Typically, these days you will be doing a 64-bit installation, which is what we used during our installation, so I am downloading that matching version.
After you download and unzip the ODAC software, you will be able to run the setup.exe file to start the Oracle Universal Installer (OUI), shown in Figure 5.4.
You must run the setup program as an Administrator on your machine, or it will fail during the install.
Figure 5.4: Oracle Universal Installer
During the installation, use the Windows built-in account. Go here for more details: https://docs.oracle.com/database/121/NTQRF/oh_usr.htm#NTQRF672
At the ODAC installation step 4 of 8, click Select all, as shown in Figure 5.5.
Figure 5.5: Default installation location with component selection
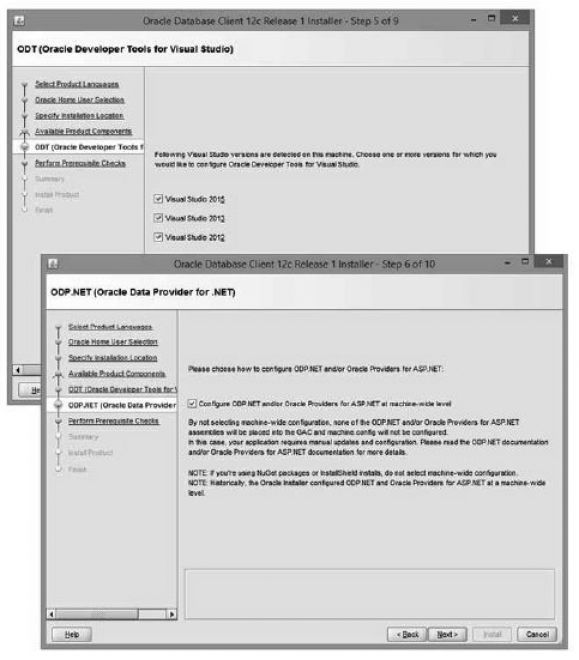
The screen shown in Figure 5.6 will then be displayed.
Figure 5.6: Oracle Developer Tools for Visual Studio and Oracle Data Provider for .NET
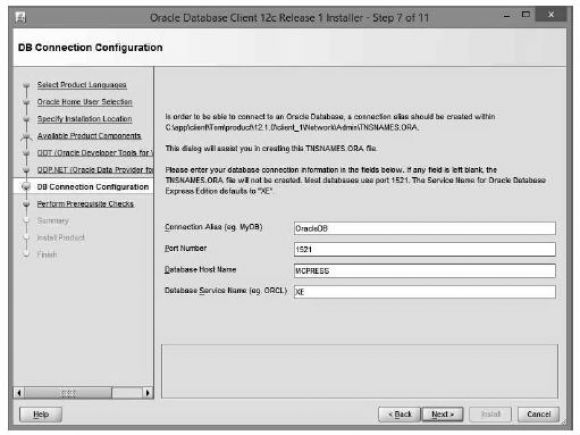
When you get to the DB Connection Configuration window (Figure 5.7, page 82), you will be setting your database connection information.
Figure 5.7: Oracle DB Connection Configuration window
To use the standard defaults that will match your default installation from chapter 2, you could specify the following values:
- Connection Alias: OracleDB
- Port Number: 1521
- Database Host Name: MCPRESS
- Database Service Name: XE
The connection alias could be any meaningful name for your Oracle database. The port number is 1521 for your default installation. The database host name will match the workspace that we created in chapter 4 when we did our database setup. And because we are using Express Edition of the Oracle database, the database name is XE.
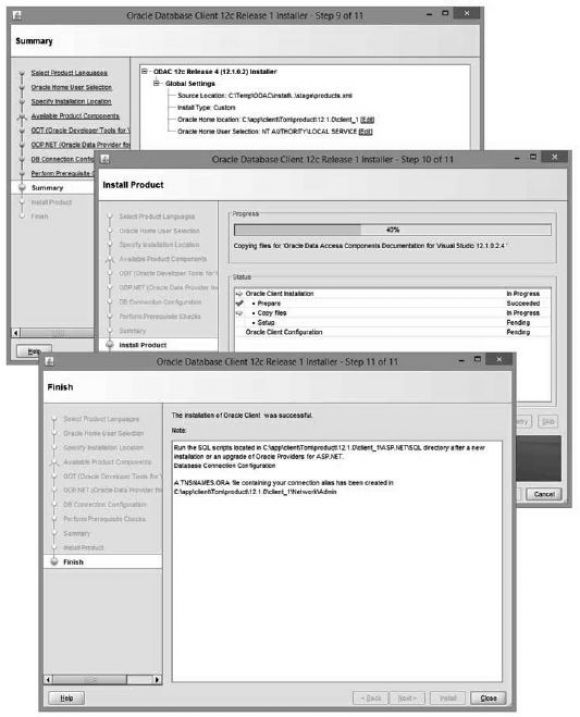
After you’ve set up your database configurations, simply click the Next button through the defaults until you reach the finish (Figure 5.8).
Figure 5.8: Installation finish
Look for TechTip: Data Source Base Project, Part 2 from Tom's book in an upcoming issue of MC TNT. Can't wait? Pick up your copy of Tom's book, Extract, Transform, and Load with SQL Server Integration Services at the MC Press Bookstore Today!


 Business users want new applications now. Market and regulatory pressures require faster application updates and delivery into production. Your IBM i developers may be approaching retirement, and you see no sure way to fill their positions with experienced developers. In addition, you may be caught between maintaining your existing applications and the uncertainty of moving to something new.
 IT managers hoping to find new IBM i talent are discovering that the pool of experienced RPG programmers and operators or administrators with intimate knowledge of the operating system and the applications that run on it is small. This begs the question: How will you manage the platform that supports such a big part of your business? This guide offers strategies and software suggestions to help you plan IT staffing and resources and smooth the transition after your AS/400 talent retires. Read on to learn:
LATEST COMMENTS
MC Press Online