Database communications will be made to the SQL Server database using Web services, XML, and database-to-database operations. We will also be creating Excel spreadsheets from our database and sending extract, transform, and load (ETL) updates to our Oracle data warehouse. Read Part 1, on DB2 Databases here:TechTip: Database Setup - IBM DB2 Database.
By Tom Snyder
Editor’s Note: This article is excerpted from chapter 4 of Extract, Transform, and Load with SQL Server Integration Services--with Microsoft SQL Server, Oracle, and IBM DB2, by Thomas Snyder and Vedish Shah.
SQL Server Database
Order Entry Database
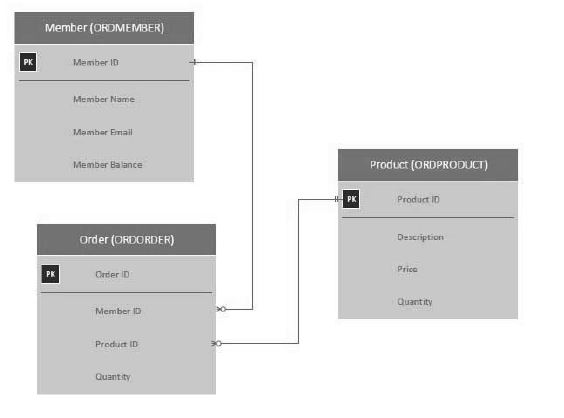
The order entry system for our project will reside in the SQL Server database, which is a smaller database than the accounts receivable database and contains minimal information. Figure 4.6 shows the ERD for the order entry database.
Figure 4.6: SQL Server crow’s foot ORD ERD
Member Table (ORDMEMBER)
This is a minimized version of the MCPMEMBER table, which will be refreshed from the SOR that is used by the order entry system.
Product Table (ORDPRODUCT)
This table contains a complete list of available products with available quantity and cost, which is maintained on the accounts receivable database.
Order Table (ORDORDER)
This table contains a list of orders that were placed by the member. The data in the table will originate in the order entry system.
Deploying the Code
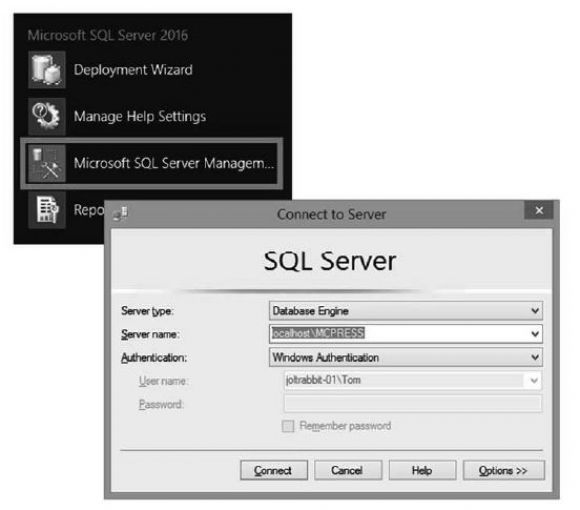
Deploying the code on your local SQL Server database is as simple as dragging your source into a SQL Server Management Studio (SSMS) window, as shown in Figure 4.7.
Figure 4.7: Launching SSMS
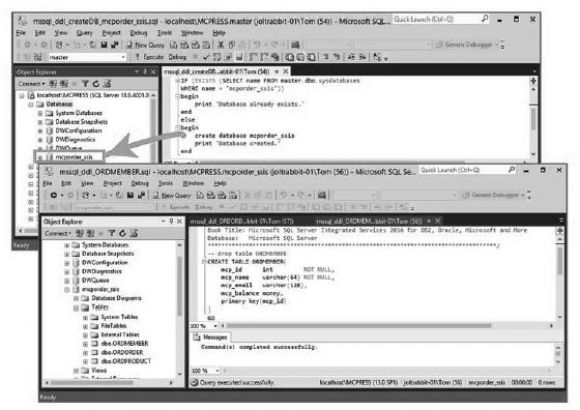
Then, open your File Explorer and drag and drop your code into the window, as shown in Figure 4.8.
Figure 4.8: Deploying SQL Server using SSMS
We will first create our new mcporder_ssis database, which we will use for our ORD code. Then we’ll deploy the DDL, followed by the DML to populate the tables. We will only be populating the ORDORDER table, as the rest of the tables will be populated through our actions in chapter 5.
When you open SSMS, you must then select your newly created mcporder_ssis database using the downloadable code for this book. You then open File Explorer to your SQL code and drag and drop the code into the query window at the right. When you execute the code, it will give you immediate results, shown at the bottom of the screen.
You could review the structure of the table in the Object Explorer window at the left. If you click on the Columns folder, it will expand to display the fields that exist within the table.
Oracle Database
Data Warehouse Database
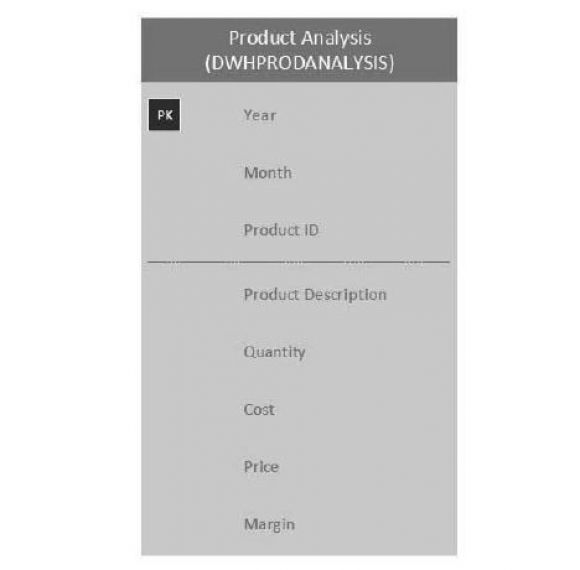
Our data warehouse will be a bare-bones database containing a single table that we can use to perform analysis on the sales of our products. Figure 4.9 shows the ERD for the data warehouse database.
Figure 4.9: Oracle SQL data warehouse (DWH) ERD
Product Analysis Table (DWHPRODANALYSIS)
The product analysis table will summarize the data by product for analysis by month.
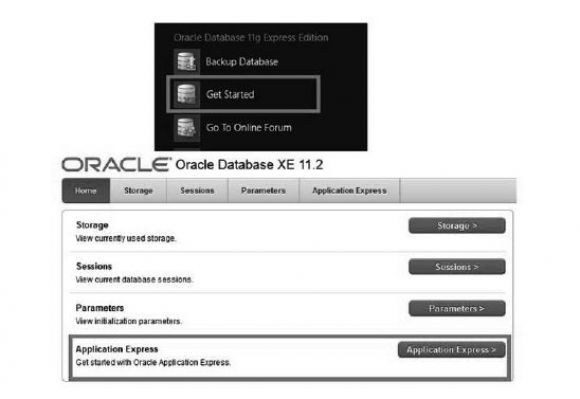
The first thing we will do is create an Oracle workspace. The Oracle workspace is similar to a SQL Server catalog, which contains all the schemas. To create the workspace, go into the Windows tiles, click the Oracle Database 11g Express Edition tile, and select Get Started to open the Oracle database, then select Application Express, as shown in Figure 4.10.
Figure 4.10: Oracle Database XE link to Application Express
Once you click the Application Express link, you can create your new workspace (Figure 4.11). Make sure to record all the information that you enter to create the new workspace.
Figure 4.11: Creating an Oracle database workspace
After you create the workspace, you will receive a notification that it was created and a link to log in. Log in using the information you just entered for the workspace (Figure 4.12).
Figure 4.12: Oracle workspace login screen
To create the table we will use for our example, you will use a DDL file that is included with the downloadable code for this book. We will be executing the DDL in the SQL Workshop under the SQL Scripts option (Figure 4.13).
Figure 4.13: Oracle SQL Scripts
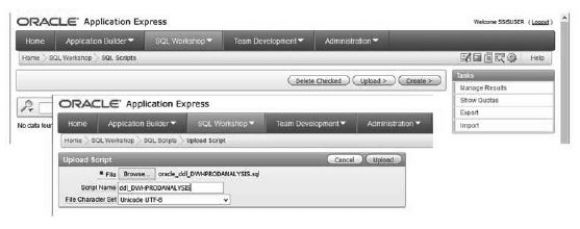
On the SQL Scripts screen, we will be uploading the DDL provided with the book’s downloadable code, as shown in Figure 4.14, to create the table we will use in our data warehouse.
Figure 4.14: Uploading the DDL source script to Oracle SQL
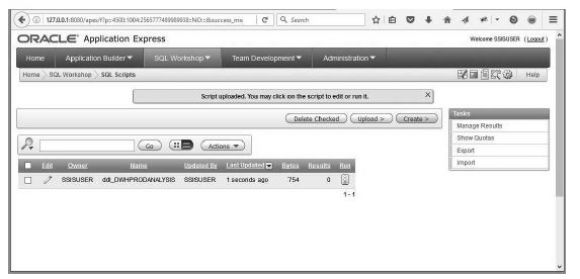
You will see a screen to confirm that your DDL has been updated. This screen (Figure 4.15) contains a Run column that we will use to execute our DDL script.
Figure 4.15: Oracle SQL DDL source script upload confirmation screen
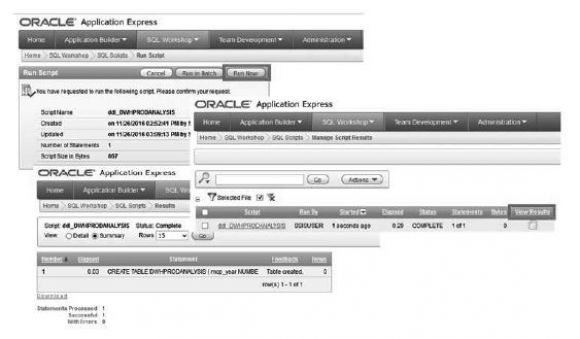
When you click the Run column, you will next see a series of screens. You will first confirm that you want to run the script. Once the script has finished running, a screen is displayed (Figure 4.16) that reports how long the script took to run with a View Results column. When you click the View Results column, you can see whether the script executed successfully. If the execution failed, you can review the errors here.
Figure 4.16: Results of running the DDL script in Oracle
Now that your DDL script has run successfully, to create the DWHPRODANALYSIS table, you can confirm the existence of your table in the Object Browser in the SQL Workshop, as shown in Figure 4.17.
Figure 4.17: Using Oracle Object Browser to confirm data warehouse table creation
Upon completion of these steps, we now have an operational Oracle SQL database that we can use for our data warehouse examples.
Look for the next excerpt from Tom's book in an upcoming issue of MC TNT. Can't wait? Pick up your copy of Tom's book, Extract, Transform, and Load with SQL Server Integration Services at the MC Press Bookstore Today!









 Business users want new applications now. Market and regulatory pressures require faster application updates and delivery into production. Your IBM i developers may be approaching retirement, and you see no sure way to fill their positions with experienced developers. In addition, you may be caught between maintaining your existing applications and the uncertainty of moving to something new.
 IT managers hoping to find new IBM i talent are discovering that the pool of experienced RPG programmers and operators or administrators with intimate knowledge of the operating system and the applications that run on it is small. This begs the question: How will you manage the platform that supports such a big part of your business? This guide offers strategies and software suggestions to help you plan IT staffing and resources and smooth the transition after your AS/400 talent retires. Read on to learn:
LATEST COMMENTS
MC Press Online