You can now use the Authority Collection feature of IBM i in graphical form.
I’m a huge fan of the Authority Collection feature added in IBM i 7.3 and enhanced in 7.4. But administrators who aren’t fans of using a command line and/or SQL may not have taken advantage of this powerful feature. If that’s you or you primarily administrate the system via Navigator for i, I’m hoping this article will help you start using Authority Collection in New Nav.
| Additional Reading |
| Three Ways to Use IBM i Authority Collection |
| New Release! What New Security Features Does IBM i V7R4 Bring Us? |
| Is Authority Collection a Replacement for the Audit Journal? |
Since I’ve previously provided scenarios of why and how one might use Authority Collection, I’m going to focus on how to configure and view Authority Collection via Navigator for i. As you know, there are two ways to collect authority: 1)by user, in which the system collects the authority information for the objects a specific user accesses or 2) by object, in which the system collects the authority information for the users accessing a specific object. Let’s start with collection by user.
Authority Collection for Users
To access the Authority Collection feature in Navigator for i, click on the padlock icon > Security > Authority Collection > Users to get to the window shown in Figure 1.
Figure 1: Authority Collection for a User
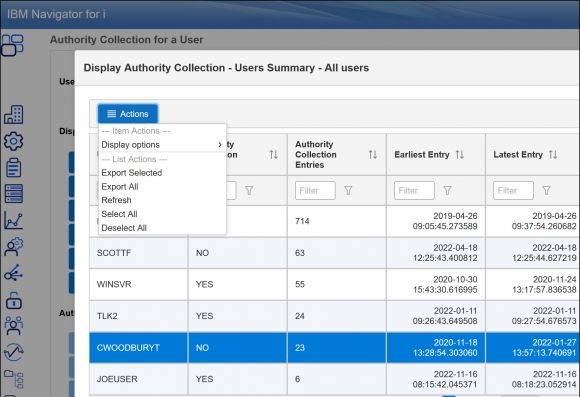
This window provides several options. The Summary option provides a list of the profiles for which an Authority Collection is active and/or an Authority Collection exists. See Figure 2.
Figure 2: Authority Collection – Users Summary
From this display, you can also display a user’s entries. Click on Actions > Display options. Going back to the original Authority Collection User window, you’ll see other options for displaying Authority Collection information. Choosing View Collection without changing the default User setting of All will display the entire collection—in other words, the information collected for all user profiles for which Authority Collection has been configured.
I’ve found that displaying this much information is very overwhelming, so I recommend that you specify a user profile or use the dropdown for the User parameter and select the profile whose collection you want to display. Once you’re viewing the user’s collection, you can filter to get to the specific information you’re looking for. And, like other Navigator for i displays, if you’re not happy with the columns currently displayed, simply click on the three vertical dots on the right of the display to include or omit other columns from the view. For example, Figure 3 shows the Authority Collection for user CWOODBURYT. The Authority Source column for two entries says GROUP PRIVATE. While interesting, you really need to add the Group column to get a complete picture.
Figure 3: Entries from the CWOODBURYT Authority Collection
Going back to the main window, you’ll see other display options. While I’ve found the Authority Failures option somewhat helpful (it’s simply filtering on the Authority Check Successful field), the others aren’t as useful. I’d rather display the user’s collection and filter from that display using my own criteria.
Finally, once you’ve specified a profile in the User field, you’ll see that the Start, End, and Delete Authority Collection buttons become active. These are simply graphical representations of the STRAUTCOL, ENDAUTCOL, and DLTAUTCOL commands. To avoid a command line, use these options when you want to start a collection for another profile, need to modify what’s being collected or end the collection for a user, or want to delete a user’s collection.
Helpful hints:
- Collection of the profile’s access starts immediately; no need to have the profile sign off and back on.
- If you modify a profile’s access (grant or revoke authority, remove *ALLOBJ special authority, or add or remove a group), I recommend that you delete the collection and start over. Entries made with old settings can really confuse things when you’re trying to determine if the profile’s new access is working correctly.
- If a collection exists for a profile but the authority collection is not currently active for that user, you may want to delete the collection if it’s no longer required.
Authority Collection for Objects
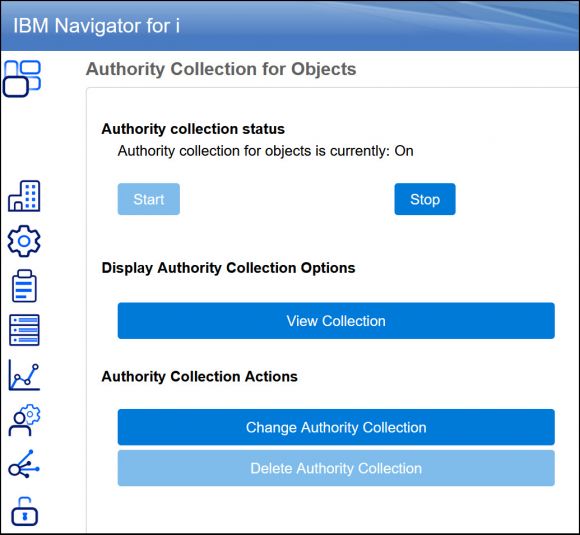
Access this feature of Navigator for i the same way you accessed it for Users, but choose Objects instead. Figure 4 shows the main window.
Figure 4: Authority Collection for Objects
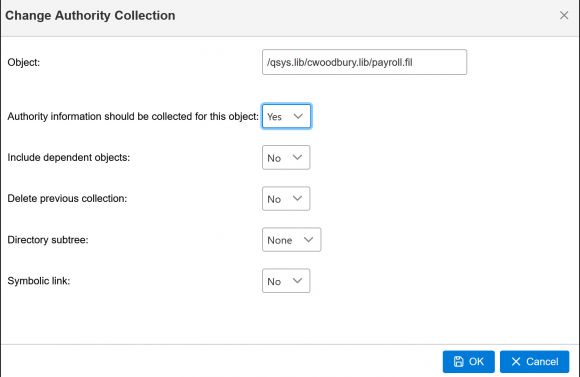
To configure Authority Collection on an object, click Change Authority Collection (which is a graphical representation of the CHGAUTCOL command). Figure 5 shows the options.
Figure 5: Change Authority Collection
Note that the object name must be specified as a pathname. This is true regardless of whether the object is in a directory or a library or whether you’re using this graphical interface or the command (CHGAUTCOL). Specifying a pathname for an IFS object is (obviously) easy! But specifying a pathname for an object in a library isn’t difficult either. The convention is /QSYS.LIB/library_name.lib/object_name.objecttype. Be sure to choose Yes for the “Authority information should be collected” parameter to enable the collection. Click OK on this display. If the Authority Collection status is Off, click Start to begin the collection for objects. You need to start object collection only once. Once started, simply click the Change Authority Collection button to configure Authority Collection for additional objects. As with the collection for users, the object collection starts immediately.
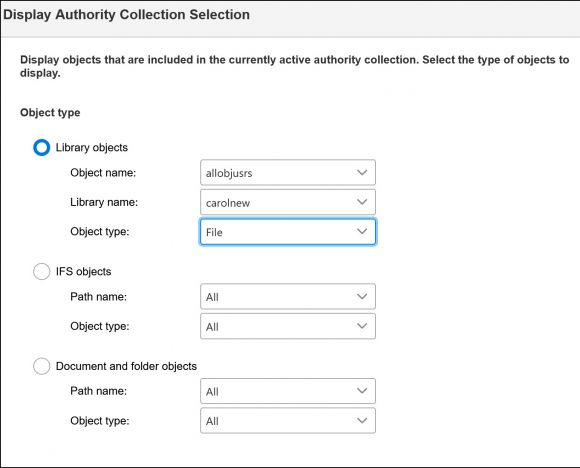
Once the collection has run for a bit, you can display the entries by clicking on View Collection from the main window. From there you’ll be prompted to specify where the object you’re interested in resides: a library, directory, or folder (for DLO objects). See Figure 6.
Note: How long you need to let the collection run before you determine that your analysis is complete is one of those “it depends” questions. You can start examining the collection minutes after you start either a user or an object collection, but to call your analysis complete may require the collection to run at least a week and often over a week-end, month-end, or quarter-end. It just depends on whether a profile is used to run new tasks or objects are accessed by different processes during end-of-month or end-of-quarter processing. Each organization is slightly different.
Figure 6: Select which object collections to display
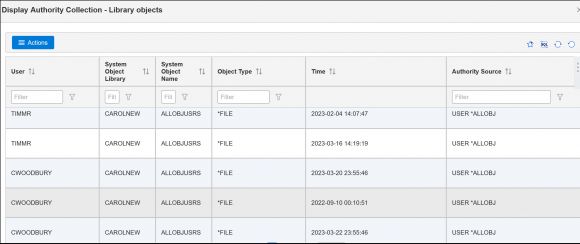
You must specify the object type because there are different views containing different information, depending on where the object resides. Next, if you’re looking for information on a specific object, specify it in this window (as I’ve done in Figure 6) to reduce the number of entries displayed in the next window, as shown in Figure 7.
Figure 7: Entries for profiles accessing the CAROLNEW/ALLOBJUSRS file
As when displaying the entries for users, you may wish to add additional columns to this object view. Or, if you want the details of just one entry, highlight that entry and click on Actions > Properties to see all possible attributes. See Figure 8.
Figure 8: Details of a specific entry
Summary
Authority Collection takes the guesswork out of setting authorities. It’s especially helpful if you want to reduce a profile’s authority or secure a specific object but don’t know who’s accessing it. Authority Collection allows you to make changes without fear of breaking something because it tells you exactly what authority is required. And now that it’s available in New Nav, it’s even easier to use. I encourage you to give it a try!





 Business users want new applications now. Market and regulatory pressures require faster application updates and delivery into production. Your IBM i developers may be approaching retirement, and you see no sure way to fill their positions with experienced developers. In addition, you may be caught between maintaining your existing applications and the uncertainty of moving to something new.
 IT managers hoping to find new IBM i talent are discovering that the pool of experienced RPG programmers and operators or administrators with intimate knowledge of the operating system and the applications that run on it is small. This begs the question: How will you manage the platform that supports such a big part of your business? This guide offers strategies and software suggestions to help you plan IT staffing and resources and smooth the transition after your AS/400 talent retires. Read on to learn:
LATEST COMMENTS
MC Press Online