Time to explore another SQL client! SQuirreL was not designed specifically for the IBM i, but it does a fine job, and it’s free!
Written by Rafael Victória-Pereira
The SQuirreL SQL Client is a very interesting piece of software. It’s the brainchild of some very clever Java developers, and it was designed to help us, mere mortals, to connect to any database for which a JDBC connector exists.
Unlike ACS’ Run SQL Scripts, which is a bit picky regarding the databases it connects to, SQuirreL SQL is database-agnostic and open source. It’s built in Java and you can actually contribute to the project through its Git SourceForge repository. Its name is an attempt at a certain funniness, a pun somewhere along the lines of “databases can make you go nuts.” The application logo, shown in Figure 1, follows the same line.
Figure 1: The SQuirreL SQL Client logo (funny guys, right?)
Just like the more serious IBM ACS that I discussed in the previous two articles (1 and 2), SQuirreL SQL’s installation process is not the typical “double-click, next, next, finish” affair. It’s a bit different, so I’ll take a moment to explain it step by step, so that you can follow along (without going nuts).
Step 1: Fulfilling the Prerequisites (JRE and JTOpen)
As I said before, SQuirreL SQL is a Java-based piece of software, which means it has some Java-related requirements. Don’t be scared by the number of times “Java” appeared on the previous sentence! You’ll need to update your Java Runtime Environment (JRE) if you’re running a version older than 1.4. This can be achieved by clicking here and following the instructions. Even if you’re at version 1.4, it’s a good idea to keep the JRE updated, so go ahead and do it anyway.
There’s something else you’ll need: the latest version of JTOpen. JTOpen is the open-source version of IBM Toolbox for Java, a library of Java classes supporting the client/server and Internet programming models for a system running IBM i. The classes can be used by Java applets, servlets, and applications, such as SQL SQuirreL, to easily access IBM i data and resources. JTOpen and the IBM Toolbox for Java licensed program product contain identical code. Both have been tested on a wide variety of platforms, including AIX, IBM i, Linux, Solaris, and Windows. Details of all the functions and capabilities are available on the IBM Toolbox for Java web page. To download JTOpen, click here and then choose the big green “Download” button. Decompress the zip file to a new folder and make a note of its location, because you’ll be using it in a bit.
Step 2: Installing SQuirreL SQL Client
Now for the installation process itself. Download the “executable” installation file from here, by clicking on the (huge) file name next to the “Looking for the latest version?” sentence. The current version is about 60Mb. You’ll need to make a note of the name of the file, because it’s not really an executable file that you can click on. It’s actually a JAR (Java archive), which you’ll run using the following command on a system command line:
java -jar SQuirreL-sql-<version>-install.jar
In this line of code, <version> is the current version, which you’ll find in the name of the file you just downloaded. In order to install the latest version available when this article was written (20170312_2141), you’d type the following:
java -jar SQuirreL-sql-20170312_2141-install.jar
If you’re lucky, it’s still the same, so you can actually copy and paste the command from the article to your command line screen. This will start the installation process, which is, against all expectations, a graphical, no-thrills, step-by-step thing. Once it’s done, it should create shortcuts (on Windows, it didn’t create desktop shortcuts, just a start menu folder and shortcut).
Step 3: Configuring a JDBC Driver for the IBM i
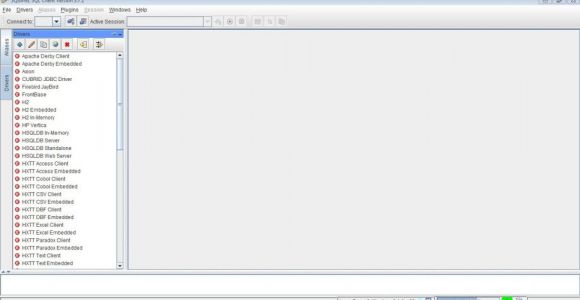
Now that the application is installed, find whichever shortcut was created and run the SQuirreL SQL Client for the first time, because there are a couple more steps you need to perform before you’re able to use this thing. Note that, because it’s a Java-based program, it may (most certainly will) take a bit of time to load, so don’t go trigger happy on that shortcut! Just give it time to load. Figure 2 shows the initial screen in which we’ll configure the appropriate JDBC driver, because as I said earlier, SQL SQuirreL is not IBM i-specific.
Figure 2: SQuirreL SQL Client main window
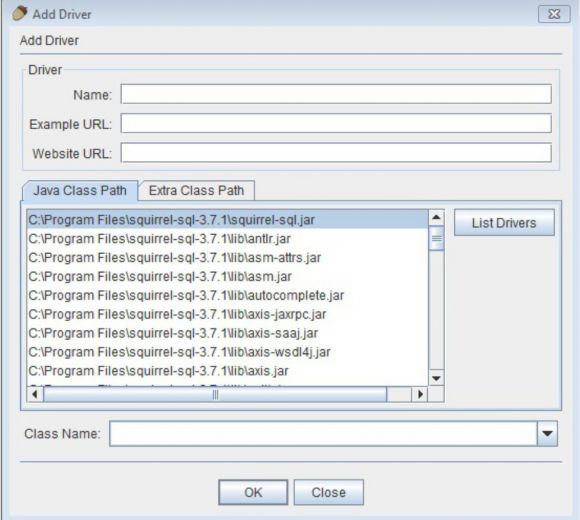
If the Drivers tab is not open, click its name on the left side of the window to display it. Now click on the icon with the plus sign (the leftmost icon on the Drivers toolbar) to add a new driver. Something similar to Figure 3 should be shown.
Figure 3: The Add Driver window
Click on the Extra Class Path tab and then on the Add button. Now navigate to the folder to which you decompressed JTOpen’s zip file (you did make a note of that, right? I told you that you’re going to need it) and double-click the “lib” folder. Finally, double-click on the JTOpen.jar file, or click just once and then press the Open button.
We’re almost there! The next step is to fill in the Name, Example URL, and Website URL fields, which you’ll fill like this:
- Name: JTOpen x.x (where x.x should be replaced by the current version, which was 9.2 when this article was written. It’s a simple way to keep track of the driver you’re using)
- Example URL: jdbc:as400://<host_name>/<default-schema>;<properties>
- Website URL: http://jt400.sourceforge.net
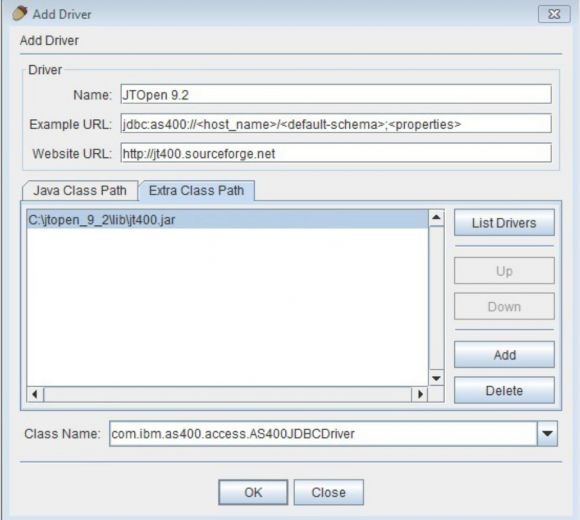
Then click on the List Drivers button in order to automatically fill the Class Name field that sits at the bottom of the window. Assuming that you decompressed the JTOpen zip file to folder C:\JTOpen_9_2 and followed all these steps carefully, Figure 4 shows what you should be seeing right now.
Figure 4: The Add Driver window after the JTOpen driver configuration steps
If you’re not seeing this or something similar to this, re-read the instructions above and figure out what went wrong. This is a critical part of the installation process, because without a properly configured JDBC driver, you won’t be able to connect to an IBM i box using SQuirreL SQL, which is the next (and final) step of the process. Once you get everything right, click on the Add Driver window’s OK button. This will send you back to the main window.
Step 4: Creating a Connection to Your IBM i Box
We’re in the final stretch!
Now click on the Aliases tab (it’s just above the Drivers’ you clicked earlier) and press the button with the plus sign on it. A new, smaller window will pop up, in which you’ll configure the connection to your IBM i. Fill in whichever name suits you (personally, I like to use the actual IBM i box name here) and select the driver you created on the previous step.
The next task is correctly configuring the URL. This is the critical task of this step. You should type something like this:
jdbc:as400://<system name or IP address>/<default schema>;
If your system’s name is myIBMi and the schema (read: file library) you want to use is myLIB, then this is what you should write on the URL box:
jdbc:as400://myIBMi/myLIB;
You can also add some properties after the semi-colon, but it’s optional. Read the JTOpen documentation for more details on the options available. Additional settings are also available via the Properties button.
Finally, type in the user name and password you want to use to connect to your IBM i box, and that’s it! You should be up and running. Click the Test button to check whether everything is working as it should be, and you’re done! Click OK to save this connection for later use.
More to Come
In the next article, I’ll take you on a trip through SQuirreL SQL’s GUI and functionality. Until then, feel free to comment, share your experience, or ask a question in the Comments section below.


 Business users want new applications now. Market and regulatory pressures require faster application updates and delivery into production. Your IBM i developers may be approaching retirement, and you see no sure way to fill their positions with experienced developers. In addition, you may be caught between maintaining your existing applications and the uncertainty of moving to something new.
 IT managers hoping to find new IBM i talent are discovering that the pool of experienced RPG programmers and operators or administrators with intimate knowledge of the operating system and the applications that run on it is small. This begs the question: How will you manage the platform that supports such a big part of your business? This guide offers strategies and software suggestions to help you plan IT staffing and resources and smooth the transition after your AS/400 talent retires. Read on to learn:
LATEST COMMENTS
MC Press Online