Inner joins, outer joins, exception joins, cross joins... Do you know how to take full advantage of all the types of joins?
Editor's Note: In this excerpt from SQL for eServer i5 and iSeries, author Kevin Forsythe explains how to use the various joins available in SQL.
In SQL, the basic SELECT statement displays one or more columns from a single file. When columns must be merged from two or more files, a join should be used. There are two ways to accomplish this. A join can be written either with or without the JOIN keyword. Creating simple joins is easy enough, but as they get more complex, using the JOIN keyword becomes more attractive.
Join Without the JOIN Keyword
Creating a simple join that pulls two columns from different files is easy. Simply include each column name in the SELECT clause, include both files in the FROM clause (separated by a comma), and add a WHERE clause that indicates how the data is matched up between the two files:
SELECT CUSTNAME, ORDERNBR FROM CUSTMAST, ORDERMAST WHERE CUSTNBR = CUSTNO
Notice that the customer number fields in the WHERE clause are spelled differently. Had they been spelled the same, a different syntax would be required. When more than one file in the SQL statement contain field names that are spelled identically, a correlation name should be provided to identify in which column the referenced file exists:
SELECT CUSTNBR, CUSTNAME, ORDERNBR FROM CUSTMAST C, ORDERMAST O WHERE C.CUSTNBR = O.CUSTNO
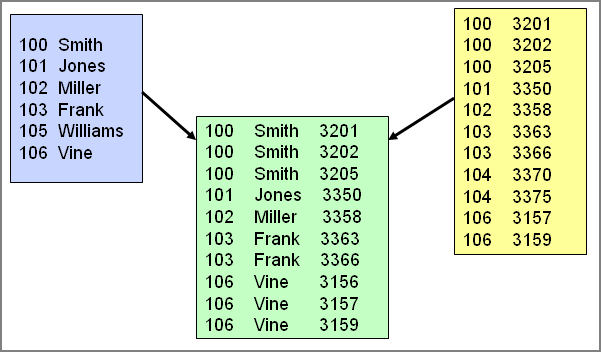
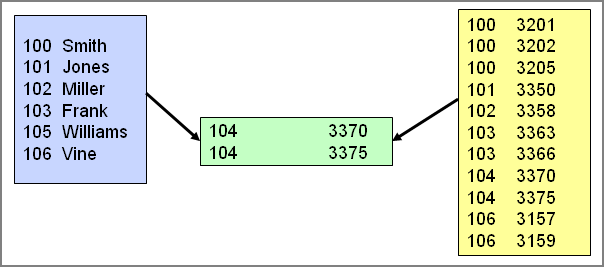
Any number of files can be joined together in this fashion, although performance will degrade as the number of files increases. This style of join is an inner join, and it is illustrated in Figure 1.
Figure 1: Inner join. (Click images to enlarge.)
Only records that have a match in both files are included. Other kinds of joins are discussed below.
Using the Join Keyword
The JOIN keyword allows for both a simpler and more flexible syntax for joining files:
SELECT CUSTNAME, ORDERNBR FROM CUSTMAST JOIN ORDERMAST ON CUSTNBR = CUSTNO
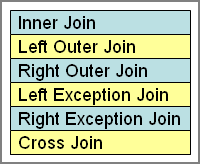
This SQL statement functions exactly the same as the previous example, but it uses the JOIN keyword to explicitly identify the type of join being performed. The WHERE clause is replaced with the ON clause, which explicitly identifies the comparisons used to connect the data in the files being joined. This separation allows the WHERE clause to be used exclusively for record selection, thus making the statement much easier to read. This syntax also allows the join types listed in Figure 2 to be implemented more easily.
Figure 2: Join types.
Using a Left Outer Join
The left outer join uses the ON clause to filter which records to include in the result table from the "right" or second file listed. The ON clause is not applied to records from the "left" file. This is useful when you want all the records from a given file, whether the joined file has data or not. Consider the example given in Figure 1. In that example, only those customers who had orders in the order master were included in the result table. What if we had wanted to list all customers, even if they had no orders? The following SQL statement accomplishes that:
SELECT CUSTNBR, CUSTNAME, ORDERNBR FROM CUSTMAST LEFT OUTER JOIN ORDERMAST ON CUSTNBR = CUSTNO
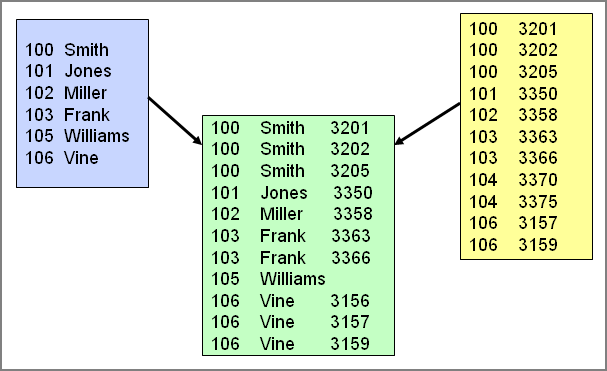
This statement is similar to the previous inner join example, but in this case, customer number 105 is included in the result table, even though there is no order for that customer. On the other hand, customer number 104 is not included, because it does not exist in the Customer Master File, which is the "left" file. Figure 3 illustrates this technique.
Figure 3: Left outer join.
Using a Right Outer Join
The right outer join uses the ON clause to filter which records to include in the result table from the "left" or first file listed. The ON clause is not applied to records from the "right" file. This is useful when you want all the records from a given file, whether the joined file has data or not. In the previous example, all the records from the Customer Master File are included, whether those customers had orders or not. What if the reverse was wanted? By simply changing the keyword from LEFT OUTER JOIN to RIGHT OUTER JOIN, the behavior of the SQL statement is reversed. Consider the following SQL statement:
SELECT CUSTNBR, CUSTNAME, ORDERNBR FROM CUSTMAST RIGHT OUTER JOIN ORDERMAST ON CUSTNBR = CUSTNO
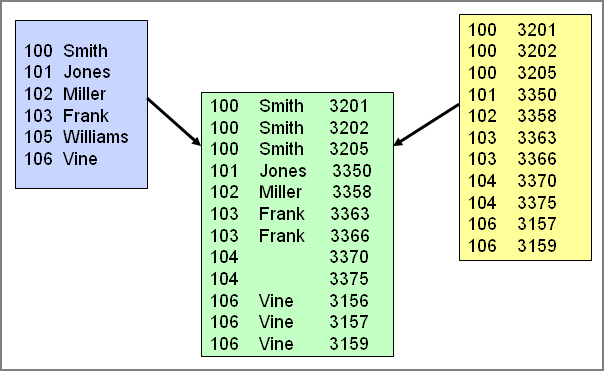
In this case, customer number 104 is included in the result table because it had an order, even though it does not exist in the Customer Master File. But customer number 105 is not included, because it does not have any orders. An illustration of this technique is shown in Figure 4.
Figure 4: Right outer join.
Using an Exception Join
Corruption often creeps into any company's database. How many times have you heard--or even seen for yourself--that during a conversion to a new software package, a company finds that it has a large amount of invalid data in its database? What can be done to avoid this in your database? If you have the ability to modify the structure of your database, you can consider adding constraints (which are discussed in the book). If you can't use constraints to prevent corruption from weaseling its way into your database, then the next best option is to detect it when it does! Left and right exception joins are great tools for trapping invalid data. In the previous examples, invalid data existed in both files. To determine which records in the Order File have invalid customer numbers, the following SQL statement is used:
SELECT CUSTNBR, ORDERNBR FROM CUSTMAST RIGHT EXCEPTION JOIN ORDERMAST ON CUSTNBR = CUSTNO
In the example shown in Figure 5, customer number 104 is included in the result table because it does not exist in the Customer Master File.
Figure 5: Right exception join.
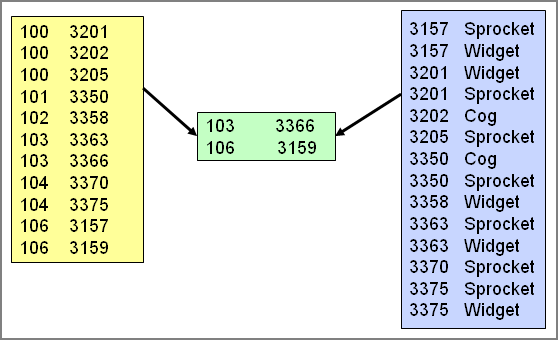
The left exception join is useful when searching for master records with no detail. For example, an SQL statement is created that lists all order master records with no detail:
SELECT CUSTNO, ORDERNBR FROM ORDERMAST M LEFT EXCEPTION JOIN ORDERDETL D ON M.ORDERNBR = D.ORDERNBR
Order numbers 3159 and 3366 are included in the result table (shown in Figure 6), because they do not exist in the Order Detail File.
Figure 6: Left exception join.
Using a Cross Join
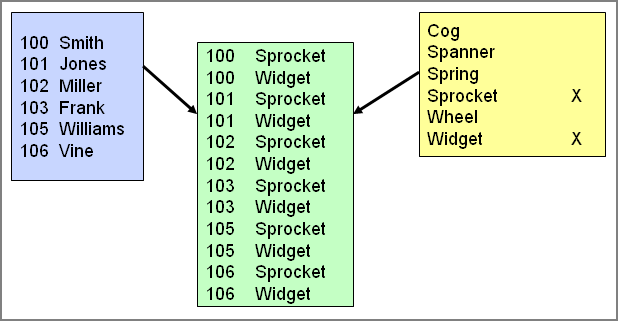
The most unusual kind of join (and the hardest to find a good use for) is the cross join, also called a Cartesian join. The cross join connects every record from the left-hand file to every record on the right-hand file. The result table created by this SQL statement can be huge. Typically, some sort of selection criteria is applied to the result table to minimize the number of records selected. So the question is, how do we use a cross join in the real world? Consider this example: We want to create a list of all our customers, and for each customer, we want to include a list of all items that are available for a special offer:
SELECT CUSTNBR, ITEM FROM CUSTMAST CROSS JOIN ITEMMAST WHERE SOCODE = 'X'
In this case, all customers are selected and each item marked with an "X" in its special offer code column is included for each customer. Figure 7 shows an illustration of this technique.
Figure 7: Cross join.
It may not be a technique you're likely to use every day, but you may stumble across situations where it comes in handy.
Vertical Joins with Unions
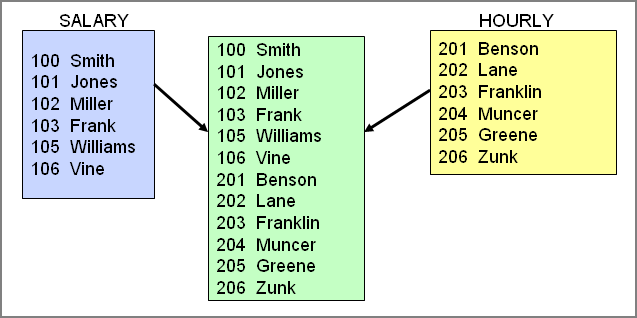
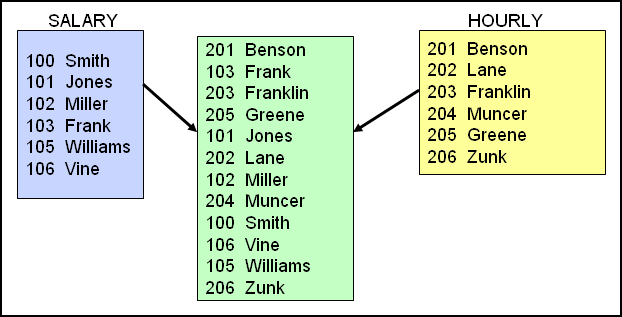
The joins discussed might be described as horizontal joins, meaning that columns from different tables are merged together within the same record. A different technique creates a vertical join, or union. A union merges together rows of data from different files. Very different from the previous joins, however, the union must select the exact same number of columns from each table. And the data type for each column selected must match the data type in the other selected column. This kind of SQL statement is most useful when merging data from files that contain similar data. For example, a database might contain a Salaried Employee file and an Hourly Employee file. To create one list of employees, the following union can be used:
SELECT EMPNBR, EMPNAME FROM SALARIED
UNION ALL
SELECT EMNO, ENAME FROM HOURLY
All the employee names from both files are included in the result set, shown in Figure 8.
Figure 8: Union ALL.
The UNION keyword merges the two SELECT statements together, and the ALL keyword indicates that duplicate records in the result set are allowed. Without the ALL keyword, the duplicates are eliminated.
Sorting Unions by Column Number
Notice that the union created above is not in any particular sorted order; it is presented however the SQL engine threw it together. At the end of all UNION statements, an ORDER BY clause can be added to specify the sort order of the result table. The difficulty here is that the ORDER BY clause normally contains column names such as this:
SELECT EMPNAME FROM SALARIED
ORDER BY S_NAME
This will not work with unions, because the column names may not be consistent between the SELECT statements being merged together. Do not give up hope, though. It is still possible to sort the data. Simply use the ordinal number of the column or columns to sort by. Ordinal numbers represent the sequence number of the columns in the SELECT statements. Ordinal number 1 is the first column, 2 is the second column, and so on. So, to sort the previous union by employee name, use this statement:
SELECT EMPNBR, EMPNAME FROM SALARIED
UNION ALL
SELECT EMNO, ENAME FROM HOURLY
ORDER BY 2
The result set created by this SQL statement is shown in Figure 9. It merges the data from both SELECTs together, sorted by the second column.
Figure 9: Sorted union.
Handling Inconsistent Data Types in Unions
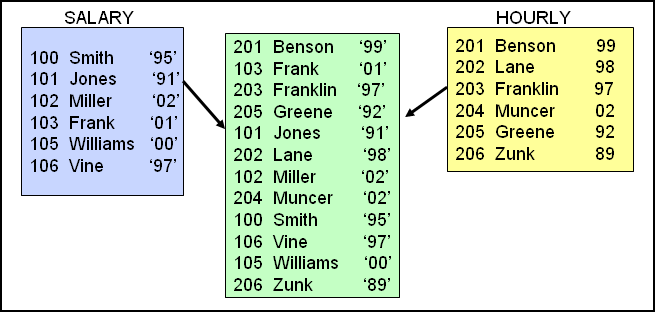
Each SELECT statement must provide the same number of columns and the same basic data type for each column. The exact data type or length is not an issue: For example, a quantity column could be packed decimal in one file and zoned decimal in another. The SQL engine handles that situation with no trouble. But what happens if one of the files has a column called YEAR that stores the date as a two-digit numeric field, and the other file being merged by the union has YEAR stored as a two-byte character field? Some sort of conversion must be performed to allow the union to execute:
SELECT EMPNBR, EMPNAME, HIREYEAR FROM SALARIED
UNION ALL
SELECT EMNO, ENAME, DIGITS(HYEAR) FROM HOURLY
ORDER BY 1
As illustrated in Figure 10, the DIGITS function in this example converts the numeric field HYEAR to a two-byte character field.
Figure 10: Converting numeric data to character.
The CHAR function would have worked as well, but it would have dropped leading zeros and left-justified the value. That doesn't work well with year numbers. The DIGITS function performs a more disciplined translation to text by simply converting each digit and performing no other editing.
What if we had wanted to convert the character field to numeric, instead of the numeric to character, as in the last example? Other SQL functions are available to convert character fields into numeric:
SELECT EMPNBR, EMPNAME, DEC(HIREYEAR) FROM SALARIED
UNION ALL
SELECT EMNO, ENAME, HYEAR FROM HOURLY
ORDER BY 1
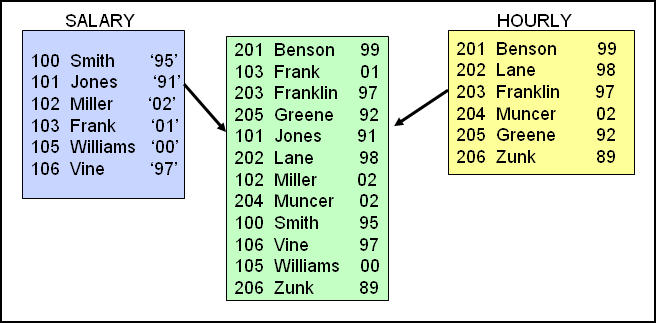
Figure 11 displays the results of this union.
Figure 11: Converting character data to numeric.
The DEC function used in this example converts the character data in HIREYEAR to a two-digit numeric field. The CAST function would have worked as well, but it is quicker to type the DEC function, so I use that instead! DEC also has optional parameters for specifying the number of digits and decimal places:
DEC(HIREYEAR,2,0)
Handling Missing Data in Unions
In the previous examples, we talked about using consistent data types for each column, but what if one of the files involved simply doesn't have a particular column in any form? A missing column can be handled by providing a place holder in one SELECT. For example, if the SALARIED file contains a column called PERDAYS for personal days, the HOURLY file may not contain a similar column if hourly employees do not receive personal days. To include that column from the SALARIED file, the HOURLY file must hard-code a value to correspond to the PERDAYS field, and its data type must match:
SELECT EMPNBR, EMPNAME, PERDAYS FROM SALARIED
UNION ALL
SELECT EMNO, ENAME, 0 FROM HOURLY
ORDER BY 1
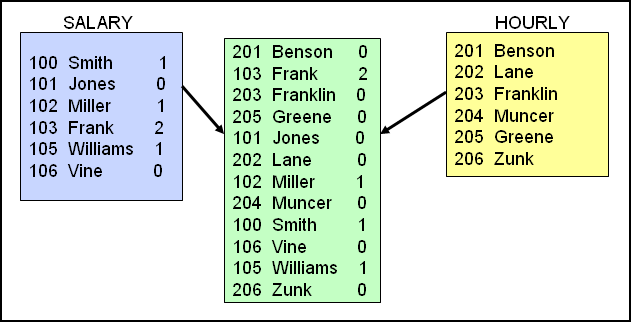
This example creates a consistent set of columns in both SELECT statements by hard-coding the necessary values. The results of this statement are illustrated in Figure 12.
Figure 12: Hard-coded zero to create consistent data.
The 0 specified for the second column from HOURLY forces a zero value into that column for every record selected from the HOURLY file. If the column without a corresponding match is a character field, use a blank within quotes to signify the default value.


 Business users want new applications now. Market and regulatory pressures require faster application updates and delivery into production. Your IBM i developers may be approaching retirement, and you see no sure way to fill their positions with experienced developers. In addition, you may be caught between maintaining your existing applications and the uncertainty of moving to something new.
 IT managers hoping to find new IBM i talent are discovering that the pool of experienced RPG programmers and operators or administrators with intimate knowledge of the operating system and the applications that run on it is small. This begs the question: How will you manage the platform that supports such a big part of your business? This guide offers strategies and software suggestions to help you plan IT staffing and resources and smooth the transition after your AS/400 talent retires. Read on to learn:
LATEST COMMENTS
MC Press Online