In addition to allowing the external definition of database files, ILE RPG lets you define reports externally.
Editor's Note: This article is excerpted from chapter 3 of Programming in ILE RPG, Fifth Edition.
Externally describing printer files offers many of the same benefits as externally describing database files. In particular, this method lets you change a report format without changing the source code of the program that produces the report—a wise approach to application maintenance. Also, if you externally define printer files, you can use a system utility, such as RDi’s Report Designer, to help you design the report’s layout visually on your workstation. The utility then generates the DDS required to describe the report so you don’t have to do the grunt work of figuring out line position and spacing entries. (Appendix B covers Report Designer in more detail.)
You use DDS to define printer files in a source file, the same as you do for database files. The source members of printer files, like those of database files, are generally stored in QDDSSRC. A printer file’s type, however, is PRTF.
After you have generated the source code by using an editor or another utility, you compile the source to create a printer file object. The compiler command for printer files is CRTPRTF (Create Printer File). Once the object exists, it can receive output from a program for printing. The DDS code for a printer file is analogous to that of a database file, except that its focus is the definition of record formats of information to be sent to a printer. A record format in a printer file represents one or more printed lines on the report. Printer files can contain multiple record formats, each defining a different set of output lines. The DDS can also include keyword entries at the file level, the record level, and the field level to define the output’s position or appearance or both.
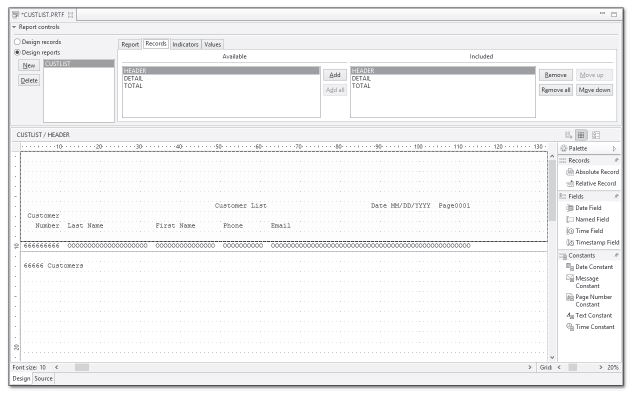
To illustrate how to externally define a printer file, let’s reconsider the customer listing report from Chapter 2. Recall that the desired report includes headings and detail lines. The Report Designer layout for the report is reproduced in Figure 3.10. The ILE RPG program in Chapter 2 wrote data to three report lines (grouped as Header, Detail, and Total) to generate this output. These lines are defined in the externally described report by using DDS.
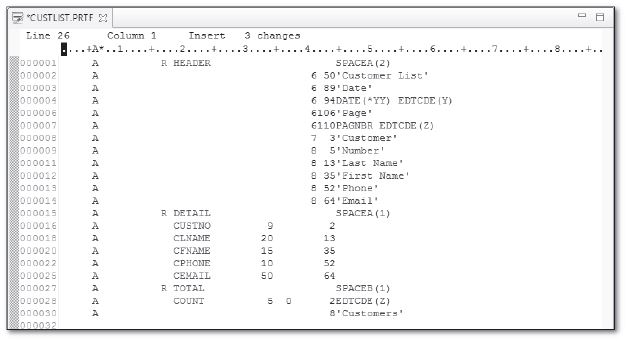
The code in Figure 3.11 shows the DDS for the customer list. If you use RDi Report Designer to create the report, you can easily use tabs to switch between the Design View in Figure 3.10 and the Source View in Figure 3.11. By comparing the design in Figure 3.10 with the DDS code in Figure 3.11, you can understand how the DDS code renders the report.
First, you must define one record format for each line or group of lines to print in a single output operation. Then, for each of those record formats, you need to specify the fields and literals you want to print as part of that format, the vertical line spacing each format should follow, where the variable or constant data should appear horizontally on a line, and the editing (if any) to associate with the numeric fields.
Figure 3.10: Layout for customer listing report
Figure 3.11: DDS for printer file
Each record format begins with an R in position 17, followed by the format’s name in positions 19–28 (Name++++++). Next, for each record format, you need to define all the information that is to print as part of that format. Specify fields in positions 19–28, just as for database files. Constants and literals are coded in positions 45–80 (Functions) and must be enclosed in apostrophes.
To define each field within the DDS, you provide its length in positions 30–34 (Len++), and for numeric fields, you indicate the number of decimal positions in positions 36–37 (Dp). Blanks in the decimal position columns signal a character field. This is similar to the way you defined the field length and data type for database fields.
You also need to specify where each piece of information is to appear on the report. When the data is to print on an exact vertical line number, positions 39–41 (Lin) indicate the line. The entry in positions 42–44 (Pos) specifies the field’s or constant’s horizontal position (where it starts within the line). Thus, in the example, Customer List prints on vertical line 6, beginning in horizontal position 50. The report skips to that line when the program writes the record format. When the report is already past the specific lines to be printed, it skips to that line on the next page. The Header format in the example DDS uses absolute lines (6, 7, and 8).
Sometimes, though, the vertical position of a line is relative to the previous line already printed. In that case, the DDS can specify a SPACEB (Space Before) or SPACEA (Space After) keyword to indicate that the report should simply space a certain number of lines from the current vertical position. The Detail and Total formats in the example use relative spacing, rather than absolute skipping, to determine the vertical position. Each time the report prints the Detail format, it spaces a single line—SPACEA(1)—afterward, similar to a carriage return. Before the report prints the Total format, it spaces one more line—SPACEB(1)—so that an extra blank line exists before the total prints.
You can code the SPACEB and SPACEA keywords (as well as the SKIPB and SKIPA keywords, which indicate absolute skipping) at either the record-format level, if they apply to the entire format, or at the field level, if they apply to a single field. The example specifies them at the record level for each format, before any fields are specified in the DDS. Depending upon the report’s requirements, you can stipulate them at the field level instead (for example, on the same line as CEMAIL). The Header format uses a SPACEA keyword, in addition to specific line numbers. After the last literal (Email) prints on the heading, the report spaces down two lines in preparation for printing the next Detail format.
DDS prints the system date and the report page numbers by using DDS-reserved keywords DATE and PAGNBR. When you specify DATE(*YY), the report uses four digits to represent the year; however, when you indicate DATE(*Y) or simply DATE, the report prints only two digits. These fields, as well as the Count field, also use the EDTCDE (Edit Code) keyword to make the values more readable.
Other optional features of externally described printer files (e.g., changing fonts, printing bar codes, using indicators, defining fields by reference) are beyond the scope of this text. But with this introduction, you should be able to use DDS to externally describe most common types of printed output.


 Business users want new applications now. Market and regulatory pressures require faster application updates and delivery into production. Your IBM i developers may be approaching retirement, and you see no sure way to fill their positions with experienced developers. In addition, you may be caught between maintaining your existing applications and the uncertainty of moving to something new.
 IT managers hoping to find new IBM i talent are discovering that the pool of experienced RPG programmers and operators or administrators with intimate knowledge of the operating system and the applications that run on it is small. This begs the question: How will you manage the platform that supports such a big part of your business? This guide offers strategies and software suggestions to help you plan IT staffing and resources and smooth the transition after your AS/400 talent retires. Read on to learn:
LATEST COMMENTS
MC Press Online