What if you could prepare data queries for your users without worrying about ODBC data sources? That's where Excel Web Query comes in. If you're not already familiar with Web Query, check out "Getting Data into Microsoft Excel Using the Web." This functionality allows you to retrieve data from a Web page directly into an Excel spreadsheet.
In this article, I'll examine the benefits of using Web Query. I'll also step through a simple example of creating a Web Query, and then I'll explore how to create Active Server Page (ASP) Web pages that can be used to prepare data for use in an Excel Web Query. Finally, I'll explain how to use VBScript code within your Excel spreadsheet to customize the data retrieved by your Web Query.
Why Web Query?
The uses for this powerful tool are numerous. One great example is if you have a customer or supplier who allows you to retrieve order information through the Internet. Using Web Query, you can pull that order information directly into Excel and manipulate it into whatever format you need. When you pull data using Web Query, you have the option of retaining the HTML formatting of the data, including embedded hyperlinks. This means that if the data you're retrieving contains a hyperlink to a page containing information related to the data you've retrieved, that link will be available within the spreadsheet. This not only saves time but also adds some great functionality to your spreadsheet. I'll step you through the basic process of importing HTML data into an Excel spreadsheet.
Getting the Data
With Office XP, the process of importing Web data
into Excel has been simplified a bit because Microsoft has built a browsing
function into Excel that allows you to point to the specific page and table from
which the data is to be extracted. To create a new Web Query, select the Data
menu, then select Get External Data, and finally select New Web Query. The
screen display (shown in Figure 1) allows you to browse to the location of the
page containing the data you want to import into Excel. The big change in Office
XP is that this browsing can be done directly in Excel; you don't have to launch
a browser window to get the location of the page.
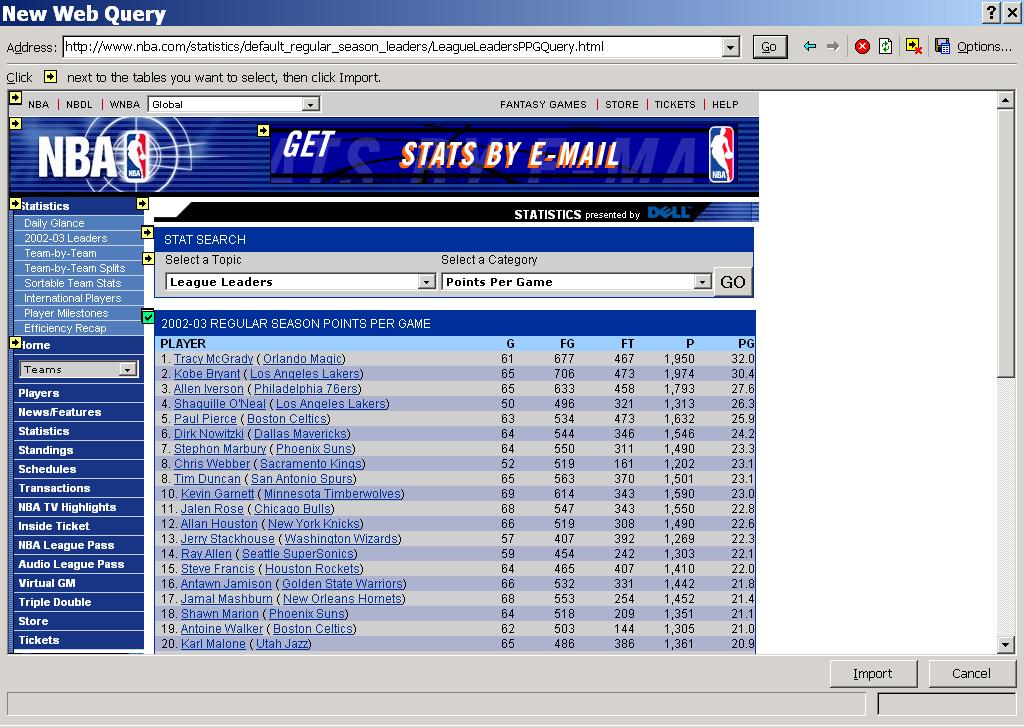
Figure 1: This wizard retrieves Web data into Excel. (Click images to
enlarge.)
When the
page is loaded into this window, several arrow icons will allow you to select
one or more tables within the page to be imported into Excel. When a table is
selected for import, the icon changes to a check mark. This added functionality
makes it much easier to incorporate data from a single table into your
spreadsheet. When you consider that HTML tables are used not only for displaying
columns of data but also for other aspects of page design, the ability to select
which table you want to retrieve data from can make the import process much more
useful. You can import only the required data into your spreadsheet instead of
the entire page. Click on the Options button to display the dialog shown in
Figure 2.
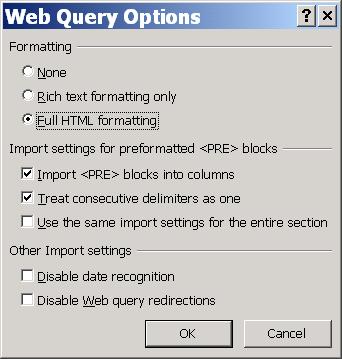
Figure 2: You can define how the data is imported from this
dialog.
At this top of this dialog box, you can define how much of
the Web data formatting (font sizes and colors, background colors, etc.) will be
retained within Excel. If you select None, the data is imported into Excel
without any of the formatting that existed in the Web page. This data will
appear as though it were simply typed into Excel. The Rich Text Formatting Only
option incorporates some, but not all, of the Web page formatting by converting
the data to Microsoft Rich Text format prior to importing. The final option is
Full HTML Formatting. This option copies the data into your spreadsheet exactly
as it appears in the Web page, including hyperlinks, which can be used directly
from within the spreadsheet.
The middle section of this dialog allows
you to define how blocks of data within HTML
tags are imported. Thetag identifies data that has been preformatted for display in the browser.
The two selections at the bottom of the dialog let you prevent Excel from automatically detecting cells containing date values and allow you to ignore any Web Query redirections defined in the page. It is possible within an HTML table definition to identify a different location. Figure 3 shows how the table in Figure 1will appear when imported into Excel. You'll notice in this figure that you have retained all of the HTML formatting, including background coloring and fonts.
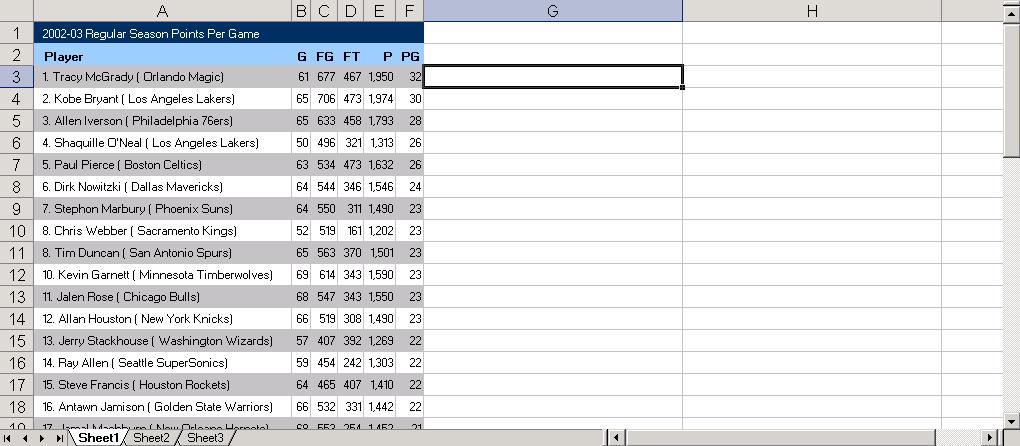
Figure 3: Your Web data will look like this in your Excel spreadsheet.
Once the data is in Excel, you can use any of the standard Excel functions to manipulate and massage the data into whatever format you need. For example, you could easily take the data shown above and create an Excel chart. Then, to update the Excel spreadsheet with current data, you simply right-click within the area of the spreadsheet containing the Web data and select Refresh Data from the Context menu.Building a Better Web Query
The one downside to what I've covered so far is that it relies on data contained in a Web page outside of your control. You can extend this concept by using Web Query to access custom-made ASPs. These ASPs will handle the database access for you. The advantage to this method is that, unlike Microsoft Query and ODBC, it allows you to take control of what data is made available to Excel users. To use this method, you must be running a Web server that supports ASPs. The most likely option here would be Microsoft's Internet Information Server (IIS). The ASP source shown in Figure 4 loads data from the selected fields in the SYSTABLES file on the iSeries and displays these fields in an HTML table.
|
Figure 4: This source creates a simple Active Server Page.
Just
to clarify, ASPs are Web pages with embedded VBScript or JavaScript code that
dynamically generates HTML source for the Web page. The VBScript or JavaScript
is executed on the Web server and therefore allows for a more secure means by
which to access a data source. In this example, I've used ActiveX Data Objects
(ADOs) to retrieve data from the iSeries. The VBScript then reads this data and
outputs it to the browser within the cells of an HTML table. The technique used
here is the same technique you would use to read data from any file on your
system and display it in an HTML table. You pull this data into Excel using the
method described earlier in this article, but this time, you point to the URL
that references the page in Figure 4. Figure 5 shows how this data will appear
in Excel when loaded using the None option for formatting.
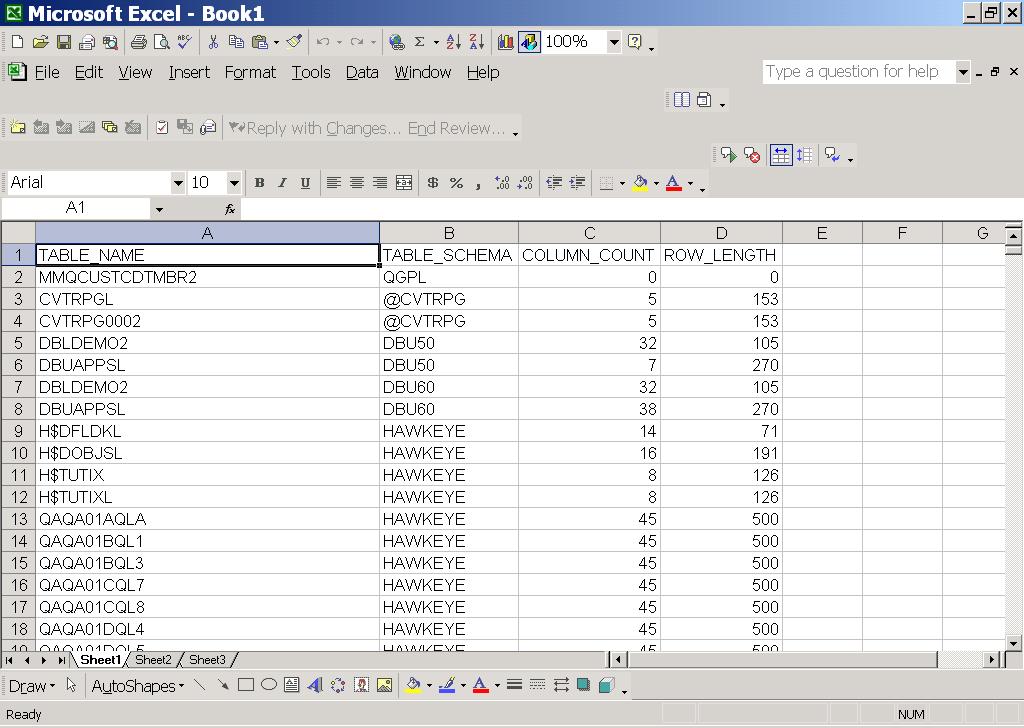
Figure 5: This data was loaded from the iSeries through an
ASP.
In this case, you'll notice that the data appears without any of
the formatting shown in the earlier example. It's also possible to create an
ASP that accepts parameters, which can be used to filter the data displayed in
the table and ultimately displayed in Excel. These parameters are passed through
what is called a Querystring. The Querystring portion of a URL is
identified by a question mark (?). Each parameter passed in is identified in the
format Parm=value.
When specifying more than one variable, an ampersand
(&) is placed between variables. For example, the following Querystring
passes two variables in to the ASP identified in the URL.
In this example, the value of the parameter lib would be QSYS2,
and the value of the variable file would be SYSTABLES. The code in Figure
6 shows how these variables would be read into and used within an
ASP.
|
Figure 6: This ASP example accepts two Querystring
variables.
This page is similar to the example used earlier. The
difference is that I read in two Querystring variables and used them to build
the WHERE clause for the SQL statement that acts as the source for the ADO
Recordset. This example selects field data from the file and library supplied
through the Querystring. The Querystring variables are read into the ASP through
the Request.Querystring statement. In each case, the parameter supplied to the
Request.Querystring statement represents the name of the variable to be read in.
To incorporate this page into an Excel spreadsheet, you specify the full URL,
including the Querystring variables as shown earlier. Figure 7 shows the
resulting data displayed in Excel.
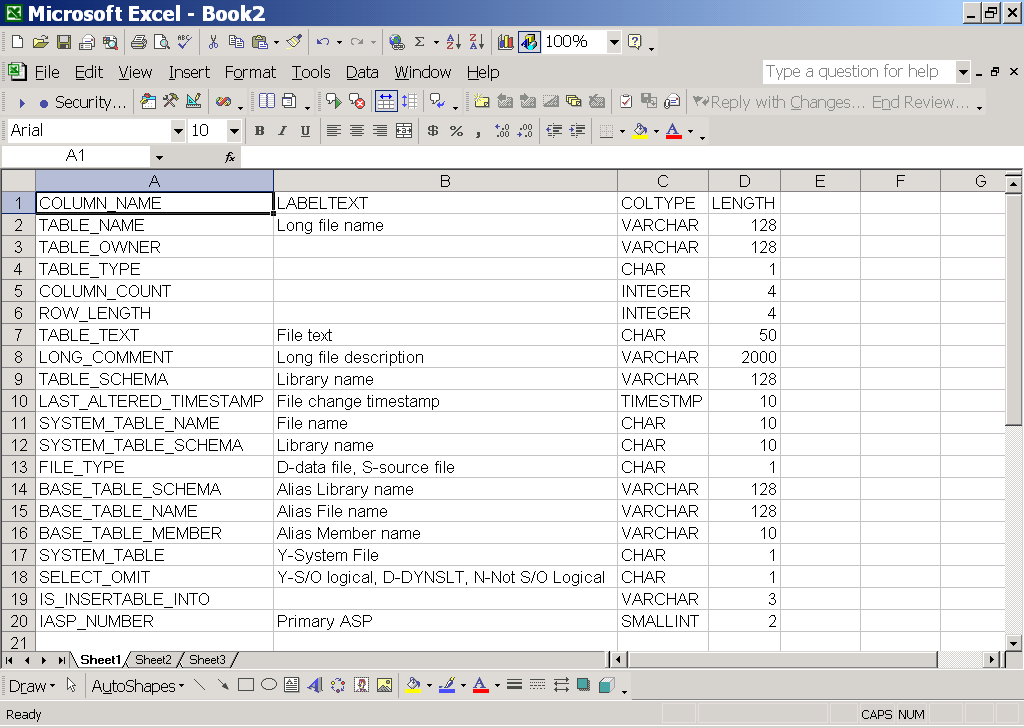
Figure 7: This Excel spreadsheet is retrieved using Querystring
variables.
This method gives you the flexibility of being able to
select the information to be imported. The downside is that you have to modify
the URL in your Web Query every time you want to change the data. You can get
around this little problem by incorporating some VBScript code into your Excel
spreadsheet.
Using VBScript with Web Query
By incorporating VBScript code into an Excel
spreadsheet, you can control elements of the spreadsheet, including Web Query
options. You can add a button to your spreadsheet and build the Querystring
dynamically, based on values from cells within the spreadsheet.
Now,
I'll explain the process of creating an Excel spreadsheet with embedded VBScript
code that will be used to load data from the page in Figure 6. To start off,
you'll need to go into Excel and create a new (blank) spreadsheet. Next, you'll
add headings in cells A1 and C1. These headings will identify the cells to
contain the values to be passed through your Querystring variables into the ASP.
Type Library: into cell A1 and File: into cell C1. Now, you're
ready to drag a command button onto the page. You'll find the command button
icon on the toolbox, which can be displayed by right-clicking on the menu bar
area of the screen and selecting Control Toolbox. This will cause the VB toolbox
to be displayed. Locate the icon in the toolbox that looks like a small command
button as shown highlighted here:

Now, to create your command button, click and drag the
pointer onto an area of the spreadsheet from E1 to F2. Right-click on the
command button and select Properties. Change the Caption property to read
"Display Field Data." Your spreadsheet should appear as shown in Figure
8.
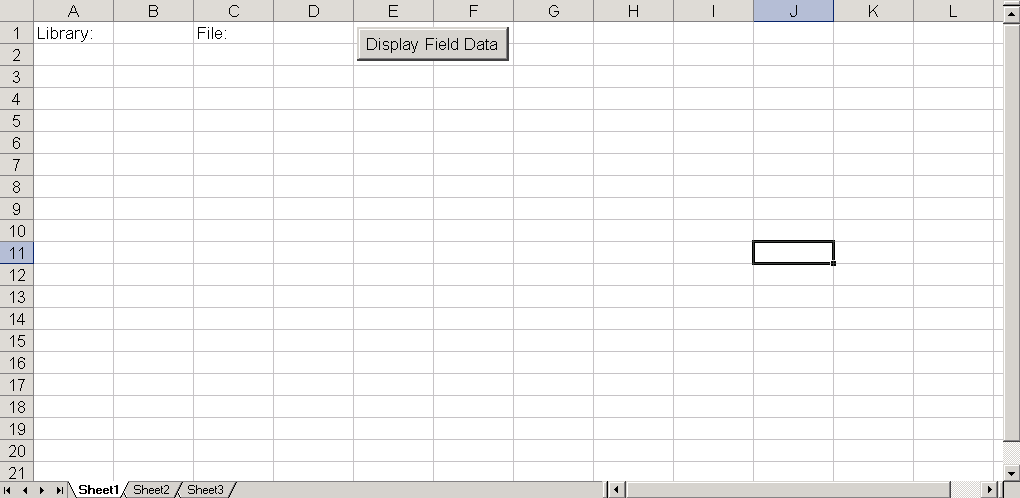
Figure 8: Prepare your spreadsheet for VBScript code.
After
closing the Properties dialog, right-click on the command button and select View
Code to display the VBScript development environment for the
CommandButton1_Click event. This will allow you to define the code to be
executed when the command button is clicked. Figure 9 contains the code to be
placed in the CommandButton1_Click event.
|
Figure 9: This code will build a Web Query by inserting cell values into
the URL.
This script first clears the contents of the destination
range. Then, it creates a new Querytable within your spreadsheet. A Querytable
(not to be confused with a Querystring) object is the link to the Get External
Data menu option. The first parameter identifies the URL from which the data is
to be retrieved. In this case, the values for the two Querystring variables are
fed in from spreadsheet cells B1 and D1. Once your Querytable object (WebQ) has
been created, you define some properties that control how the data will be
imported into Excel. The .Name property simply gives an identifier to the
new Querytable. The .WebFormatting option identifies what, if any,
of the HTML formatting should be included. These are the possible
values:
- xlWebFormattingAll:--All HTML formatting is included.
- xlWebFormattingNone:--None of the HTML formatting is imported.
- xlWebFormattingRTF:--The HTML formatting is converted to Rich Text Format prior to importing.
The .RefreshOnFileOpen property
defines whether or not the data is automatically refreshed when the spreadsheet
is opened. The .BackgroundQuery property identifies whether data
refreshes are performed in the background or users must wait for the refresh to
complete before they can continue working with the spreadsheet. The
.TablesOnlyFromHTML property defines whether only the HTML table data
should be imported or the entire page should be imported. Finally, the
.Refresh method is used to initiate the Web data import.
Once
you've entered the code for your CommandButton1_Click event, close the source
window and return to your spreadsheet. To activate your command button, click on
the icon labeled Exit Design Mode (shown here) from the Control toolbox:

Your new command button will now be active. To test your
new button, enter a valid library name in cell B1 and a valid file name in D1.
Then, click on the Display Field Data command button to retrieve the data from
the ASP. The results should appear as shown in Figure 10.
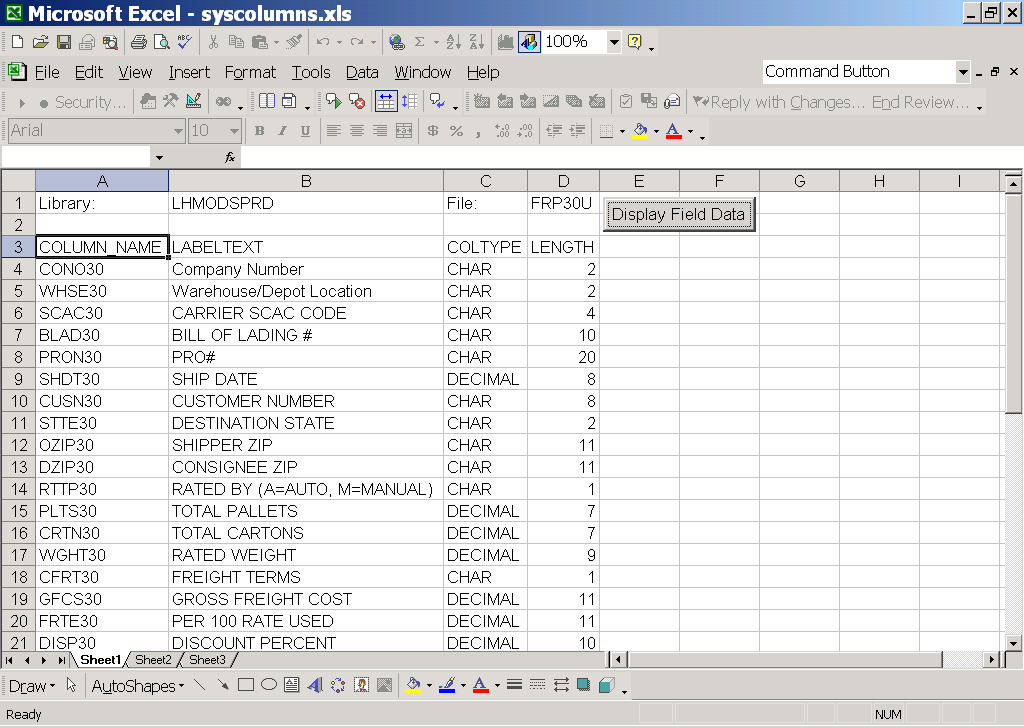
Figure 10: This spreadsheet will automatically retrieve data from an
ASP.
As you can see, you can easily extend the use of Excel Web Query
functionality using VBScript code. You can reuse the technique shown in the
simple example by modifying the URL and Querystring variables to point to your
own ASP. You can also easily modify the ASP example shown in Figure 7 to
retrieve whatever data is required from your iSeries. With a little tweaking,
you can take the examples shown here and change them to retrieve any data that
your Excel users need. The best part is that you won't ever again have to
explain data transfers or ODBC!
Mike Faust is
MIS Manager for The Lehigh Group in Macungie, Pennsylvania. Mike is also the
author of The
iSeries and AS400 Programmer's Guide to Cool Things
from MC Press. For more information on Active Server Page programming, watch
for Mike's upcoming book entitled Active Server Pages
Primer from MC Press . You can contact Mike at


 Business users want new applications now. Market and regulatory pressures require faster application updates and delivery into production. Your IBM i developers may be approaching retirement, and you see no sure way to fill their positions with experienced developers. In addition, you may be caught between maintaining your existing applications and the uncertainty of moving to something new.
 IT managers hoping to find new IBM i talent are discovering that the pool of experienced RPG programmers and operators or administrators with intimate knowledge of the operating system and the applications that run on it is small. This begs the question: How will you manage the platform that supports such a big part of your business? This guide offers strategies and software suggestions to help you plan IT staffing and resources and smooth the transition after your AS/400 talent retires. Read on to learn:
LATEST COMMENTS
MC Press Online