Editing files in the IFS has been a hot topic since COMMON Spring 2016. I wanted to share how I currently do it.
With PASE becoming more and more popular via open-source languages, it makes sense that there are more and more ways to edit code in the IFS. For example, you could use the dinosaur EDTF 5250 command, which is fairly rudimentary but can do the job in a pinch (hey, I still use it sometimes). A next step up is the Joe editor, which can be used from an SSH session and actually works decently—yet another editor I use in a pinch. I've also used RPGNextGen.com's editor for IFS files, and that has worked, though it lacked syntax coloring. And of course I'd be remiss if I didn't mention RDi and its ability to easily navigate and edit IFS files. But as we all know, RDi comes at a premium and still doesn't run on Mac (which is what I use).
So what do I use when I'm doing significant IFS file editing? Well, up until recently I used SublimeText3 and the SFTP plugin. This worked OK but required I manually set up multiple config files, one for each project in the IFS I was working on, and also did a lot of file syncing back and forth that was clumsy sometimes. I've now found a better way that is even simpler and more robust (didn't require an editor plugin and instead ran at the operating-system level).
I can't believe the following sentence is coming from my mouth and is accurate and truthful. Get ready. Drum roll.
I am using Microsoft's Visual Studio Code as my primary editor, it works great, and I like it…a lot. [Aaron shivers, wags his pseudo tail, and claps]
[Aaron looks to see if he lost friends]
OK, glad some of you are still here and are willing to hear me out. Let me clarify a few things. First, it's not the Visual Studio that you might be thinking of. It is specifically named Visual Studio Code and can be obtained for free at the following URL: code.visualstudio.com. Second, it is written in…wait for it…wait a little longer...Node.js. How do I know that? Because it's also open source, and the source can be found here. Note: There are other languages, like Typescript, also used in Visual Studio Code (I will call it VSCode for the remainder of the article to stave off carpal tunnel).
Installing VSCode on your computer is simple and can be accomplished by visiting code.visualstudio.com and following the directions for your operating system.
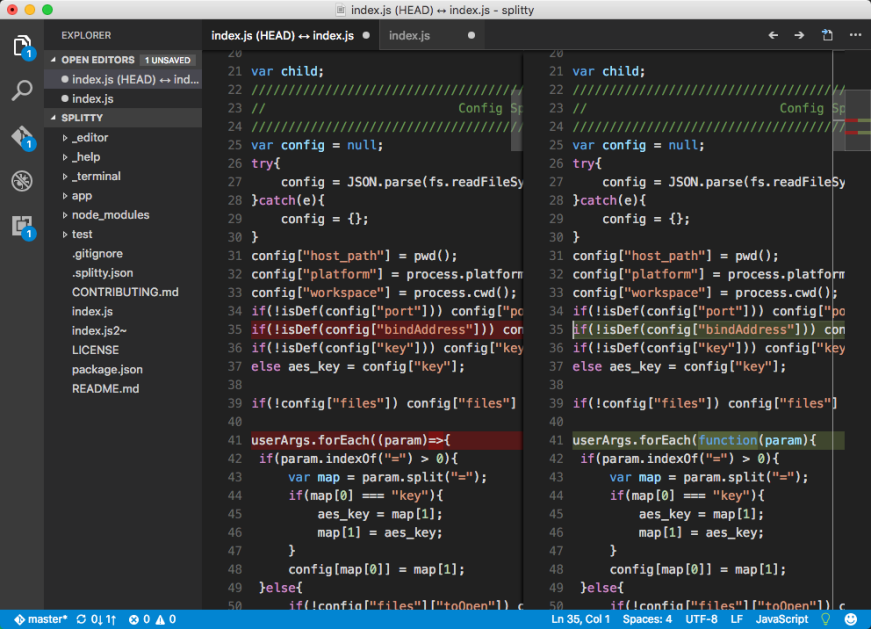
Before getting too much further, I want to show a screenshot of what my installation looks like, as shown in Figure 1.

Figure 1: Here’s VSCode Editing a Node.js file in the IFS
In Figure 1, we see IFS file /home/aaron/git/splitty/index.js in the editor. Splitty is a browser-based editor I have been playing around with. VSCode has a number of things you'd expect in an editor, such as syntax coloring, code collapsing, code completion, file system search, source file search, etc. I like those things a lot, but what really took VSCode to the next level for me is the integrated Git support, specifically the Git Diff features (the ability to see the changes I've made since the last commit to the repository). That's what we see in Figure 1, a split view that has the "before changes" view on the left (red) and the "after changes" view on the right (green). Not only does it show you the changed lines, but it also does an excellent job of conveying what on the line changed (in this case, I changed from JavaScript arrow functions to an old-school function definition). Further to that, I can also edit the code on the right and it continues to show the diff. The reason this is so nice is it keeps me from having to remember all the areas I touched; instead, I can simply review the far left scroll column, where the red and green marks tell me where there have been changes in this file.
I've only touched the tip of the features in VSCode, and this article isn't as much to convey the editor but instead to explain how to connect any client-side editor to the IFS using something called SSHFS.
SSHFS is a two-part definition; the first part is SSH, which stands for Secure Shell, and the second is File System, or defined in full: Secure SHell File System. Wikipedia defines SSHFS as follows:
In computing, SSHFS (SSH Filesystem) is a filesystem client to mount and interact with directories and files located on a remote server or workstation over a normal ssh connection.
Translating the above into my world, that means I can use SSHFS to mount a local directory on my laptop that points at a remote directory on my IBM i, and it communicates back and forth using the SSH protocol, which is already installed on 99 percent of the IBM i machines I come into contact with. Since we've mentioned the requirement of SSH on IBM I, it would be good for me to convey how to start it. The below command starts the "SSH Daemon." Starting SSH the first time will potentially take a long time (it generates a number of things).
STRTCPSVR *SSHD
Once SSH is started, you could connect to your IBM i via a client SSH terminal so you can interact with the PASE environment. This is an alternative to using CALL QP2TERM to interact with the PASE environment. There are a number of options for SSH clients, and Krengeltech's Litmis team has documented a few here. Putty or Chrome's Secure Shell are probably the easiest to get started with. BTW, that is a publicly editable wiki, so please feel free to add more that you have come across.
OK, now that the SSH Daemon is running on your IBM i, it is time to install another bit of software on the client—specifically, the SSHFS portion. I first learned of SSHFS via this Digital Ocean tutorial, which has setup instructions for Windows, Mac, and Linux. Please follow the directions for your laptop's operating system and then return to this article once complete.
In my case, I am on a Mac and went the route of installing OS X Fuse. Once the install was complete, I needed to create a local directory that will act like a shortcut (think Windows desktop shortcut) to a directory on my IBM i. Below, I issue the pwd (print working directory) command from the Mac Terminal app so you can see where I am in the file system. Mac Terminal is similar to Window's cmd.exe program.
$ pwd
/Users/aaronbartell
Next I create a new directory named remote_spaceslitmis_home_git using the mkdir command. Note this is done on my Mac, not the IBM i.
$ mkdir remote_spaceslitmis_home_git
Now it's time to make the stateful connection using the sshfs command. Note this is how Mac and Linux accomplish the task. Windows does it slightly differently based on the aforementioned Digital Ocean tutorial.
$ sshfs -o allow_other,defer_permissions,IdentityFile=~/.ssh/id_rsa
The -o portion of the command stands for "options." In this scenario, I am connecting to spaces.litmis.com, which only allows ssh key authentication (no passwords allowed), which is a topic for another day, but that means I had to add the IdentityFile=~/.ssh/id_rsa portion to let it know where my private key was stored so it could look to that for the authentication portion. If you don't have key-based authentication set up, you will be prompted for a password. The next portion,
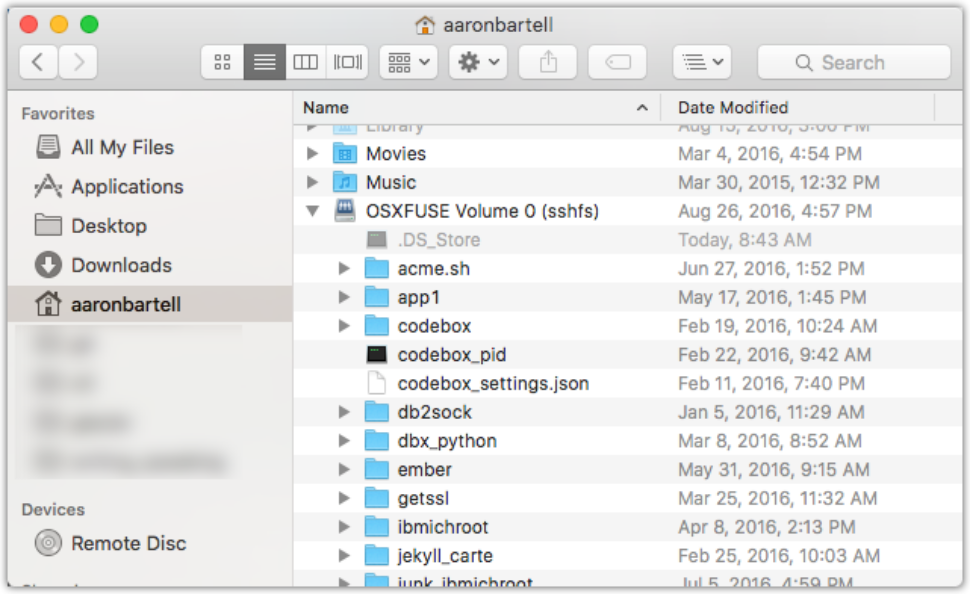
I can now see the remote folder in the Finder app (Finder is like Windows Explorer), as shown in Figure 2.

Figure 2: SSHFS is shown in Finder.
The cool thing about using SSHFS at the laptop operating system level is that I can now use my editor of choice to edit code. That could be NodePad++, Eclipse, SublimeText3, TextMate, notepad.exe, VSCode, or any other local editor. Heck, I even tested editing the IFS with the nano shell editor on my Mac.
At this point, your setup is complete. To edit IFS files in VSCode, you simply do a File > Open and navigate to the SSHFS directory on your local machine. Simple! Note: Sometimes the first load of a larger directory can take some time (i.e., 15 seconds for me), but subsequent editing/saving/traversing of files was much quicker (usually subsecond).
The other thing I want to talk about is editing RPG source in the IFS. This has been a hot topic as of late, and that's a good thing because storing RPG in the IFS affords the use of Git to manage it. Obviously, VSCode could be used to edit RPG in the IFS, but there isn't currently a plugin for RPG syntax colorization. Never fear! The VSCode project has a full tutorial showing how to add new languages for syntax colorization. Learn more here. It would be great if somebody from the community would take this on for RPG. If you end up pursuing this task of RPG colorization for VSCode, then please issue a comment below so others don't duplicate efforts and can maybe even collaborate with you on the effort.
I hope this has given you more perspective on yet another option for how you can interact with the IBM i for code development. I believe there will be more integrated developments in the future that are more "IBM i aware," but for now this works. If you have any questions or comments, please comment below or email me at


 Business users want new applications now. Market and regulatory pressures require faster application updates and delivery into production. Your IBM i developers may be approaching retirement, and you see no sure way to fill their positions with experienced developers. In addition, you may be caught between maintaining your existing applications and the uncertainty of moving to something new.
 IT managers hoping to find new IBM i talent are discovering that the pool of experienced RPG programmers and operators or administrators with intimate knowledge of the operating system and the applications that run on it is small. This begs the question: How will you manage the platform that supports such a big part of your business? This guide offers strategies and software suggestions to help you plan IT staffing and resources and smooth the transition after your AS/400 talent retires. Read on to learn:
LATEST COMMENTS
MC Press Online