Several tools available for Windows and Linux desktops allow you to securely delete files containing sensitive information.
In the past, I wrote a tip on how to securely erase an entire hard drive and also mentioned that the best way to dispose of a dead or dying hard drive is to physically destroy it. This method of destroying sensitive information is perfect if you're actually disposing of the hardware, but it doesn't solve the problem of securely destroying information at a file level within a working file system.
No matter what OS you're running, it's possible that when you delete a file from your system, the space on the drive that the file occupied could still contain data. Hard drive data retrieval tools can completely or partially retrieve the files even if they're not readily visible from the OS. Both Windows and Linux desktops offer tools to remedy exactly this sort of situation.
Windows Eraser
My very first TechTip showed you how to wipe hard drives clean by using the DBAN utility. Darik's Boot and Nuke (DBAN) actually uses an algorithm in the dwipe utility adapted from the Heidi Eraser program, which meets the Department of Defense (DoD) standards for erasing data on media.
The Heidi Eraser program is an open-source GPL erasing utility for Windows 95, 98, ME, NT, 2000, XP (32/64), and Vista (32/64), as well as Windows Server 2003 and DOS. To obtain a copy, visit the project's Web site. With six erasing methods available, you can choose from the simplest of wipes to the most complex. Eraser supports the DoD methods of passing over data both three and seven times, as well as the Gutmann method of passing over data 35 times.
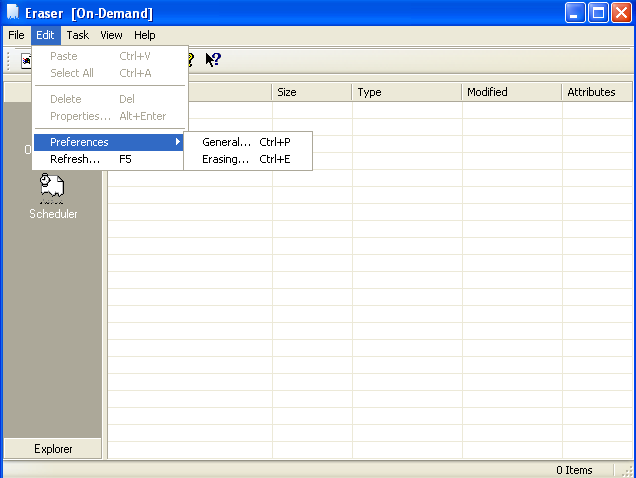
Eraser not only allows you to erase files and folders, but also has the ability to delete encrypted files and drives, erase compressed files and drives, erase hard drives using DBAN, and wipe free space on Windows 95, 98, ME, NT, 2000, XP, and DOS. The GUI interface is pretty intuitive and even allows you to set up schedules to automatically purge and delete almost all the categories listed above. Once you download and install a copy, you can launch the program from the Start menu. You should see something similar to the GUI in Figure 1.
Figure 1: Eraser's GUI and menu offer assorted erasing methods.
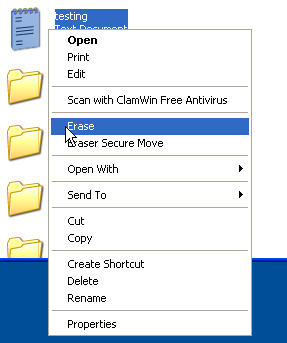
To change methods of data destruction, enter the menu as shown above. As I mentioned, the GUI interface is extremely intuitive. To delete something, click on File and then New Task, or simply hit CTRL+N to bring up the properties for the particular task. Here, you can delete the free space on the device in the list, delete all files in a folder, or select a specific file to delete. Once the file is in the task list, right-click the file and choose Run to start the process. To delete individual files, simply right-click on the file in the Windows Explorer folder and choose Erase.
Figure 2: Erase a file using Windows properties selection.
There are too many options to explain here, so browse around Eraser's menus, and you'll find it's highly customizable. The schedule feature is nice because you can set up a folder to hold your shredding material and then have Eraser go through once or twice a day to wipe the contents while leaving the folder intact.
Linux Tools
Most Linux/UNIX distributions already ship with a utility, "shred," that is capable of securely deleting files on your server and desktop systems. The package that provides shred is Linux coreutils, and it should already be installed on your system.
The shred tool overwrites files to hide the contents and then deletes them. Shred does have a few limitations that you need to be aware of. One obstacle presented is that shred doesn't allow you to wipe a directory by itself. I'll show you how to get around this shortly. Shred's biggest limitation relates to particular file systems. If you look at the shred manual or help file, a paragraph explains about the file systems shred cannot function properly on. The manual states the following:
# man shred
# shred --help
"In the case of ext3 file systems, the above disclaimer applies (and shred is thus of limited effectiveness) only in data=journal mode, which journals file data in addition to just metadata. In both the data=ordered (default) and data=writeback modes, shred works as usual. Ext3 journaling modes can be changed by adding the data=something option to the mount options for a particular file system in the /etc/fstab file, as documented in the mount man page (man mount). "
What this means that if you have an ext3 file system that you didn't change the mount mode on, you'll be fine to use shred. By default, ext3 file systems are mounted in ordered mode. In the case of ordered mode, the file system pushes all data out to the main file system before the metadata is committed to the journal, whereas with journaling, both data and metadata are committed to the journal before the main file system. You really don't need to worry about this if you're using default installations of ext3 file systems.
Shred is extremely simple to use from the command line. The help command listed above gives you all the options, but a typical command to overwrite and erase a file is as easy as the following:
# shred -u -v testing.txt
All the output has been snipped here, but as you can see if you run the command, shred will first overwrite the file with random data 25 times. Since the remove option was specified, it will rename the file 11 times and then delete it. The combination of overwriting and renaming the file should prohibit recovery tools from being able to discover the file. This process offers no guarantees, but it does make file recovery very difficult to nearly impossible.
Although shred doesn't delete directories, you can use it to delete entire disks. Be very careful with the following command, because it's all too easy to type in a command on a live file system. The following will completely wipe drive hda on this particular machine. If you have SCSI interfaces, it would be drive sda.
# shred -u -n 30 /dev/hda
Shredding Directories
I mentioned that I'd show you how to use shred to wipe a directory clean. By using a simple "for" loop on the Linux bash shell, you easily get rid of a directory's contents.
# cd /directory/to/shred
# for file in *; do shred -u $file; done
Be careful with this command as well, and make sure you've entered the path that you want. As most Linux gurus already know, there is no prompting before running commands that delete items in a Linux system.
If you want to set up a schedule to automatically delete and purge items in a directory, use the crontab automation. You could place the for loop in a bash script and then call it at specified times. Open up a file and create the script:
# vim shredit.sh
#!/bin/sh
for file in /dir/to/shred/*;
do /usr/bin/shred -u $file;
done
# chmod +x shredit.sh
Be sure that the path you want to delete is absolutely correct and then save the file. Next, put the command into crontab to run at whatever time you would like.
# crontab -e
##################################################
#minute (0-59), #| hour (0-23), #| | day of the month (1-31),
#| | | month of the year (1-12),
#| | | | day of the week (0-6 with 0=Sunday)
#| | | | | commands
##################################################
01 02 * * * /path/to/shredit.sh
These scripts will allow you the same scheduling functionality as the Eraser program. With this example, your directory will be cleaned at 2:01 a.m.
Scrap Sensitive Data
These days, you can't afford to keep sensitive data lying around for fear of identity theft. Furthermore, if your company has retention policies in place, perhaps you have to delete and destroy data after certain periods of time. In either case, you now have the ability to delete sensitive information from Windows and Linux desktops and servers. These utilities work great for both personal and corporate use, so have fun wiping files from your file systems. Always remember, though, it's possible a backup copy exists elsewhere.


 Business users want new applications now. Market and regulatory pressures require faster application updates and delivery into production. Your IBM i developers may be approaching retirement, and you see no sure way to fill their positions with experienced developers. In addition, you may be caught between maintaining your existing applications and the uncertainty of moving to something new.
 IT managers hoping to find new IBM i talent are discovering that the pool of experienced RPG programmers and operators or administrators with intimate knowledge of the operating system and the applications that run on it is small. This begs the question: How will you manage the platform that supports such a big part of your business? This guide offers strategies and software suggestions to help you plan IT staffing and resources and smooth the transition after your AS/400 talent retires. Read on to learn:
LATEST COMMENTS
MC Press Online