Valence provides a free and easy way to explore this exciting web and mobile technology.
Of all the interfaces used to interact with business data over the years, arguably nothing has evolved more rapidly than the technology behind what we see in today's desktop and mobile web browsers.
When you consider how commonplace highly intuitive features — like fields that auto-complete as you type, editable data grids, drop-down menus, collapsible trees, etc. — have become in the browser world, it's easy to forget there was once a time when the Internet was just a bunch of clunky, static HTML pages. The sluggish process of clicking on links and waiting for pages to draw themselves over and over again often served as a solid test of one's patience. It's no wonder then that businesses observing those early days of the "Web 1.0" evolution might have been reluctant to move their applications away from their tried-and-true client server or even 5250-based interfaces. The proposed browser-based replacements just weren't that impressive.
But how things have changed! When AJAX started becoming more mainstream around 2005—made popular by web pages sporting PC-like features such as Google Maps and Microsoft Outlook for Web—the interactive nature of the Internet changed big-time. And it's been year upon year of steady improvement ever since. Borrowing from a popular ad campaign of the '70s and '80s to address the evolution of the web: You've come a long way, baby!
The secret sauce behind today's slick "Web 2.0"-style web pages is HTML coupled with JavaScript, and over the past decade a number of handy frameworks and libraries have evolved to make it easier for developers to create apps that leverage this technology. JavaScript frameworks and libraries not only supplement HTML code, but in some cases they can be leveraged to generate nearly all the HTML code of a web page, abstracting developers from many of the intricacies and idiosyncrasies of HTML-based development. This is a big deal, and it has significantly transformed the way many web and mobile pages are developed on nearly every platform. Ergo, it has moved us from creating simple web pages to building fully functional web-based apps.
And the good news is that there are no technological hurdles preventing this development paradigm from applying to IBM i as well. That is to say, RPG developers can be part of this party too!
But if you're like most RPG developers, you probably spend the majority of your time focused on back-end business logic and supporting ongoing day-to-day business needs. This can make the prospect of jumping in to front-end browser development a bit tricky to undertake. Where to start?
That's why CNX released the free Community Developer version of Valence for IBM i back in 2009, with most of its source code included. This way RPG developers can install the software and quickly get their hands dirty working with practical, functioning examples in the exciting world of AJAX-based web and mobile development using Ext JS and Sencha Touch.
Perhaps the best way to quickly see what a JavaScript framework (in this case, Ext JS) can do on IBM i is to take a common green-screen concept—the ubiquitous subfile—and extend it to the browser. In the web world, the rough equivalent to a subfile is called a grid, and there are several example grid apps included with the Valence Framework to illustrate how they work.
So as a quick exercise, let's walk through the steps of taking one of these example grid apps and making it display data from your own, say, customer master. This process should take just a few minutes to complete.
First, if you haven't already, download the free Community Developer edition of Valence. This gets you a self-extracting file that, when launched, will ask you for some basic configuration info and then automatically unpack itself onto your IBM i. Note that some email systems strip the ".exe" suffix from the downloaded installation file, so you may need to rename it before you launch it.
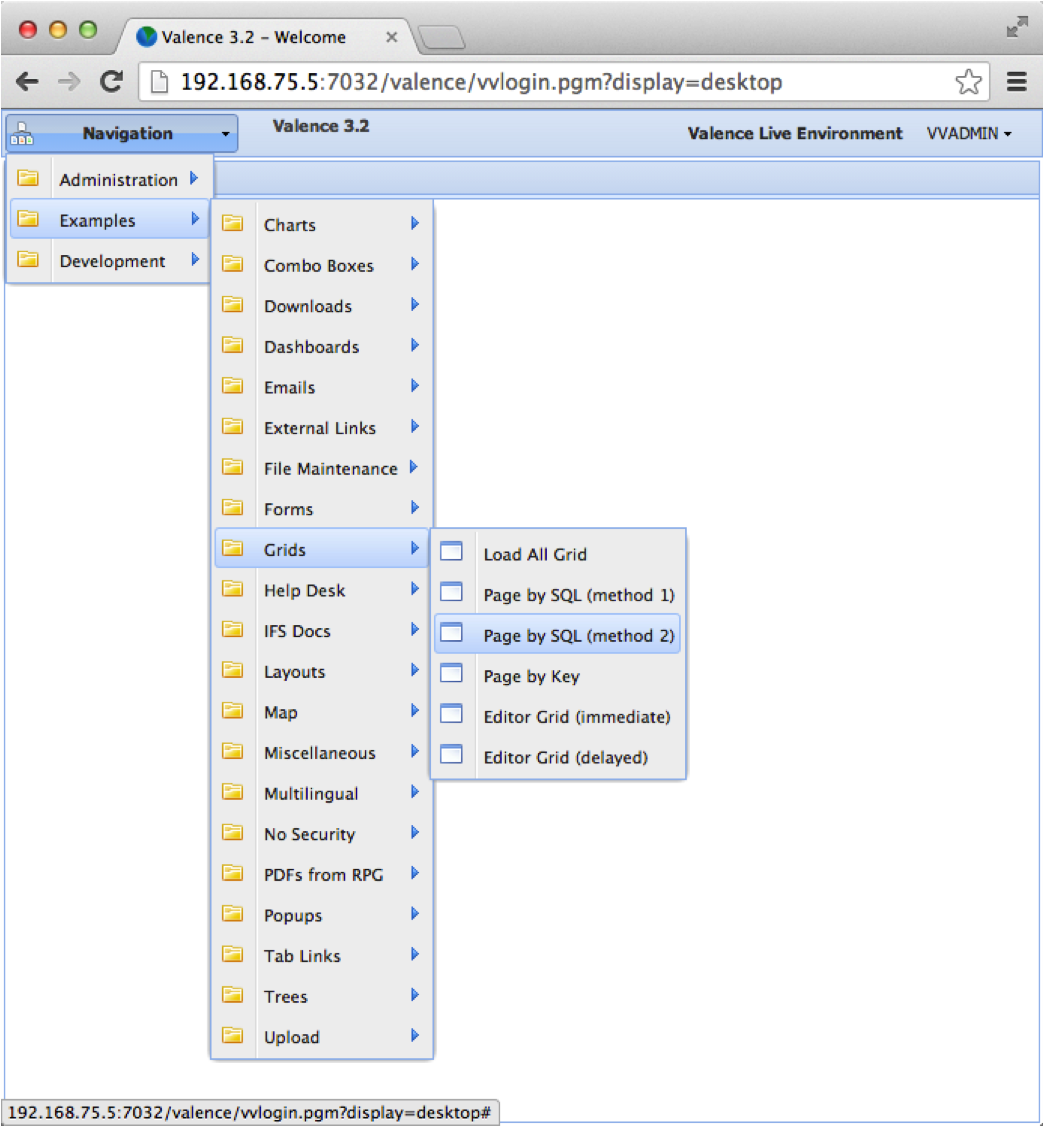
Once Valence is installed, log in by going to the URL link and using the default user and password (VVADMIN). This will get you logged into your IBM i via the Valence Portal. Click on the Navigation button in the upper left to navigate to the Examples folder. Open up Grids and launch the Page by SQL (method 2) app. This is the app we're going to doctor up to run over your own IBM i data.

Figure 1: Launch the grid example app: Page by SQL (method 2).
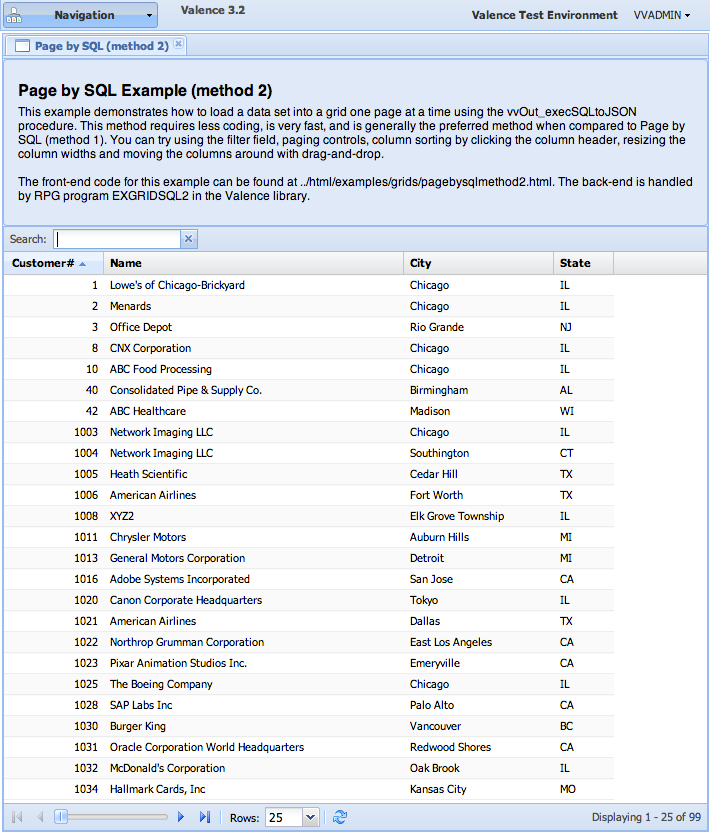
When launched, the Page by SQL example app shows dummy data from a sample customer master file included with Valence called DEMOCMAST.

Figure 2: This example grid app will be displaying your customer data.
Switching this app to show data from your own customer master file will entail two simple steps:
- We'll adjust the back-end RPG program to pull data from your own physical file. As you'll see, we're using a simple SQL statement to achieve this. If you're not yet using embedded SQL in your RPG programs, this will be a great way to see it in action on your system. There are other example apps showing how to load a grid using native I/O (i.e., READing through a file in a loop), but you'll quickly learn it's both simpler and far quicker to use embedded SQL, particularly when it comes to dynamic sorting of data.
- We'll adjust the front-end JavaScript code so it knows to look for the new field names coming from your RPG program.
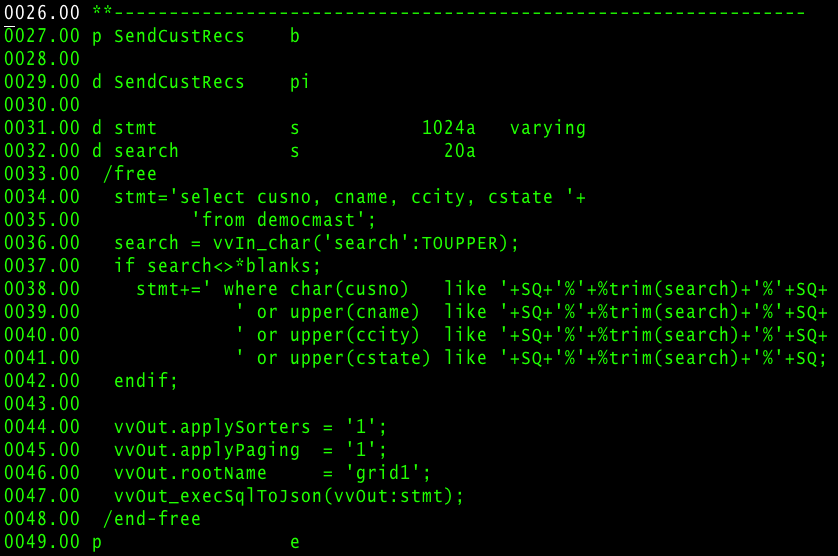
So let's get started on step 1. Using your favorite source editor, open up the RPG source for member EXGRIDSQL2, located in file QRPGLESRC, library VALENCE32. Scroll down to the SendCustRecs procedure, where you'll find the following:

Figure 3: RPG code for the server-side logic is provided.
Let's break down what the RPG program is doing and what we want to change here:
- At line 34.00, we're setting the dynamic select and from clauses of the SQL statement in the stmt field. Change this to pull some select fields from your own customer master file.
- At line 36.00, we're pulling in a field, converted to uppercase, called "search" from the browser. Then, at lines 38.00 through 41.00, we're appending search constraints to the statement. Note that we're uppercasing the character fields to ensure we're doing an apples-to-apples comparison to the uppercased "search" field. Change these fields to match the fields in your select statement.
- Finally, lines 44.00 through 47.00 prepare the service program to process the SQL statement and send the results to the browser. The applySorters setting ensures a sort clause is added to the SQL statement to match the column the user wants to sort by; applyPaging tells the service program to load just a single page of data (akin to a page-at-a-time subfile); the rootName just gives the data set a name, which is used to link the results up to the grid in the browser.
Save your changes and compile the program (be sure VALENCE32 is in your library list). Then you're ready to adjust the corresponding front-end code.
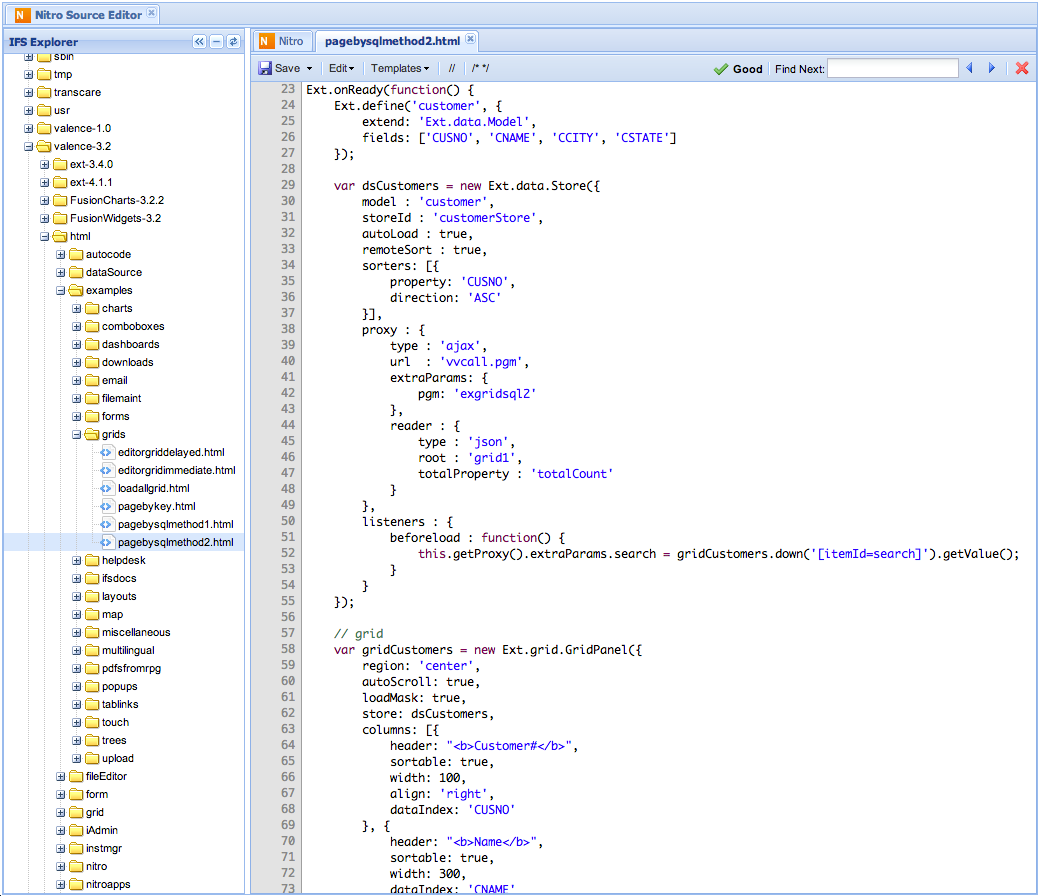
For step 2, we'll edit the JavaScript source that controls the Ext JS grid of our example app. This source is located on your IBM i's IFS in path /valence-3.2/html/examples/grids/pagebysqlmethod2.html. You can edit this source using any editor or even something as simple as Notepad. Alternatively, since you're in the Valence Portal anyway, you may find it easiest to make these edits through the Portal's built-in source editor, which you can access by clicking on Navigation and launching the Nitro Source Editor app located in the Development folder. Once launched, scroll down to the IFS path in the tree panel on the left and double-click on the file to open it for editing.

Figure 4: Here's the JavaScript code for the browser-side Ext JS logic.
As an RPG developer, this front-end code may look a bit foreign at first. But it's not necessary to understand every element right away, as you can take time to do that later. For now, we're only concerned with telling the front-end which fields to expect from your revised RPG program. The simple changes to be made are as follows (be careful not to lose any of the opening and closing brackets; in JavaScript, they're important!):
- The code at line 26 defines the fields associated with the data model for the grid. Think of this as a front-end data structure for each customer. So update the list of fields here to match what you placed in the SQL "select" clause of your RPG program. Be sure they're all entered in uppercase, since that's the way the SQL engine will output them.
- The "sorters" property at line 34 sets the default sort column (which users can change by clicking on any other column heading). For the sake of this example, change CUSNO to the field name associated with the first column you're showing.
- Finally, the code starting at line 58 defines the columns on our grid. There are thousands of different ways to configure these columns, but for this exercise you'll just change the "header" properties to whatever column headings you want, and the "dataIndex" to match the field names you set in the data model.
With those changes made, click the "save" button and then close and relaunch the app. You should now see your own familiar customer data, loaded into an Ext JS grid and displaying one page at a time.
And with that, you've officially dipped your toe into the exciting world of JavaScript Framework-based development on IBM i!


 Business users want new applications now. Market and regulatory pressures require faster application updates and delivery into production. Your IBM i developers may be approaching retirement, and you see no sure way to fill their positions with experienced developers. In addition, you may be caught between maintaining your existing applications and the uncertainty of moving to something new.
 IT managers hoping to find new IBM i talent are discovering that the pool of experienced RPG programmers and operators or administrators with intimate knowledge of the operating system and the applications that run on it is small. This begs the question: How will you manage the platform that supports such a big part of your business? This guide offers strategies and software suggestions to help you plan IT staffing and resources and smooth the transition after your AS/400 talent retires. Read on to learn:
LATEST COMMENTS
MC Press Online