Deliver real-time WRKACTJOB stats to the browser using Node.js, DB2 for i Services, and WebSockets.
I am continually intrigued by the capabilities HTML5's WebSockets afford us on IBM i. In the article Node.js Is Genius with Web Sockets, I walked through the creation of a simple chat application that used WebSockets to communicate messages from the server to each browser currently participating in the chat. That was fun but not as immediately relevant to IBM i as it could have been. In this article, we will implement WebSockets into the IBM i Dash open-source project by adding an auto-updating page that conveys information equivalent to the WRKACTJOB command.
As a side note, the most recent V7.2 TR3 IBM i announcement includes Apache WebSocket support.
The ease of accessing WRKACTJOB-type information on IBM i has been made incredibly simple because of IBM's growing ecosystem of DB2 for i Services. These services essentially make system information (formerly only accessible via complex API calls) very easy to obtain via a simple SQL statement. Below is an SQL SELECT statement that calls upon the ACTIVE_JOB_INFO() User-Defined Table Function (UDTF). If you're new to UDTFs, you should read this article by DB2 expert Birgitta Hauser that does an excellent job of introducing the subject matter.
SELECT
JOB_NAME,
AUTHORIZATION_NAME,
ELAPSED_TOTAL_DISK_IO_COUNT,
ELAPSED_CPU_PERCENTAGE
FROM TABLE( QSYS2.ACTIVE_JOB_INFO() ) X
ORDER BY ELAPSED_CPU_PERCENTAGE DESC
FETCH FIRST 20 ROWS ONLY
In short, UDTFs are used in similar fashion to RPG's service programs, which hide complexity and provide reusability. In this case, there are likely many things going on under the covers of ACTIVE_JOB_INFO, but we only care about the inbound and outbound parameters. For this example, we provide no input (which would allow us to further filter results) and instead specify result columns we need for the web page we're creating. The ORDER BY clause is sorting by ELAPSED_CPU_PERCENTAGE because one of my primary uses of WRKACTJOB is to see who's hogging the machine. I used the STRSQL 5250 command to test the above SQL and honed it to meet the needs of the web application.
Now that we've resolved the DB2 for i Service syntax, it's time to implement it within the existing IBM i Dash open-source project. Note that you can feel free to add your own dashboard pages by "forking" the project, as detailed on the IBM i Dash README.md file.
I used a Litmis Space to accomplish this feature, which required that I copy my SSH public key from my home directory to my Bitbucket.org profile so I could perform the below git clone command. You can get full details on how to obtain your SSH public key and place it on Bitbucket in this MC Press Online article.
The below two commands will copy the ibmidash project down to your development environment and place you into the immediate project's directory with the cd (change directory) command.
% git clone
% cd ibmidash
Note: whenever you see the percent symbol (%), it means you're in a PASE shell. An alternative is to use CALL QP2TERM to enter these commands.
Included in the ibmidash project is file package.json. This holds a variety of items, which include module dependencies for this project—in this case ExpressJs and Jade. We don't yet have those modules installed in this environment, so it's necessary to run npm install, as shown below.
% npm install
Next we need to install the socket.io module and save it to the package.json file using the below command.
% npm install socket.io --save
At this point, we have everything installed that's necessary to complete the programming. One of the nice things about storing code in git on Bitbucket is the ability to easily see changes done across an entire project to learn what was affected. Here is a link to the changes I made that we will now walk through.
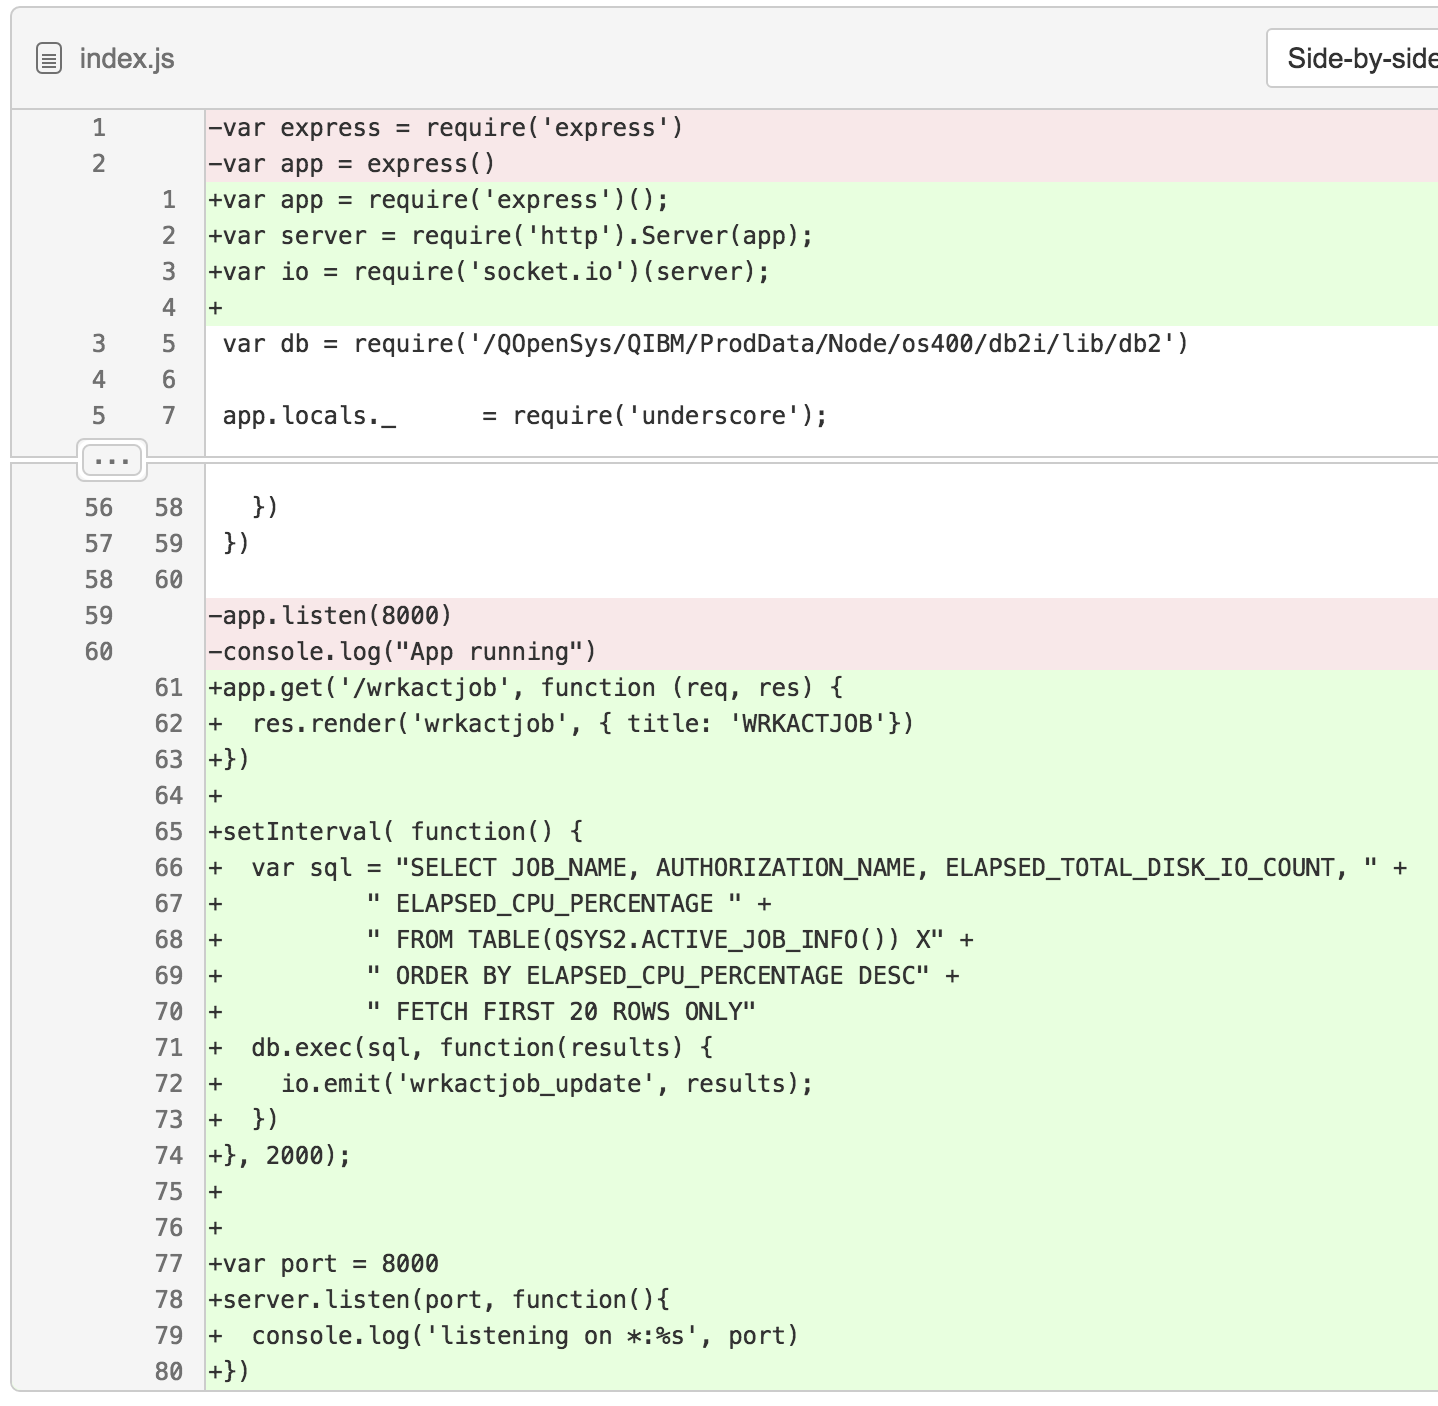
Below is a screenshot of the changes made to index.js, in which red highlights denote removing lines and green adding lines. The first relevant change is on line 3, where the socket.io module is being brought into our program. Think of this as being similar to doing an RPG /copy to bring in outside functionality.

Figure 1: Git shows the changes to index.js.
The next change is adding route app.get('wrkactjob', …). This will render the views/wrkactjob.jade file to the browser. We'll cover its contents later. The key server-side bit of code is line 65 through 74. The setInterval function is a means to emit updates to WebSocket event listeners every two seconds (line 74 is 2000 milliseconds). The value being emitted is the result of the call to ACTIVE_JOB_INFO(), as detailed on line 68. Line 72 is where the emitting actually happens, and it's sending this message only for those clients listening for the particular event ID of 'wrkactjob_update'.
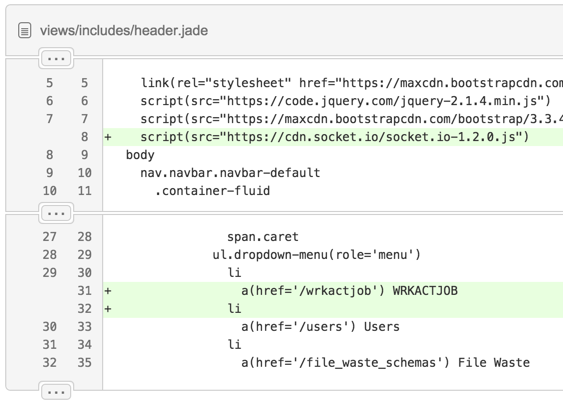
Figure 2 shows the changes to header.jade. In this case, we needed to include reference to the client-side socket.io code so it could be downloaded from the Content Delivery Network (CDN). A new menu item was also added so users can navigate to the new page. Note how the link in the anchor (a) tag matches the route in index.js we mentioned earlier so inbound requests will deliver the wrkactjob.jade file to the browser.

Figure 2: Git shows the changes for header.jade.
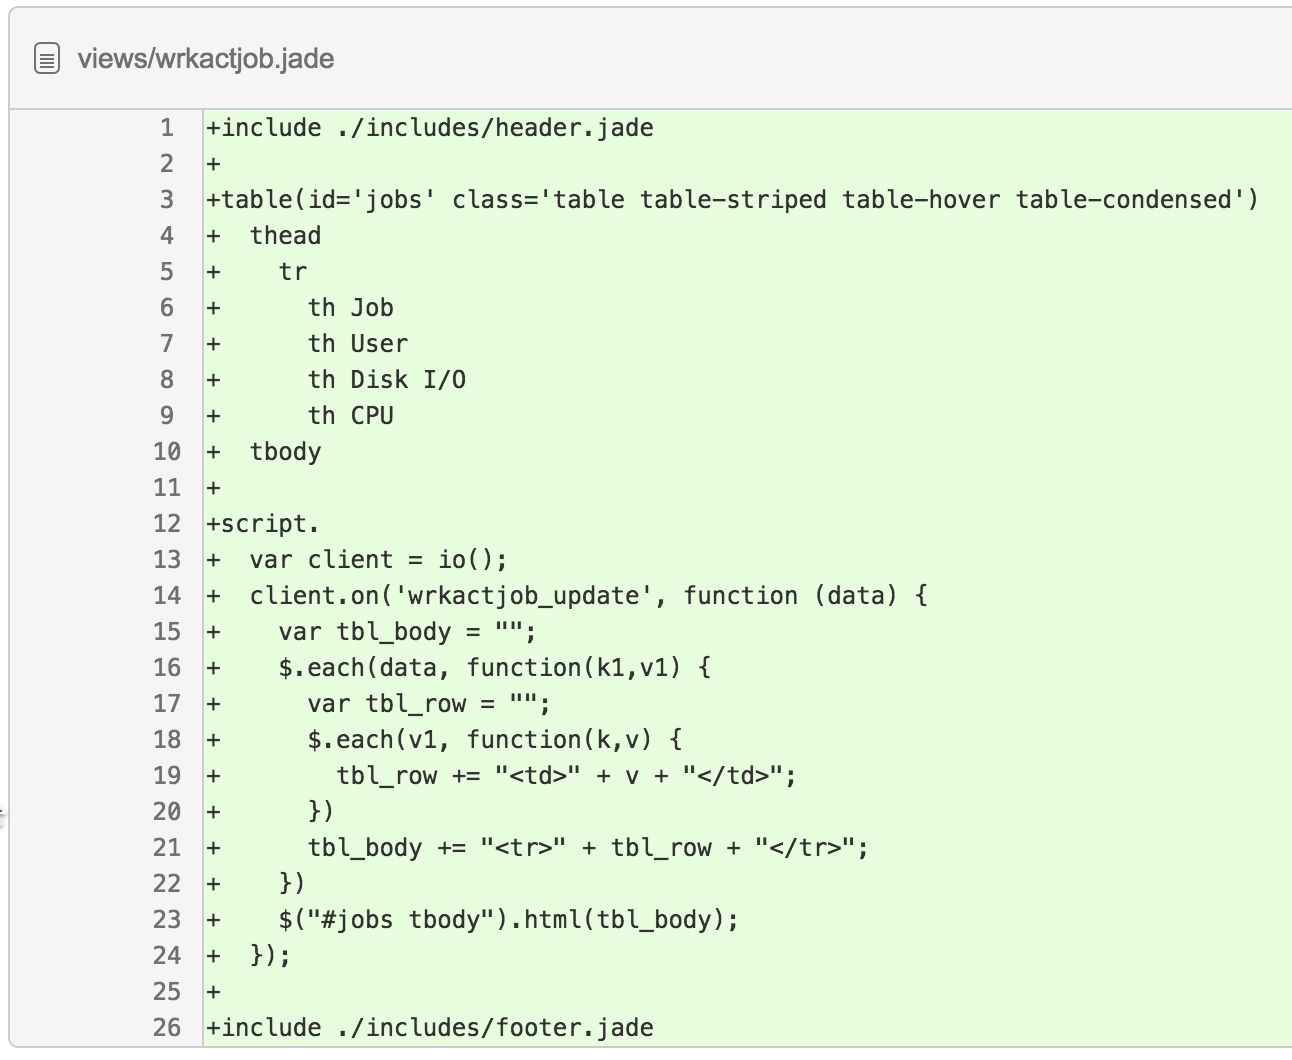
Figure 3 shows the new wrkactjob.jade that's delivered down to the browser. Of initial interest is the table being composed, which contains an empty tbody. That's because the app will subsequently fill it with data from the WebSocket after the page loads.

Figure 3: Git shows the changes of wrkactjob.jade.
Lines 12 through 24 are where the action happens with JavaScript embedded in the HTML document. On line 13, we're initializing the client-side socket.io library. On line 14, we're listening for an event of 'wrkactjob_update' being emitted from the server. Upon receiving an event from the server, jQuery will be used to iterate over the result set and concatenate a new set of table rows. Then $("#jobs tbody").html(tbl_body) is used to select and update the tbody tag's contents.
We've now seen the code changes, and it's time to see the application in action. Starting the application is as simple as running node index.js, as shown below.
% node index.js
Connect to *LOCAL
Connected to *LOCAL with ID , password: .
listening on *:8000
SQL: SELECT JOB_NAME, AUTHORIZATION_NAME, ELAPSED_TOTAL_DISK_IO_COUNT, ELAPSED_CPU_PERCENTAGE FROM TABLE(QSYS2.ACTIVE_JOB_INFO()) X ORDER BY ELAPSED_CPU_PERCENTAGE DESC FETCH FIRST 20 ROWS ONLY
When the app is running, you'll see the SQL statement repeated in the console because database debugging is turned on at the top of index.js.
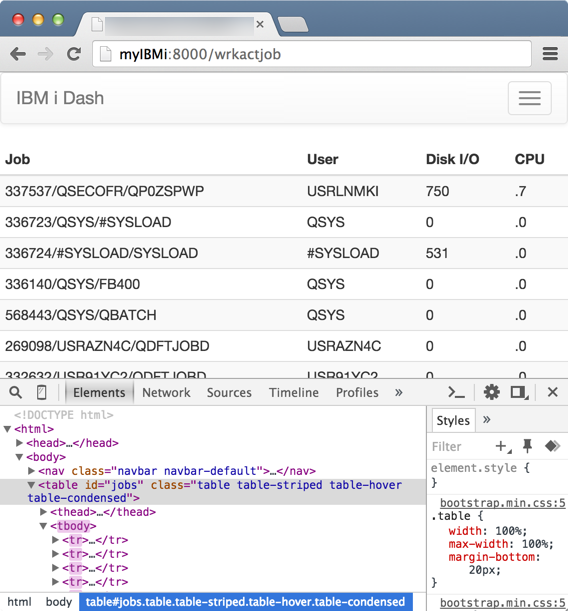
Figure 4 shows the application running. A still image doesn't really do it justice. The entire table actually updates every two seconds, which is pretty cool! At the bottom of Figure 4 is the Chrome developer console with the Elements tab displayed. In this case, the tbody and tr tags are highlighted because they were just recently updated.

Figure 4: iDash WRKACTJOB auto-updates the page.
In conclusion, there are undoubtedly many other DB2 for i Services that could make use of this same WebSocket scenario (e.g., NETSTAT_INFO). It's my hope that others in the community will take on my challenge to contribute additional features to this project!
What ideas do you have for enhancing the IBM i Dash project?
Let's start a conversation and talk through the possibilities! Reach me directly at


 Business users want new applications now. Market and regulatory pressures require faster application updates and delivery into production. Your IBM i developers may be approaching retirement, and you see no sure way to fill their positions with experienced developers. In addition, you may be caught between maintaining your existing applications and the uncertainty of moving to something new.
 IT managers hoping to find new IBM i talent are discovering that the pool of experienced RPG programmers and operators or administrators with intimate knowledge of the operating system and the applications that run on it is small. This begs the question: How will you manage the platform that supports such a big part of your business? This guide offers strategies and software suggestions to help you plan IT staffing and resources and smooth the transition after your AS/400 talent retires. Read on to learn:
LATEST COMMENTS
MC Press Online