Procedures are part of modules. A module can contain one or more procedures.
Editor's note: This excerpt is from chapter 3 of Evolve Your RPG Coding: Move from OPM to ILE ... and Beyond.
The previous chapters explored some theory. Now, it's time for some hands-on work. Let's leverage your OPM RPG knowledge with a simple and practical example of using procedures.
Here are just a few quick notes first, to avoid confusion:
- What I refer to here as a "procedure" is also known as a subprocedure, because for some, the term "procedure" applied only to the main program flow procedure, similar to an OPM program. I'll use the term "main program flow procedure" or "main program flow module" to refer to the latter concept.
- I'm presenting RPG code in fixed format until chapter 8, in which I'll help you, dear reader, make the transition (as smoothly as possible) to free format. Let's take one step at a time to keep things as simple as possible. After all, as I mentioned in the introduction, this is not a quick reference guide, but a "slow" one!
- You might notice that I use parameters in the procedures, but don't present or discuss the (many) keywords related to them. That's all going to be explained in a later chapter as well.
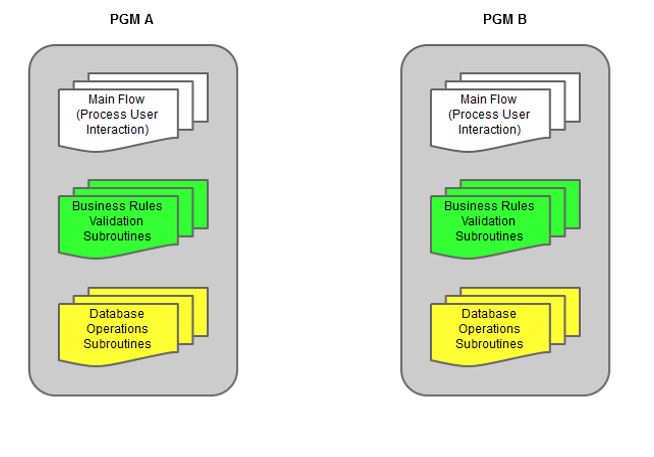
If you are an experienced RPG programmer, you might argue that the OPM scenario presented in chapter 1 and shown in Figure 3.1 is too old-fashioned and simplistic.

Figure 3.1: The traditional OPM scenario
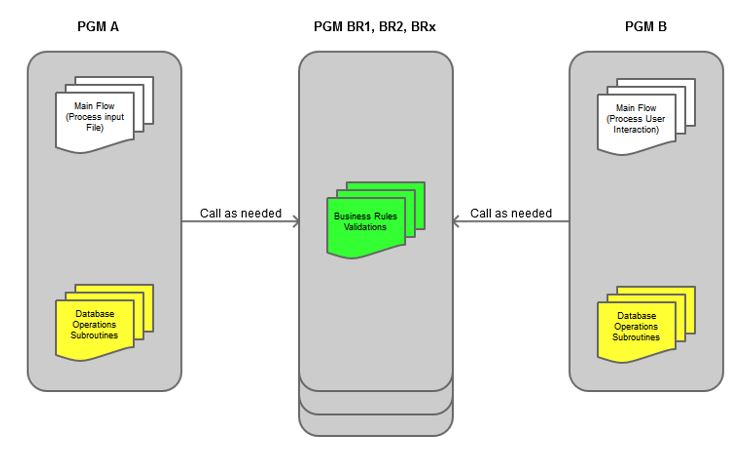
You are right, of course. Even in OPM, it's possible to avoid duplicating the same code over and over again in multiple programs. To be fair, a more accurate scenario would be the one depicted in Figure 3.2, in which the code related to business rules is isolated in several standalone programs (BR1, BR2, … BRx). These programs are called as needed by programs A and B.
Figure 3.2: An evolved, more current, and more realistic OPM scenario
How to Build Your First Procedure, Using Your OPM Knowledge
I'll use the more realistic and up-to-date scenario in Figure 3.2 as my starting point for the creation of a simple procedure. I'll stick to the scenario described in the first chapter: programs A and B both handle inventory, but they do slightly different things. While A imports inventory items from a cargo manifest CSV file, B handles the user inventory management via screen interaction. They both use some of the same business rules, which I've isolated into programs BRx in this new scenario.
Let's say that BR1, one of those programs, translates the supplier's item ID into the company's item ID. PGM A would call BR1 whenever it needs to import a new item, passing the external item ID and supplier ID codes, and receiving the internal item ID. This means that a PLIST would be defined in PGM A to call BR1 with the necessary variables:
C PL_BR1 PList
C Parm P_ExtItmID
C Parm P_SupID
C Parm P_IntItmID
The structure should be familiar, so let me just explain the parameter names:
- P_ExtItmId is the external (supplier) item ID.
- P_SupID is the ID of the supplier (just in case different suppliers use the same item ID for different things).
- P_IntItmId is the internal item ID that is returned by the program.
Now let's transform BR1 into a procedure, step by step.
To use a procedure, I need to "tell" the program how to call it, the same way I would do for a program. For that, I'll use something called prototype definition. This definition must be used in every program or service program that uses the procedure. Since the idea here is to reuse code instead of duplicating it, I usually create a source member in a separate source file, named QCPYLESRC, with all the module's procedure prototypes. I then include it in the program or service program where I need to use it, via a /COPY or /INCLUDE instruction. In fact, as you can see below, the prototype definition (shown as part of the QCPYLESRC/BR_INV_PR source member) is actually quite similar to PLIST:
* ----------------------------------------------------------------------*
* Prototype . : BR_INV_PR *
* Description : Inventory Related Procedures *
* Author .... : Rafael Victoria-Pereira *
* Date ...... : March 2014 *
* Changes ... : *
* ----------------------------------------------------------------------*
* ----------------------------------------------------------------------*
* Convert the External Item ID into the Internal Item ID
* ----------------------------------------------------------------------*
D CvtItmId PR
D P_ExtItmID 50
D P_SupId 256
D P_IntItmID 50
Then, all I need to do is include this definition in my program/service program, using either /COPY or /INCLUDE:
* Prototype definition for Inventory-Related Procedures
/COPY QCPYLESRC,BR_INV_PR
Later in this chapter, I discuss which to choose, depending on the situation.
Just a note about the procedure name: instead of BR1, I'm using a (slightly) clearer name for the procedure: CvtItmID. I like to use a verb to identity the procedure type ("Cvt" being short for "convert" in this case), followed by the subject ("Item ID"). You could argue that Convert_Item_ID would be even clearer (and you'd be right!), but it's important to avoid getting carried away with long names. Besides, Convert_Item_ID wouldn't "fit" in the space reserved for the function name in the D-line (although that's not really a problem). In the next chapter, you'll learn how to solve this "problem." For now, just keep in mind that you need to find the right balance between readability and maintainability. Excessively long names cost you additional time while coding. They also increase the chance of misspelling when you need to call the procedure (especially if you still use Source Entry Utility—SEU).
Speaking of calling, the way to call a procedure also differs from calling a program:
C CallP CvtItmID(P_ExtItmID : P_SupID : P_IntItmID)
CALLP is used instead of CALL, and the parameters follow the procedure name enclosed by parentheses and separated by a colon, just like in a built-in function. You can also use a slightly different notation, similar to a program call with parameters:
C CallP CvtItmID(P_ExtItmID :
C P_SupID :
C P_IntItmID )
OK, that's how the procedure is defined and called. Now let's see how to create it! Here's an example of a simple procedure structure, without the actual code:
*-----------------------------------------------------------------------*
* Convert the External Item ID into the Internal Item ID
*-----------------------------------------------------------------------*
P CvtItmID B EXPORT
D CvtItmID PI
D P_ExtItmId 50
D P_SupId 10 0
D P_IntItmId 50
C*
C* The procedure's code goes here
C*
P CvtItmId E
As I explained in chapter 1, procedures are part of modules. A module can contain one or more procedures. This means that the compiler needs to know where each procedure begins and ends. The P-lines you see above delimit the CvtItmId procedure. Note that the first P-line, which contains the procedure name (positions 7 to 21) also has the keyword EXPORT. This means that this procedure will be exported by the module with the CvtItmId. (Since RPG is case insensitive, you can and should use mixed case or some other form of writing to make names more easily understandable, but for RPG, it really doesn't matter.)
The EXPORT keyword means that this procedure will be available to the programs and/or service program that are bound to this module. This line also has a "B," indicating the beginning of the procedure. Similarly, the other P-line, which ends the procedure, has an "E" in the same position, thus telling the compiler that the code of the procedure is contained between the two P-lines.
Everything in between the P-lines is somewhat similar to a standard OPM program. I say "somewhat similar" because right after the beginning of the procedure comes the procedure interface (PI). The D-lines shown here are used to define the procedure's parameters, just like an *ENTRY PLIST would in an OPM program—and just like in an OPM program, you don't need to specify a procedure interface if your procedure doesn't have parameters. However, you should always include a PI line for consistency between procedures.
Note that this list begins with a D-line that repeats the procedure name and has "PI" in positions 24-25. Having the procedure name in the PI line is optional, but I recommend that you always specify the procedure name with your procedure interface because it makes it easier to create the prototype definition for the copy member. You simply copy the "PI" block of lines to the respective member in QCPYLESRC, replace the "PI" with "PR," and you're done! This line marks the start of the procedure interface. Also, note that the D-lines don't have the usual "S," "C," or "DS" in positions 24-25 for the definition type because they are part of the prototype interface. It's also possible to define variables within a procedure (more on this later); these variables would be defined using the usual notation in positions 24–25 ("S," "C," or "DS").
Finally, there would be a bunch of C-lines containing the actual procedure code, just like in a regular OPM program. One of these lines would assign a value to P_IntItmID, thus allowing the procedure to return the internal item ID to the calling program, just as it would in an OPM program.
Learn more with the book Evolve Your RPG Coding: Move from OPM to ILE ... and Beyond.
.


 Business users want new applications now. Market and regulatory pressures require faster application updates and delivery into production. Your IBM i developers may be approaching retirement, and you see no sure way to fill their positions with experienced developers. In addition, you may be caught between maintaining your existing applications and the uncertainty of moving to something new.
 IT managers hoping to find new IBM i talent are discovering that the pool of experienced RPG programmers and operators or administrators with intimate knowledge of the operating system and the applications that run on it is small. This begs the question: How will you manage the platform that supports such a big part of your business? This guide offers strategies and software suggestions to help you plan IT staffing and resources and smooth the transition after your AS/400 talent retires. Read on to learn:
LATEST COMMENTS
MC Press Online