


Rational Developer for the IBM i makes programmers more productive, and this technique is one way to make Rational more productive!
I use Rational Developer for the IBM i (RDi) a lot. I use it every working day, and I can't imagine trying to program without it. On those occasions when I am forced to rely on SEU, I find my fingers flailing away at key combinations that I use almost without thinking in Rational and muttering a bit under my breath. But even when using Rational, I'm always looking for new shortcuts to make my life easier. I'd like to share one that has begun to really save me time and has great potential for expansion as time goes on.
Templates as Time-Savers
RDi has a little-used (by me, anyway) feature called a template that hearkens all the way back to WDSC. The template concept is actually quite common in most other languages, but it really hasn't lent itself well to RPG. That may be at least partially due to the columnar nature of RPG prior to free-form syntax; because they sometimes substitute text, template techniques are more suited to free-form coding than fixed columns. But now that we do have free-form RPG in all specifications, I think you may find a lot more use for templates in the future.
A template is in essence a predefined chunk of code that can be easily inserted into your program source. RDi has two varieties of predefined code: templates and snippets. Snippets are more complex and in some ways more powerful; I'll leave them for another day. Templates are very simple: you specify the code that will be inserted and also define where you want the cursor to be positioned within that chunk of code. The cursor positioning comes in handy with multi-line templates that have some common lines at the beginning. I'm going to use a single-line template for the purposes of this article, so the cursor isn't as important.
Let's walk through adding the template first so you can see how it's done. First, bring up the Preferences panel. If you're unfamiliar with Preferences, you need to get familiar with them; they're the primary way that you can configure RDi to work the way that best suits you. Using the main menu, select Windows > Preferences to bring up the panel in Figure 1.
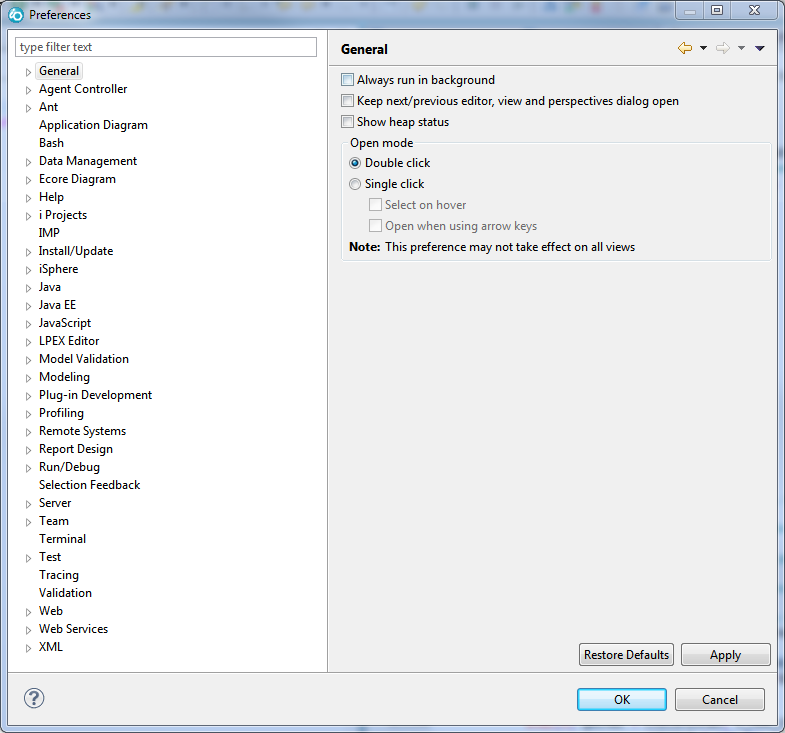
Figure 1: This is the Preferences window, the place where you configure all of RDi.
In another article, I'll introduce you to many of the more important preferences and also explain how to navigate the Preferences panel when you’re trying to find something. But for expediency, I'll just tell you how to get there: expand Remote Systems; then, below that, expand Remote Systems LPEX Editor, then IBM i Parser, then finally ILE RPG. Then click on Templates, and the dialog will look something like Figure 2 (you may have to resize the window to make it match my example).
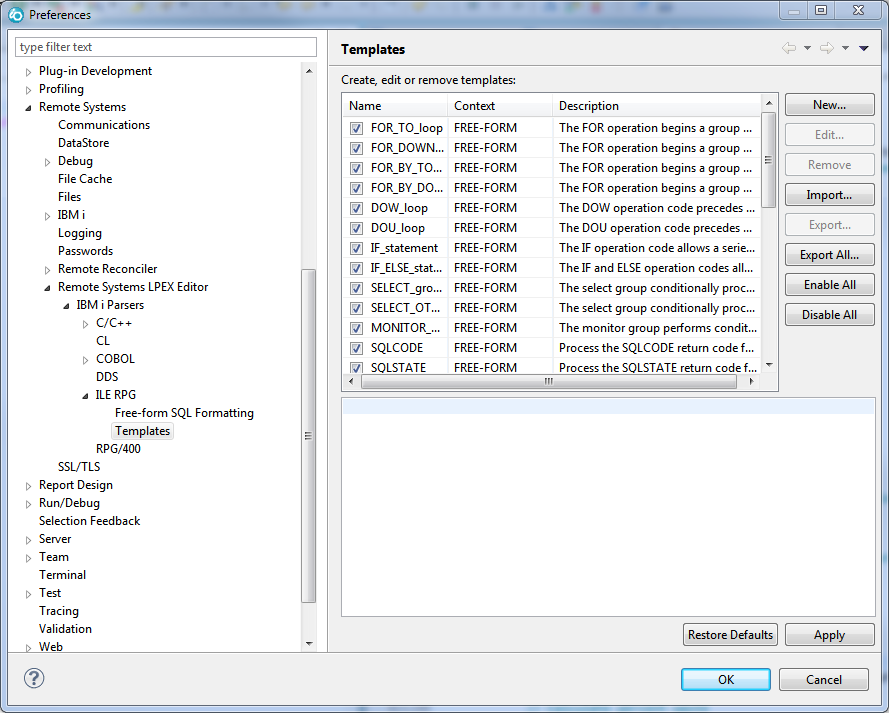
Figure 2: A bit of drilling will take you to the ILE RPG Templates page.
Now you can add a template. Notice I'm not yet telling you a lot about what templates do: that will come in a moment. Let's get this one entered. Hit the New button to bring up the New Template dialog.
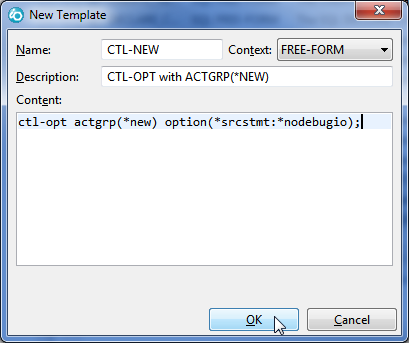
Figure 3: This is the New Template dialog with the values filled in for my CTL-NEW template.
The dialog will be mostly empty with the Context set to FREE-FORM. Fill in the values for Name, Description, and Content as shown. The name is important: the first characters are used to find the templates, as we'll see in the execution example. You may recognize this as a completely free-form control specification (i.e., the specification formerly known as an H-Spec). Nearly every program I write has this specification, the only difference being the activation group. I use either *NEW or *CALLER. You may also notice the option(*srcstmt:*nodebugio) keyword; I use that in every program. The first value, *SRCSTMT, makes sure that error and debug messages always report the source code line number rather than the internal compiler line number that you only ever see in compile listings. The second stops me from having to step through every generated move when I CHAIN to a file in debug mode. Both make my life much easier when debugging.
As I noted, I use the *NEW/*CALLER technique; for more on that please refer to an article I wrote a while back on activation groups. That means that in addition to CTL-NEW, I should probably add a template for CTL-CALLER. You can do that exactly the same way.
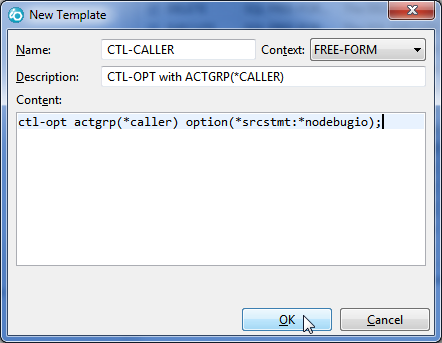
Figure 4: Use the same dialog to add another template, this time for ACTGRP(*CALLER).
I know that some people also like using named activiation groups. Let's do that so that I can show an example of the cursor-positioning keyword.
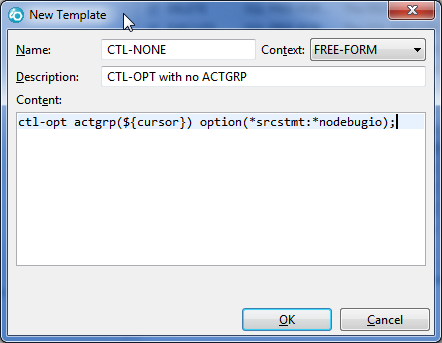
Figure 5: This version of the template uses ${cursor} to position the cursor after insertion.
The last template shows the use of the special value ${cursor} to position the cursor. We'll see how that works in the next couple of paragraphs as we actually use the templates in a new source member.
Using a Template
To use the new templates, create a new source member of type RPGLE (or SQLRPGLE; free-form RPG templates work in both types of source members). Position yourself in the first line as shown, type "CTL" and hit the universal content-assist key Ctrl+Space (that is, hold down the Ctrl key and press space).
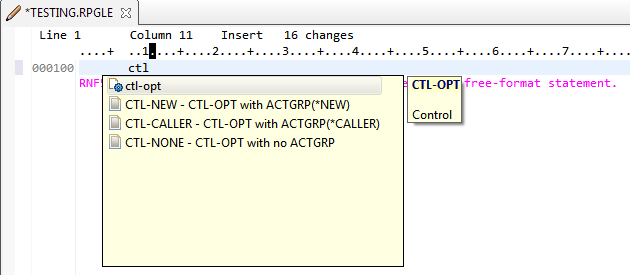
Figure 6: RDi searches its internal list and also the templates for something that matches what you've typed.
When you trigger content assist, RDi builds a list of things that match the characters you've typed. Content assist is actually a bit more intelligent than that and examines the entire line to find context for the search, but in this particular case you've only typed a few characters, so all it does is find them. It will search its internal list looking for things that match (which is why the first entry in the list is the ctl-opt keyword itself) as well as the templates. At this point, you can now select either the standard ctl-opt keyword or one of our predefined templates. If you select CTL-NEW, you will see the version with actgrp(*new). Let's pick CTL-NONE, though, to see what happens.

Figure 7: The template is inserted wth the cursor positioned for you to type in the activation group.
As you can see, the line is inserted but without an activation group (which causes the editor to complain). The cursor is positioned within the ACTGRP keyword so that you can type in the activation group and move on to the next line.
I hope you can see how much this can save you time. Not only does it insert the line quickly, it keeps you from having to remember the various keywords and their values (personally, I always have a problem remembering that the keyword is OPTION on the ctl-opt but OPTIONS on parameter definitions inside a DCL-PI). It's especially powerful when you tend to do the same thing over and over again.
I hope this gives you a taste of how templates can help your programming. We'll look at more time-saving features in upcoming articles.

Joe Pluta is the founder and chief architect of Pluta Brothers Design, Inc. He has been extending the IBM midrange since the days of the IBM System/3. Joe uses WebSphere extensively, especially as the base for PSC/400, the only product that can move your legacy systems to the Web using simple green-screen commands. He has written several books, including Developing Web 2.0 Applications with EGL for IBM i, E-Deployment: The Fastest Path to the Web, Eclipse: Step by Step, and WDSC: Step by Step. Joe performs onsite mentoring and speaks at user groups around the country. You can reach him at
MC Press books written by Joe Pluta available now on the MC Press Bookstore.
 |
Developing Web 2.0 Applications with EGL for IBM i Joe Pluta introduces you to EGL Rich UI and IBM’s Rational Developer for the IBM i platform. List Price $39.95 Now On Sale
|
|
 |
WDSC: Step by Step Discover incredibly powerful WDSC with this easy-to-understand yet thorough introduction. Now On Sale
|
|
 |
Eclipse: Step by Step Quickly get up to speed and productivity using Eclipse. Now On Sale
|

 Business users want new applications now. Market and regulatory pressures require faster application updates and delivery into production. Your IBM i developers may be approaching retirement, and you see no sure way to fill their positions with experienced developers. In addition, you may be caught between maintaining your existing applications and the uncertainty of moving to something new.
 IT managers hoping to find new IBM i talent are discovering that the pool of experienced RPG programmers and operators or administrators with intimate knowledge of the operating system and the applications that run on it is small. This begs the question: How will you manage the platform that supports such a big part of your business? This guide offers strategies and software suggestions to help you plan IT staffing and resources and smooth the transition after your AS/400 talent retires. Read on to learn:
LATEST COMMENTS
MC Press Online