Java can be a formidable language to learn. The APIs are numerous, the syntax can be complex and unforgiving, and object-oriented concepts may seem foreign to some. These obstacles can make it difficult for novice programmers to learn the language and can even frustrate experienced programmers looking for an easier and quicker way to create their applications. Now there's a solution to these problems: Create your applications visually with VisualAge for Java and JavaBeans. Novice programmers can create Java applications without having to learn the intricacies of the language, and both novice and experienced programmers can take advantage of the productivity gains achieved by using pre-built JavaBean components with visual programming techniques.
VisualAge for Java for Non-Programmers shows you how easy it is to build useful applications in a fraction of the time it would take to code by hand. Take, for example, the ToDoList application shown in Figure 1.
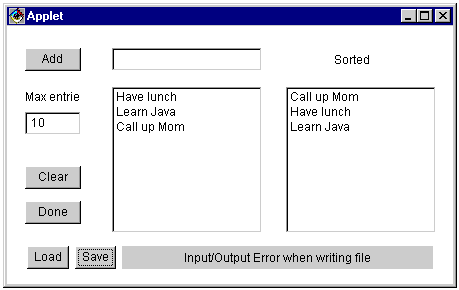
Figure 1: This screenshot shows the VisualAge for Java ToDoList application.
This ToDoList application contains basic user interface elements, such as buttons to trigger particular actions, text fields to enter data, scrollable list boxes to show the entries in your ToDoList, and file dialogs to select a file name. It also includes commonly used application functions, such as sorting data, reading from and writing to files, and handling program errors. But the thing that's different about this application is that it was created without writing a single line of code. Let me show you how it was done.
VisualAge for Java's Visual Composition Editor
VisualAge for Java is a full-function integrated programming environment for developing Java applications. It contains all the functions you'd expect for writing code by hand, but it also contains a powerful editor for creating programs visually, as shown in Figure 2.
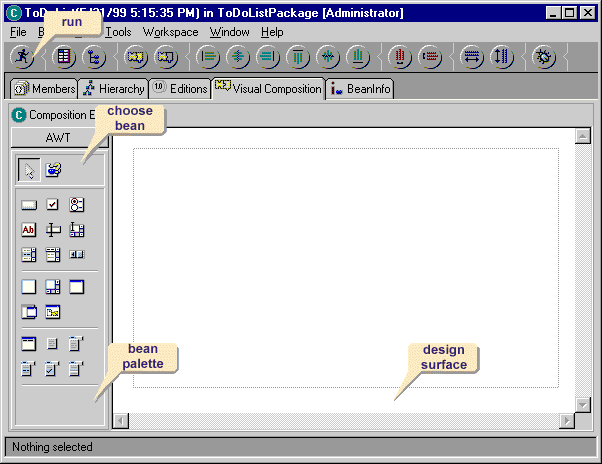
Figure 2: This screenshot shows the Visual Composition Editor.
At the left edge of the window are the bean palettes where you select the JavaBean components you want to add to your application. These can include user interface elements, such as buttons and text fields, as well as non-visual components, such as ReadFile and WriteFile beans. In the center of the window is the design surface where you build your application.
First, select the bean you want by clicking on it in the bean palette, and then drop it on the design surface. The dashed line shown in the design surface separates the visual portion of your application from the non-visual (logic) portion. So you would drop user interface components (buttons, text fields, and so on) inside the dashed area, and you would drop non-visual components (ReadFile, WriteFile, and so on) outside the dashed area. After adding the beans you want to the visual composition surface, customize their properties to set whatever values you want the beans to use (for example, setting a button's label). Finally, wire the beans together to tell them how you want them to interact (for example, when the user clicks on the Add button, move the text from the input text field to the scrollable list box).
And that's all there is to it: Select the beans you want, add them to the design surface, customize their properties, and wire them together. And, if you want to test your application at any point along the way, just press the Run button in the toolbar. VisualAge for Java will generate the Java code for your application and run the program for you.
JavaBeans: The Key to Visual Programming
Clearly, what makes visual programming possible are the JavaBean components that you use to build your applications. VisualAge for Java includes the complete set of user interface beans that are part of the Java programming language for both the Abstract Windowing Toolkit (AWT) and Swing. It also includes a set of DataAccess beans for working with databases. The CD included with VisualAge for Java for Non-Programmers provides all the other components you'll need to build the applications in the book, such as ReadFile and WriteFile beans, Drag & Drop beans, and an assortment of other user interface and helper beans specifically designed for visual programming.
Once you get hooked on visual programming, you'll want still more beans, and you can find them at numerous Web sites on the Internet, such as the Flashline and ComponentSource reseller Web sites.
Creating the ToDoList Application
Let's take a closer look at some of the steps to create the ToDoList application shown in Figure 1.
The first step to visually building an application is typically to add user interface elements to the design surface, as shown in Figure 3. In this case, you select a button, a text field, and a list box from the bean palette, and drop each of them on the design surface. Once you drop the elements on the design surface, you use the mouse to resize them to whatever sizes you want.
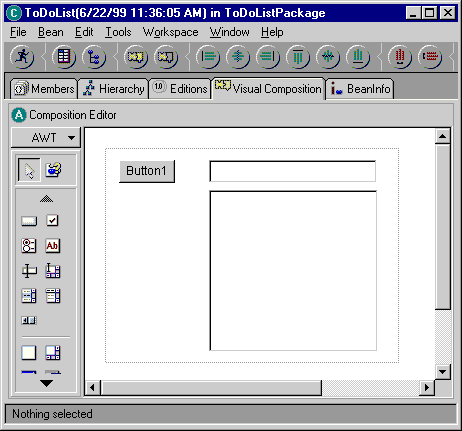
Figure 3: This screenshot shows the initial user interface elements for the ToDoList application.
The next step is to customize bean properties. This can include things like renaming the button bean to call it AddButton and setting the label that will appear on the button, as shown in Figure 4.
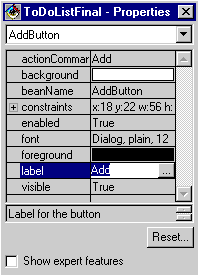
Figure 4: This window shows the property sheet for the AddButton.
Finally, you just wire the beans together to make them do what you want. For the initial wiring, you'll connect the button, list box, and text field components, such that when the user clicks on the button, the text in the text field will be added to the list box. You'll then wire in a little bit of housekeeping to clear the text field to blanks and to set the focus to the text field, so the connections at this point will look like Figure 5.
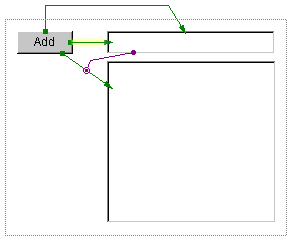
Figure 5: This shows the initial connections for the ToDoList application.
If you press the Run button in the toolbar at this point, VisualAge for Java will generate the Java code for your application and run it for you, as shown in Figure 6. At this point, you can test the application so far, and you'll see that when you press the Add button, whatever text was entered in the text field is added as an entry in the list box.
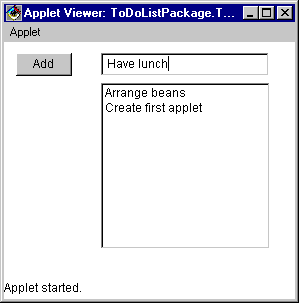
Figure 6: This screenshot shows the running ToDoList application with the initial visual elements added.
If you're curious to see what VisualAge for Java has done behind the scenes, you can click on the Members tab in the Visual Composition Editor. That will take you to all the lines of code that VisualAge for Java generated for your application. But then click back on the Visual Composition tab, because the great thing about visual programming is that you don't ever need to look at the code!
As you continue building the ToDoList application, you'll add more functionality, such as a Clear button to remove all entries from the list and a Done button to remove a selected entry from the list. When you add functionality to limit the number of entries that can be placed in the list, you now need your first non-visual component. This is the LessThan bean, a bean that compares two numbers and triggers an action based on the result of the comparison, as shown in Figure 7.
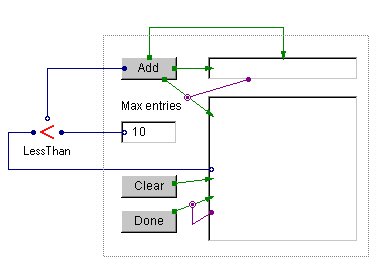
Figure 7: This shows the wiring for the Clear and Done buttons and for the LessThan bean.
Using the LessThan bean is just like using visual beans; you select the component from the bean palette and drop it on the visual composition surface, but you'll drop it outside the area for visual elements of your application. Its properties can be customized via the property sheet, and wiring is done to connect it with other elements in the composition, just as you did with the visual elements in the application. As you'd expect, the LessThan bean needs two input values. These can be set either by customizing properties in the property sheet or by wiring values directly to them, as you've done here. The first argument is provided by wiring the text value from the Max entries text field to it, and the second argument is provided by wiring the number of entries in the list box to it. The LessThan bean then compares these two input values, and the true/false result is wired to the Add button's enabled property. This automatically disables the button when the list box contains the number of entries specified by the Max entries text field, and it automatically enables the button when the number of entries falls below that limit.
The LessThan bean is clearly a very simple component, but it illustrates how easily you can add logic programs in the Visual Composition Editor. Take this concept a step further and add more complex logic, such as sorting the entries in the list box and placing the sorted entries in a second list, as shown in Figure 8.
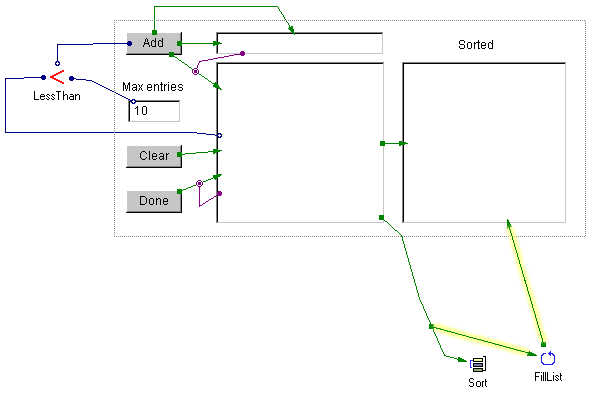
Figure 8: This shows the wiring for sorting the entries in the ToDoList.
For the connections in Figure 8, wire the entries in the first list box (an array of text strings) as input to the Sort bean. Assuming you've customized the Sort bean in its property sheet to perform an ascending sort, it passes the result (a sorted array of text strings) to another bean that iterates through the values to place them in the second list box. Quite a bit of processing for just a few connections to handle!
You could continue adding more and more function to the ToDoList application, but at some point the visual composition might get so complicated that it could be difficult to read. The solution to this problem is simple: Use the Visual Composition Editor to create a subcomponent for your application. In this case, you'll create a subcomponent for processing files that you can use in the ToDoList application and reuse in any other applications that might need this type of common processing. Figure 9 shows what a subcomponent such as this might look like.
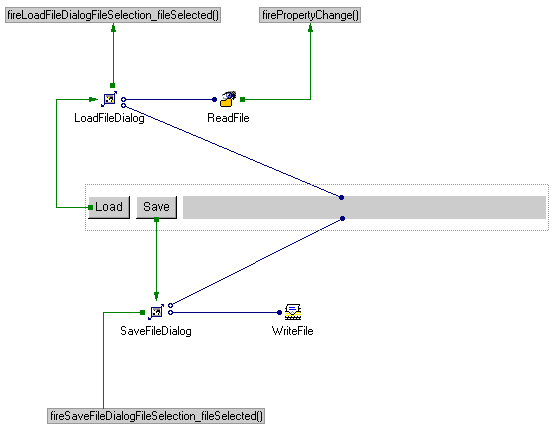
Figure 9: This shows the wiring for a subcomponent to process reading and writing files.
Just as with the main application, this subcomponent contains both visual and non-visual elements. The visual elements include a button to invoke file dialogs for selecting files and a label to display the selected file name. The non-visual elements include logic to process the file dialogs, read from the selected file, and write to the selected file. Once the subcomponent has been created, it can be used in the main application by selecting it from the bean palette and dropping it on the visual composition for the main application, as shown in Figure 10.
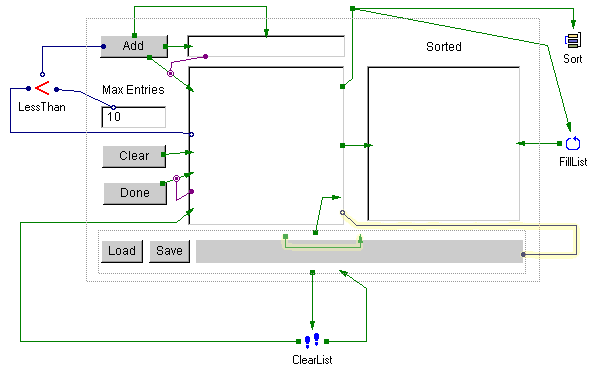
Figure 10: This shows the wiring for the ToDoList application with the subcomponent added.
After selecting the subcomponent from the palette and dropping it on the visual composition surface, it's wired to other elements of the application, just as with all the other beans. For example, when loading a ToDoList from a file, the connections cause the list box to be cleared to remove previous entries, and then the records read by the ReadFile bean in the subcomponent are added to it. When saving a new ToDoList to a file, the list box entries are passed to the WriteFile bean in the subcomponent, which writes them to the file.
Every application has something that can go wrong, and the ToDoList is no different. Errors can occur when reading from or writing to files, so you need to include logic in the application to handle errors, as shown in Figure 11.
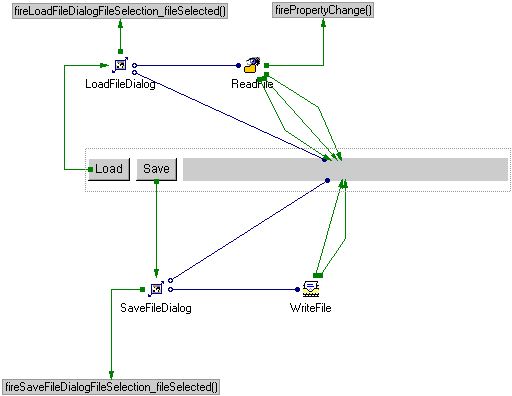
Figure 11: This shows wiring to handle errors in the file processing subcomponent.
Since the ReadFile and WriteFile beans were specifically designed for visual programming, they fire events whenever errors occur, and you can easily wire these events to other elements of your application to notify users that an error has occurred. In this case, you wire the error events to the label in the visual portion of the subcomponent so that the error messages will be presented to the user.
So, with this simple ToDoList application, I've shown that fairly complex processing can be done easily and quickly without writing a line of code.
Want to See More?
The ToDoList application used visual beans from Java's AWT, but you can also build applications that are Swing-based, as shown in Figure 12. Swing provides additional features, such as support for icons on buttons, tool tips, and customized cursors.
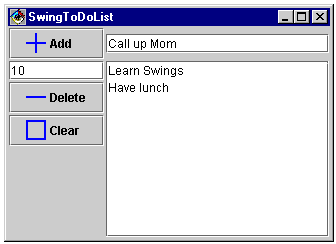
Figure 12: This screenshot shows the Swing-based ToDoList application.
As I mentioned, the power of visual programming lies in the beans you have available to use. Figure 13 shows an application that includes drag-and-drop capability. In this application, you can select text or colors from the Customizer frame, and then drag and drop those values to the main application frame--complex functionality all done without writing a line of code!
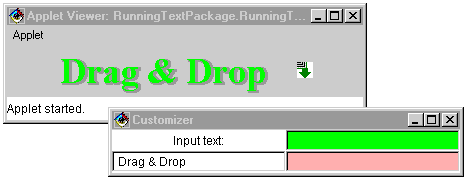
Figure 13: This screenshot shows an application that includes drag-and- drop capability.
Most modern applications have some form of database access, and you can create database applications visually with the DataAccess beans provided with VisualAge for Java, as shown in Figure 14.
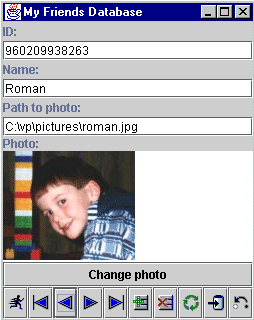
Figure 14: This screenshot shows a database application that keeps track of friends.
Conclusion
Java isn't just for programmers. Try visual programming with VisualAge for Java and JavaBeans, and see what you can create without writing a line of code.
Colette Burrus retired from IBM after more than 20 years of programming and project management. Her last assignment was project manager for the IBM alphaBeans project, working with the "JavaBeans Around the World" team. She coauthored VisualAge for Java for Non-Programmers and can be reached at the




 Business users want new applications now. Market and regulatory pressures require faster application updates and delivery into production. Your IBM i developers may be approaching retirement, and you see no sure way to fill their positions with experienced developers. In addition, you may be caught between maintaining your existing applications and the uncertainty of moving to something new.
 IT managers hoping to find new IBM i talent are discovering that the pool of experienced RPG programmers and operators or administrators with intimate knowledge of the operating system and the applications that run on it is small. This begs the question: How will you manage the platform that supports such a big part of your business? This guide offers strategies and software suggestions to help you plan IT staffing and resources and smooth the transition after your AS/400 talent retires. Read on to learn:
LATEST COMMENTS
MC Press Online