Although IBM does a much better job these days of providing documentation for installing WebSphere, it's still nice to see someone else doing it, and in the spirit of Weaving WebSphere, that's just what we're going to do today. I'll be installing WebSphere Express 6.1 from scratch, and you'll get the benefit of my mistakes!
Starting Out
Let's be clear. IBM documentation for installing WebSphere is light years better than it used to be. I will be using the online documentation from the InfoCenter, located here. For sake of brevity, I'll skip through some steps, but I suggest you follow each of the steps in order, especially the planning steps. It's a real pain to be halfway through an install only to find that you have to either download 4GB of fixes or else order them.
Also make sure you have allocated the time necessary. The order of steps is important, so time allocation is critical. For example, IBM recommends that you install the latest cumulative PTF package prior to installing WebSphere. Next, install WebSphere itself. Finally, install the WebSphere group PTFs. The steps must be executed in this sequence in order for all of the latest component to be installed. That of course leads you into the sticky area of whether you need to load the database and Hipers group PTFs before you load the cumulative PTF package, but I'll leave that to better minds than mine.
One thing I can tell you is that, when it comes to installing i5/OS software, you can't beat the image catalog concept. I'd like to put together a TechTip showing the steps for installing from an image catalog. I took notes during this process today.
Prerequisites
I'm going to condense this part quite a bit. Basically, make sure you downloaded or ordered all of your cumulative and group PTFs. Remember to include the WebSphere group, which should in turn include a lot of others. You want to end up with at the minimum the Hipers (high priority PTFs), database, Java, HTTP, and WebSphere, along with whatever else you feel you need.
Next, you have to install the cumulative PTFs. Depending on how you follow procedure, that may also include installing the Hipers and database PTFs. Evidently, there are sometimes cross-dependencies that can actually trash your machine if you're not careful. To be honest, I wasn't careful in this instance, and I loaded only the cumulative PTFs, but so far my machine has not crashed. I'll be loading everything else later.
OK, on to the fun.
Installing WebSphere
WebSphere Express V6.1 comes with lots of discs. Of those, you need exactly one to install WebSphere. That is the disk marked "WebSphere Application Server - Express V6.1 for i5/OS." Ignore all the others, which are supplemental code for other operating systems and who knows what else. The install disk above should be all you need for this part of the process. And remember, this article is an addendum to, not a replacement for, the IBM documentation I mentioned earlier. You should be using that to guide you, so, for example, you should have ensured that TCP/IP is enabled and your host servers are started prior to the next steps.
Note that there are three ways to install WebSphere. You can install it using command line options on the System i, or you can use command line options on a Windows machine, or you can use the GUI installer. I am going to use the GUI installer, even though IBM warns that it may take longer. I'm comfortable with the somewhat slower automatic technique as opposed to the manual approaches, which both require me to edit a "response file" to make the installation run. I would guess that these manual procedures are more suited to environments where you need to install multiple machines, since you can edit the file until you get it right and then simply re-run it over and over from a batch file. Me, I'm OK with getting prompted.
So stick the WebSphere installation disk it into the CD drive of your workstation and then navigate to it. You'll see something like this: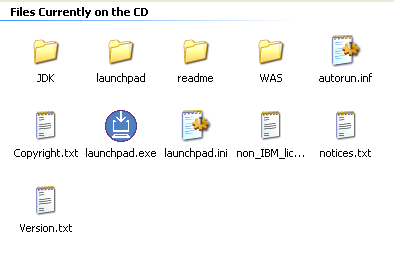
Figure 1: This is the directory for the installation disk. (Click images to enlarge).
Double-click on the launchpad.exe icon, and you'll see the WebSphere Application Server - Express installer. 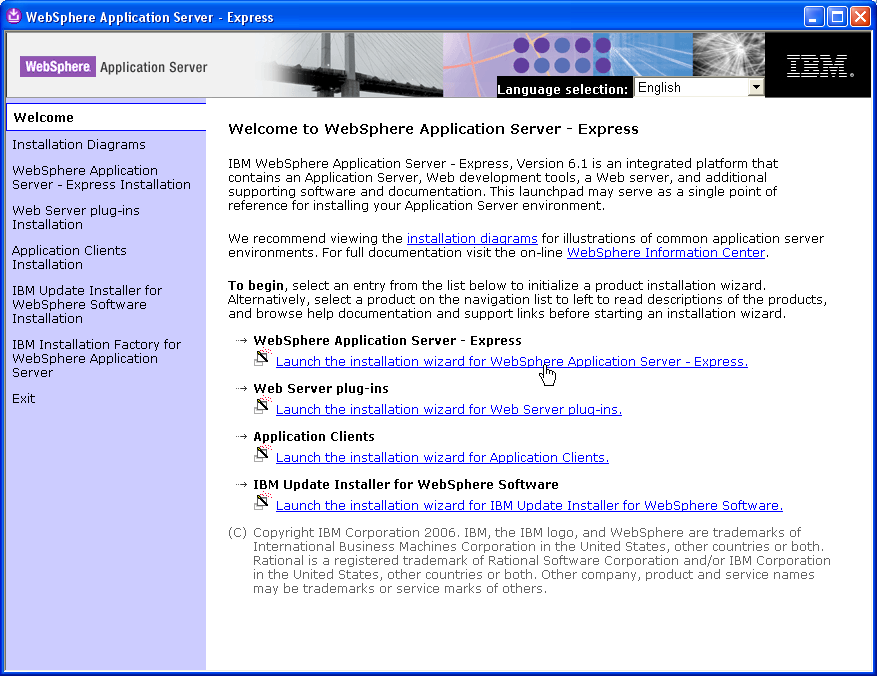
Figure 2: The installer has quite a few options; you will click on the installation wizard for Express.
Click on the option marked "Launch the installation wizard for WebSphere Application Server - Express" and you'll see a brief pop-up telling you the program is being loaded. (Please note that it can take a minute or so for the pop-up to first come up, during which time you don't get any status messages or anything. Be patient.) The pop-up will tell you it's initializing the wizard, and then eventually you'll see an installation prompt asking for your machine name as well as a user ID and password.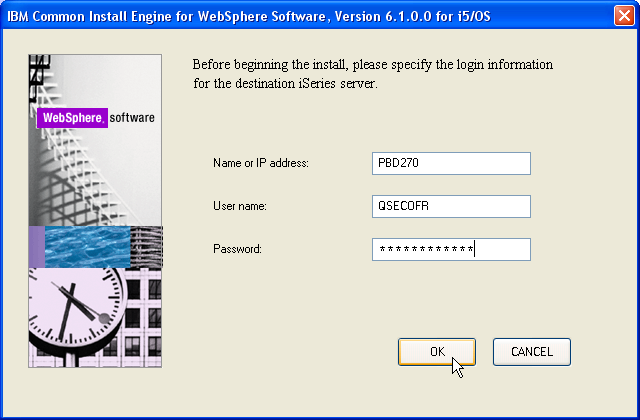
Figure 3: This is the initial connection dialog.
Once the screen in Figure 3 appears, type in the appropriate information and hit OK. I will be using QSECOFR for my installation, although my guess is you could use another profile as long as it has sufficient administrative authority. To be entirely accurate, I had a couple of problems getting the name recognized, and I actually ended up using an IP address rather than a name, as shown in the figure. You'll have to hit the Next button a couple of times and accept the license agreements, and then the installer will perform a diagnostic check. Be sure you have your host servers running (use the command STRHOSTSVR *ALL); this is spelled out in the installation procedures.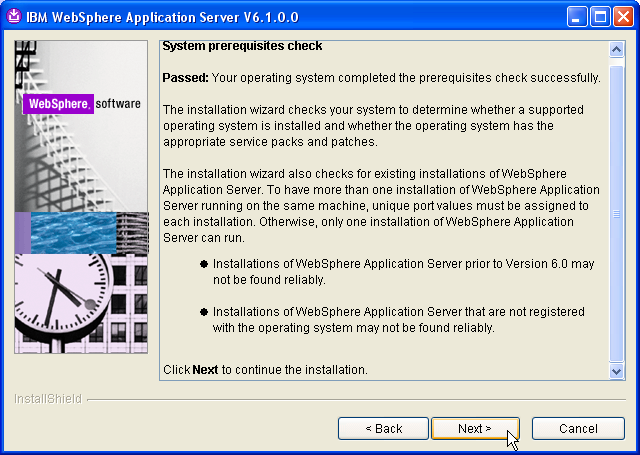
Figure 4: If your system is properly configured, you'll see this verification panel.
Figure 4 shows the dialog that will appear if your System i has the appropriate prerequisite software installed. Mine did, so I started walking through the screens.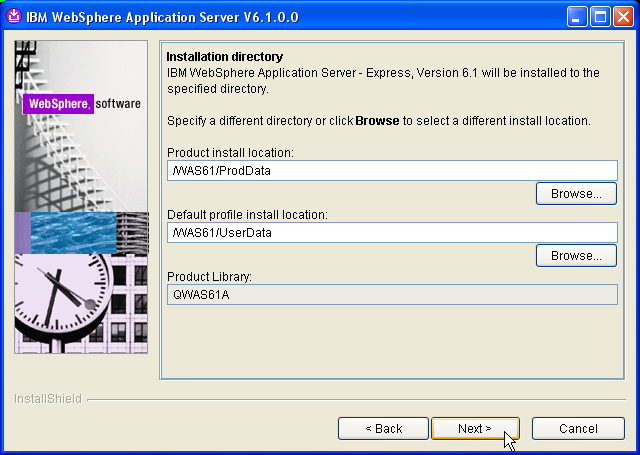
Figure 5: Here, you can update the installation directory! Hooray!
My single favorite feature is shown in Figure 5. If you've worked with WebSphere over the years, one of the primary complaints has been the complex and cumbersome directory structure that it was installed under. With this release, you can easily set up your own folders, which I did. I created a folder called WAS61, and then created folders ProdData and UserData underneath. The server software is installed in ProdData, and the configuration files and actual application software end up in UserData. The short, meaningful naming path will make it very easy for me to administer WebSphere, and for this simple change I give IBM huge kudos.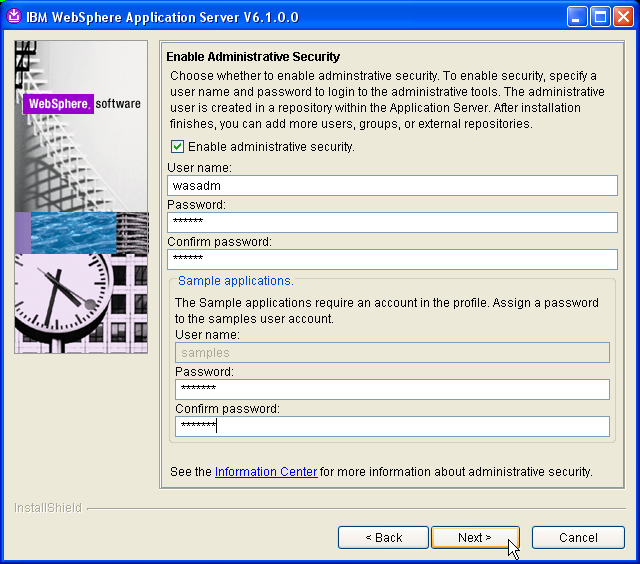
Figure 6: Configure security and install the sample application.
I had an issue with this panel. I had hoped to not have to secure the application, because it makes life a little more tedious in that you can't use the standard HTTP administration functions that you access via port 2001 on the System i; instead, you have to use something called the "Integrated Solutions Console," which has a lot more functionality but is a little more confusing, especially to a newcomer.
However, I got a little confused because, when I unchecked the "Enable administrative security" checkbox, it grayed out the user name and password information not only for the administrative ID, but also for the sample applications. I was worried that not enabling security might thus disable the samples, but now that I think about it, it probably would just have disabled security for the applications.
The point is that, if you're installing a development server for which security is not an issue, you might want to uncheck the security checkbox. It will make administration a little faster and easier.
After the installation, I started up the console in order to manage the application (since I can't manage it with the traditional HTTP administration interface on port 2001). So far, to my untrained eye, the integrated solutions console requires a lot more resources, and because of that, it's slower. The console also provides very little in the way of status messages, so it can be a bit frustrating. It probably works a lot better on a larger machine, but on a small System I, the response time is awful.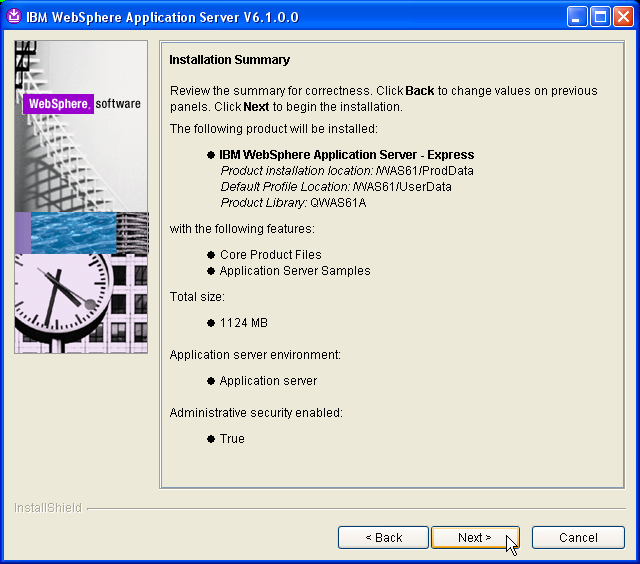
Figure 7: And here is your "Are you sure" notice. Review the options carefully.
Figure 7 shows one of the reasons I like an installation GUI, even if it does take a little longer. The next-to-last step is to review all of the choices you've made. Note that if you can't see everything because the default size of the dialog is too small, you can resize it like any other window, provided you have the room on your screen.
And Now We Wait
This is the part that can really take a while. To be honest, I went and took my little guy to the pool while this was going on, and by the time we got back, it was done, so all I can tell you for sure is that it took less than the 120 minutes IBM threatens you with in the documentation. You'll see a screen like the one in Figure 8.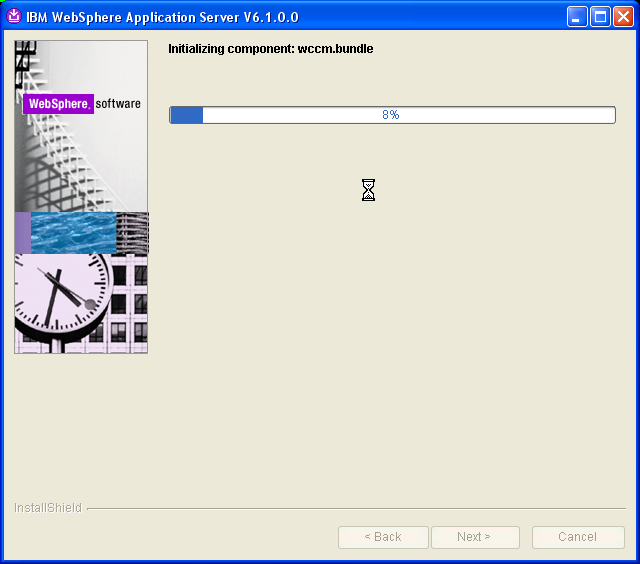
Figure 8: This is the ongoing status screen.
This process will go through a bunch of phases, starting with creating the uninstaller and continuing with initializing and installing components. The progress bar will creep along bit by bit, sometimes quickly and sometimes slowly.
And Finally, Verification
The last step is to verify your application server. This also takes a while, and once again, the interim status messages leave something to be desired. But the verification process does work if you give it time, and it's nice to know everything is in place before you start trying to debug your own applications.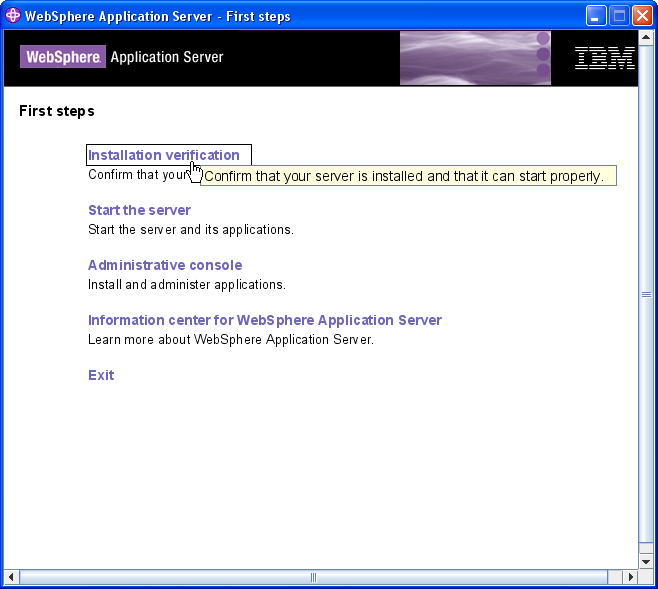
Figure 9: Next, you run the installation verification script.
Running the installation verification is straightforward. After the installation process is complete, a new browser window will appear entitled "WebSphere Application Server - First Steps" as shown in Figure 9. The first option on that panel is Installation Verification. Simply click on that option, and another browser panel will display.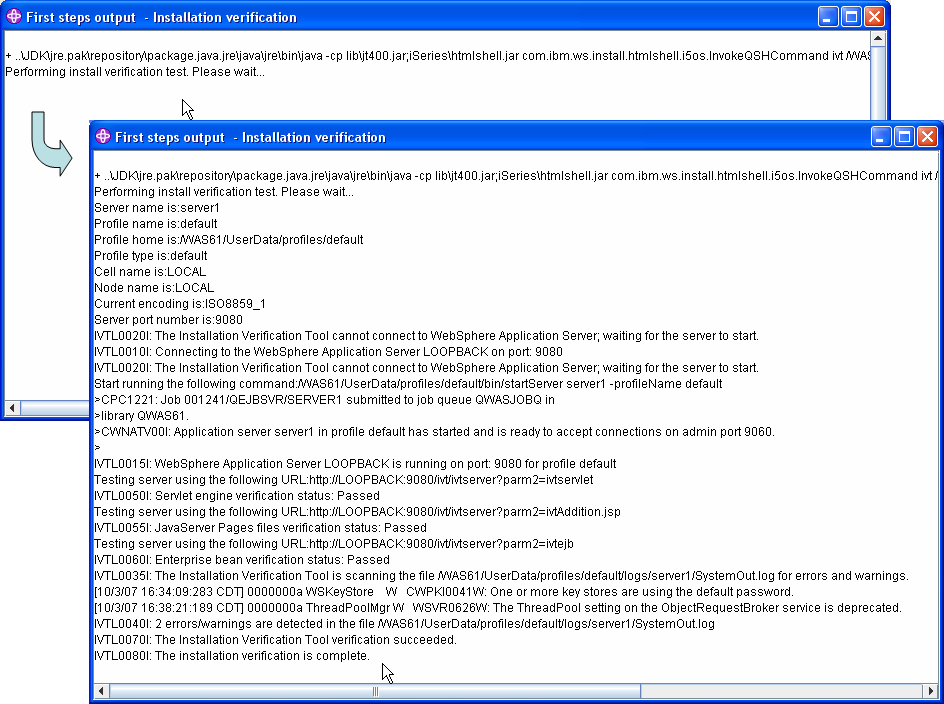
Figure 10: These are two stages of the installation verification process: running and done.
As I said, a new browser will appear like the one in Figure 10. It will tell you that it is performing the install verification test and will instruct you to wait. You'll then have an opportunity to take a nap, visit with loved ones, catch up on your reading, and so on. There will be no messages whatsoever for some time (I think my test took about 30 minutes) while the installation verification continues. Only after the entire process is complete will you see the messages above.
Among the things to be careful about: Be sure you can ping the name LOOPBACK. Simply go to a command line and type in PING LOOPBACK and be sure you get a good response. Because I failed to configure my TCP/IP properly, this didn't work, so my first hour or so of verification was wasted. After I fixed the configuration issues and reran the verification, I got the screens you see above.
You can keep track of the process by watching the log files. In my case, they're located in WAS61UserDataprofilesdefaultlogsserver1, so I can just wander in there and look at the logs to see what is going on. But you can also just be patient; the verification takes a long time but it's pretty self-sufficient.
Last Words
Well, my biggest problem is that I've been unable to actually run the applications with any degree of consistency. I'm going to uninstall the application server entirely and install a new server from scratch without administrative security, because I don't want to deal with the length of time required for waiting for the integrated console. The good news is that I'll be very comfortable with the installation process.
(Author's Note: I went back and uninstalled the product and reinstalled it without administrative security. Evidently, Murphy was not watching because everything I assumed was true, and it has indeed been easier to configure and work with the product and get not only the sample applications running but also my own applications as well. Administrative tasks are, however, still painfully slow with my machine. More on that another day.)
I dug my way through the configuration files—which were easy to find thanks to the simplified directory structure that this installation process allows—and determined how to start the sample application. The application came up once and then hung when I tried to refresh it, but since I'm still waiting on the console, I'm not certain that the console isn't tying everything up. The paging on my machine is simply through the roof, so I'm going to hold judgment until I get a cleaner setup in place. That of course leaves you a little bit in the lurch as to how to install your system, but at this writing, I'm going to tell people to configure their installations without administrative security, because the pain level is so high.
I should point out that in my logs (also easy to find thanks to the new directory structure), I'm seeing a lot of Illegal State Exceptions, which means that the sessions are hanging. I'm seeing a lot of timeouts, and I also see that my heap (the temporary memory used by Java) is getting too large. All of these combine to let me know that I'm doing something a bit naughty, and I suspect that a lot of this has to do with memory issues. I'm willing to upgrade my little 270 to 2GB, although it's rather expensive to do so, but that's all I should have to do to get acceptable performance—that and install the application without the administrative security.
Also note that the problems I had may be related to PTFs. Since the installation process recommends installing PTFs after installing WebSphere, some of the issues may have gone away after I installed the group PTFs, but since I don't have the luxury of trial and error when it comes to PTF installs, I'm just going to uninstall the server and reinstall. I'm not in the business of reviewing the administration console, anyway.
I will say this: If IBM is serious about the SMB market, then they absolutely need to have a program in place where they test these products on their low-end machines. Mom-and-pop shops don't care how well the application runs on a Model 595; they want to know how it runs on an entry-level 515. Otherwise, they're going to be forced to move WebSphere onto cheaper Wintel hardware, which then becomes the foot in the door to ease the System i out completely.
Of course, I'd be happy to do it for them... and my rates are reasonable!


 Business users want new applications now. Market and regulatory pressures require faster application updates and delivery into production. Your IBM i developers may be approaching retirement, and you see no sure way to fill their positions with experienced developers. In addition, you may be caught between maintaining your existing applications and the uncertainty of moving to something new.
 IT managers hoping to find new IBM i talent are discovering that the pool of experienced RPG programmers and operators or administrators with intimate knowledge of the operating system and the applications that run on it is small. This begs the question: How will you manage the platform that supports such a big part of your business? This guide offers strategies and software suggestions to help you plan IT staffing and resources and smooth the transition after your AS/400 talent retires. Read on to learn:
LATEST COMMENTS
MC Press Online