MC Press has brought you a number of highly informative and well-written columns on the hot topic of virtualization, including "Have You Caught the Virtualization Buzz?" and "A Closer Look at IBM Virtualization Tools," both by Connie Cradick. (If you haven't gotten a chance to read these, please take the time to check them out; they're really mandatory reading in this age of heterogeneous networks.)
Virtualization on the Desktop
In the first article, Connie mentions a product called VMWare. As it turns out, this piece of software is nothing short of incredible. It's almost mind-boggling: I can download a free server component for nearly any operating system. I can then use that server to create a virtual machine into which I can install just about any other operating system. This lets me, for example, run a Linux distribution inside a Windows machine without rebooting. Or vice versa! The opportunities are nearly limitless.
In fact, I found myself in an interesting situation. I had to create a virtual machine running on Windows Server 2003 Enterprise Edition (64-bit x86 architecture) that would run a 32-bit version of Windows. As it turns out, VMWare was up to the task.
Why Bother with This?
Well, here's the problem. When I talked to sales and explained that I would want to put in my own graphics board, they told me that would be no problem. And don't get me wrong; the people who helped me put my System x together were great folksm and the box itself absolutely screams-provided you do only what IBM expects you to do...which is evidently nothing involving anything but the most rudimentary graphics. You can't put in a new video card, and even though the onboard graphics that come with the box will support reasonably high resolutions, they are purposely crippled by the IBM-supplied drivers to a maximum resolution of 1024x768 (they say they require this in order to allow remote terminal support, but that's a pretty lousy design "feature").
But this is what really got me: After I got the machine and I asked technical support how to add a new video card, they were completely mystified as to why I would do such a thing. When I explained that I wanted a single machine to serve both as my primary network server and as a really powerful workstation, I was told that I was not using my machine as it was intended! I am not particularly fond of companies telling me how to run my business; as far as I'm concerned, I bought the machine and I ought to be able to use it however best suits my business.
But nattering about it won't make a difference. I'll protest with my checkbook: I will be getting a custom workstation from another vendor with more horsepower for less money, but that's another story for another day. So let's cut to the chase: During my attempts to save the System x from being turned into a very expensive headless server, I found one disturbing issue with WDSC (and as it turns out, probably Eclipse as well, although I haven't done the necessary research on that front).
The problem is that WDSC 7 does not work on 64-bit versions of Windows. I don't know if all 64-bit versions of Windows are affected, but I do know that my standard Windows Server 2003 Enterprise Edition 64-bit x86 architecture won't even install WDSC 7. The Installation Manager gets a nasty low-level SWT error (SWT is the UI package for Eclipse), and the rest, as they say, is misery. The particularly annoying part of all this is that WDSC 6 works just fine on this machine! It's only WDSC 7 that fails.
And lest you think it's just me and that somehow I corrupted my copy of WDSC- something that I was entirely willing to accept, mind you-I installed the same software on (of all things) my game machine, where it runs quite well, thank you. No, the problem seems to have something to do with Eclipse 3.2 and particularly the fact that the SWT software for Eclipse 3.2 has not been ported to 64-bit Windows, and there is no plan to do so.
So Back to the Show
Setting up a virtual machine is actually very easy. If there's enough interest, I can do another column showing each of the steps in my typical meticulous detail, but for the purposes of this article, let me just point out a few highlights.
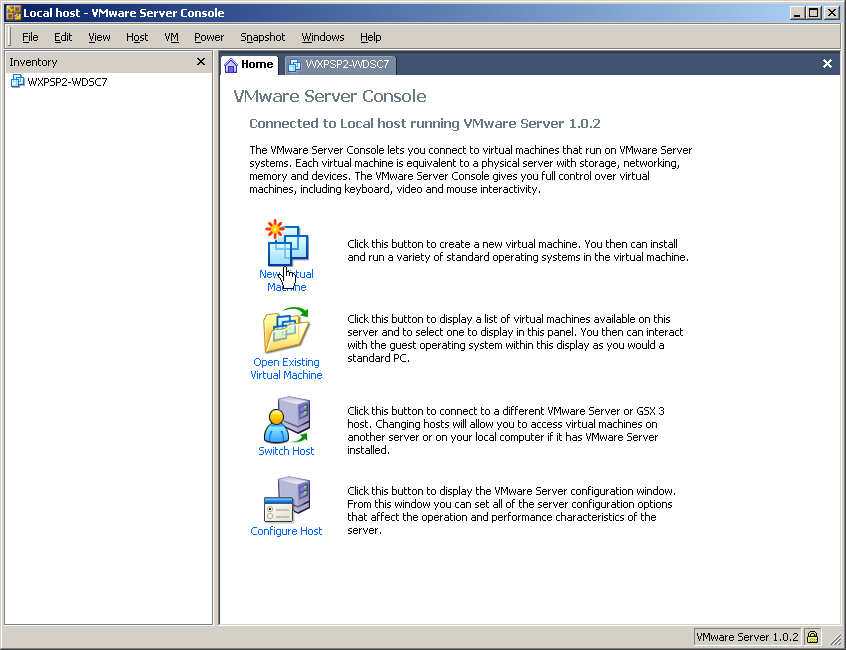
Figure 1: This is the VMWare Server Console. (Click images to enlarge.)
You start at the console, as shown in Figure 1. There's actually an initial startup screen that's not shown here; it allows you to run and edit virtual machines you have stored locally or from a host on the network. I always use the local option. The console allows you to do a lot of different things, but the very first thing you'll probably want to do is create a virtual machine. Hit the New Virtual Machine button as shown and you'll get to Figure 2.
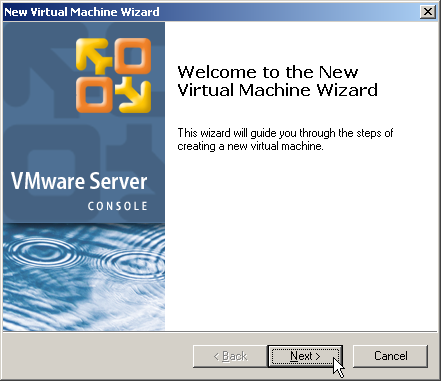
Figure 2: This is the initial Wizard screen.
This is a standard wizard, designed to "guide you through the steps of creating a new virtual machine."
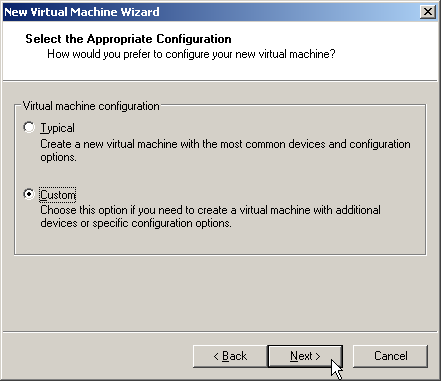
Figure 3: Here, you make your first decision--Typical or Custom?
About 99% of what you need is defaulted in the Typical configuration. However, I do want to point out one specific screen that is available in the Custom configuration: the memory allocation screen. Note that this screen is also available after you have created the virtual machine; it's just convenient to do it right away.
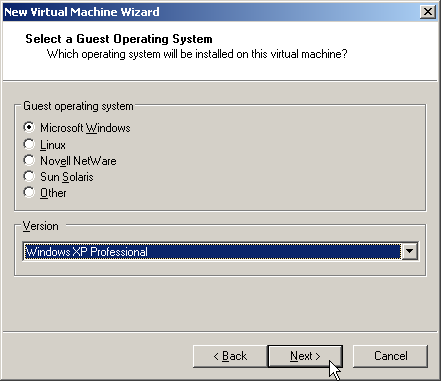
Figure 4: You select your operating system here.
There are a number of issues with which operating system you choose to use. For all intents and purposes, Microsoft sees each of these virtual machines as a new install and you need at some point to enter that big old Microsoft key. As an added twist, creating an XP virtual machine causes the Windows XP 60-day activation cycle to kick in. I haven't spent enough time with the tool to quite figure out all of the ramifications. For now, I would be a little uncomfortable shipping out fully configured virtual machines containing Windows operating systems using my keys.
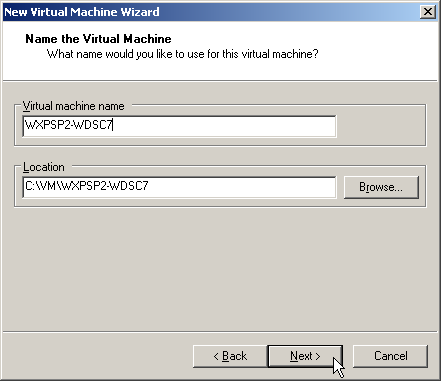
Figure 5: Here, you define the name of your machine.
I have a tendency to avoid long path names because of some really bad experiences with WebSphere and WDSC in early releases. Instead, I like to create root folders on the C: drive for related objects and then store all of them together. In this case, I created a folder called "VM" for Virtual Machines and then put each new virtual machine there. The Location field in the dialog in Figure 5 will trigger VMWare to create a new folder with that name and store all the information for the new server in that folder.
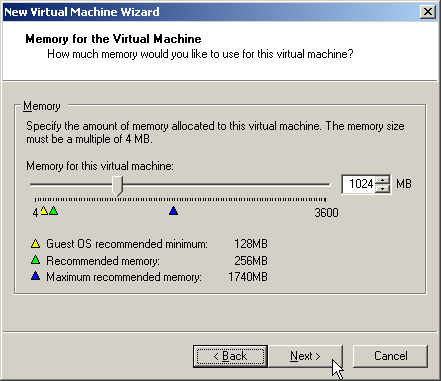
Figure 6: This is the only reason I use the Custom configuration option.
The default for a virtual machine is 256MB. That's just not a whole lot of memory these days, especially for a Java-based application. For WDSC, I like to have at least 1GB. It seems, though, that with WDSC 7-and especially WebSphere Application Server (WAS) Version 6.1-that 1GB may actually be sufficient for most development and testing. This was definitely not always the case when testing Web applications with WAS 6.0.
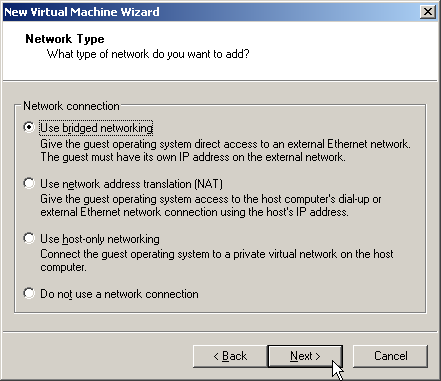
Figure 7: As long as your card supports multiple IP addresses, this is the way to go.
I have to be honest: I haven't tried any of the other options on this dialog. My NIC cards all support multiple IP addresses, so bridged networking is by far the easiest. Just remember that after setting up your Virtual Machine, you have to go into your network properties and set the LAN address for your machine. You can probably even use DHCP to get your address, but that seems a little shaky to me, since there's a Media Access Control (MAC) address involved, and at that point I start to get confused. VMWare just makes up a MAC address.
But since Windows uses the MAC address as part of its validation scheme, you have to ensure that any machine for that copy of Windows uses the same MAC address. And in fact, the number is generated when the system starts up. The VMWare knowledge base contains an article detailing the way to stop the auto-generation of MAC addresses and to manually assign one instead.
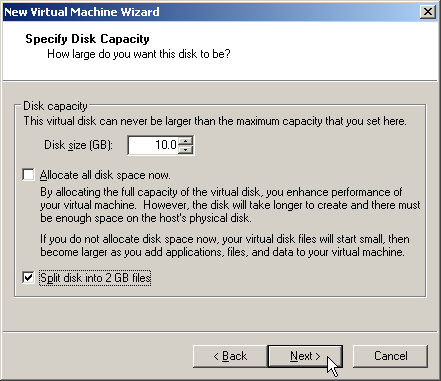
Figure 8: This is a very important dialog, as none of its settings can be maintained.
The Specify Disk Capacity dialog is perhaps the most important of the dialogs in the New Virtual Machine wizard. All of the settings on this page are permanent; they cannot be changed once the virtual machine has been created.
Based on my understanding of the product, I can make recommendations on two of these settings: the size and the "Split disk into 2GB files" option. For installing a full-blown WDSC 7 Advanced Edition environment, you should specify 10GB. Clearly smaller installations, such as Standard Edition or an "RSE only" version geared towars pure green-screen development, will require less space. By splitting disks into multiples of 2GBs apiece, you can copy the entire folder to another drive (without it, you may get strange errors when you attempt to copy the folder).
The one I'm less certain about is the "Allocate all disk space now" setting. I've been advised by people who know the tool much better than I that it's probably a good idea to make sure this box is unchecked; the system will then allocate more of the host disk as the virtual machine's disk requirements grow, on up to the amount specified in the disk size setting. The idea is that you can run tasks that require temporary disk space, which will cause the virtual disk file(s) to grow in size. Once that space is no longer needed, you can "defragment" the virtual disk, which will actually shrink the files down to the lower size.
A good example of this is the WDSC 7 install itself. A typical WDSC 7 install may require two or more gigabytes of temporary storage during the installation process. So it seems to make sense to let the disk space usage expand during the installation process and then defragment the virtual disk after the installation is complete.
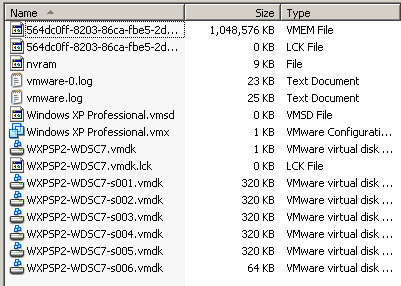
Figure 9: This is a list of the files created for the system.
I'm running out of room for pictures here. Figure 9 shows the contents of the virtual machine directory while the system is running. The VMEM file, which represents the virtual machine's RAM, is fully allocated to 1GB, while the VMDK files are each at a very small 320KB. I found that when you use dynamic disk sizing, the files don't actually grow until you "power off" the virtual machine.
This is what you would copy to another machine if you wanted to save a virtual machine. My only concern is what happens to VMWare when one of these folders is deleted. From what I've seen so far, the VMWare console thinks the virtual machine is still available, although I'm sure the console would object strenuously if I tried to start the virtual machine.
At this point, you will be able to power up your virtual machine. The next step is to "install" the operating system into the virtual machine. Usually this works quite easily: Just put the install disk into the CD drive of your machine and then power on the machine. It's kind of freaky; you get the whole startup sequence that you normally see when you turn your machine on. You may even see BIOS startup messages in the virtual machine display; it takes a little getting used to.
But the virtual machine should then attempt to boot off the load disk, and from that point on, it's a standard installation.
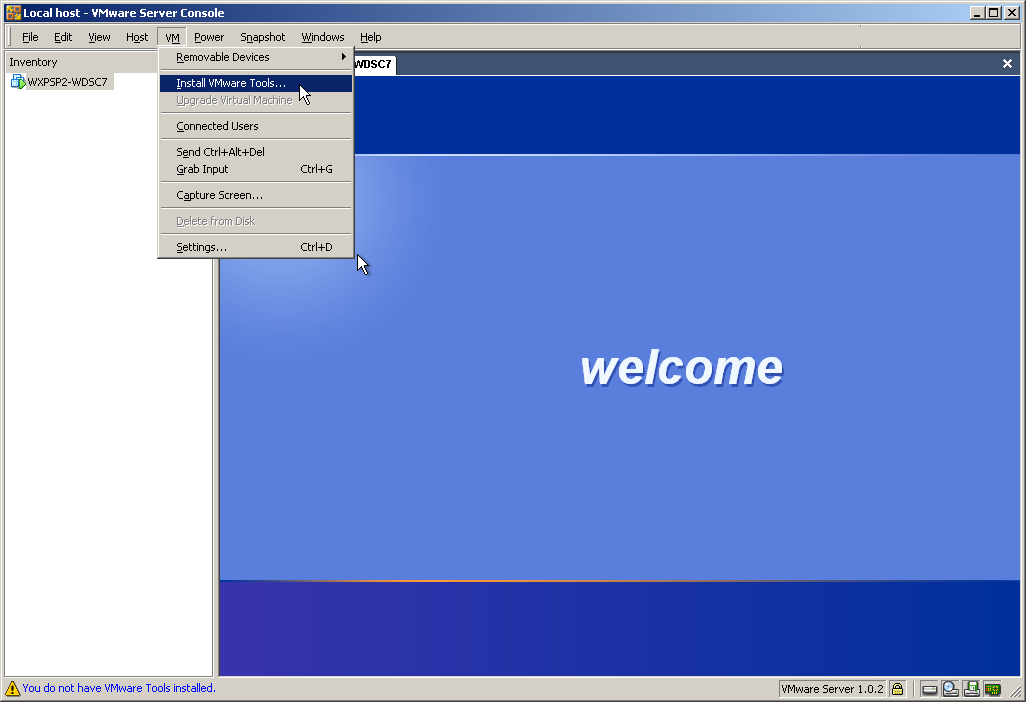
Figure 10: Make sure to install the VMWare Tools.
Once you've finally installed your OS and gotten it running, the last VMWare-specific activity is to be sure to install the VMWare Tools. This is a small set of drivers that manage to make the graphics a lot smoother. Once you've done that, your virtual machine is ready for anything you can throw at it.
So How Does WDSC Run?
As it turns out, WDSC 7 runs relatively well. Considering the fact that it's running on an operating system that is in effect being run inside another operating system, it's pretty amazing to me that it works at all. But work it does.
With a couple of caveats.
First, the console is not perfect. It does require some pixels, so the maximum size of your guest operating system desktop by definition needs to be just a bit smaller than the host operating system's desktop. And for whatever reason, I have yet to get full screen to work correctly. Most of the time, it simply reports that full screen is not supported, and the one time I did manage to get it to work (through a chance combination of resolution settings on both the guest and the host), it hung my machine. So I'm not particularly keen on trying that experiment again.
But other than that, the system runs fine. Not particularly fast, mind you, but fine. Let's compare:
System 1 (my recreational PC)
2.4GHz Pentium 4 processor, 1GB of PC2100 DDR RAM, an unremarkable 7200RPM 80GB IBM disk drive. In essence, your standard $500 game machine.
System 2 (my System x)
Dual 3.2GHz Xeon processors with 2MB L2 cache, 2GB of DDR2-400 RAM, three 15000RPM SCSI disk drives hooked up in RAID 5 with an external controller. A $3000+ behemoth.
| System Comparison | ||||
| First Time After Power Up | Subsequent Times | |||
| Workspace Prompt Appears | Workspace Loaded | Workspace Prompt Appears | Workspace Loaded | |
| System 1 | 7.0 | 19.0 | 1.5 | 7.5 |
| System 2 | 9.0 | 15.0 | 2.0 | 9.0 |
Conclusion? In general, the VMWare virtual machine running on the high-priced server machine actually runs WDSC 7 with usable performance. The graphics are a little shaky, there are noticeable hiccups in the screen refreshes, and the performance on scrolling is maybe 10% slower than on the other machine, but in general it's quite acceptable, considering what sort of magic has to be going on under the covers. While I don't think I'd recommend my particular Rube Goldberg setup to anyone, I do think that I may find an excellent use for this concept in running Linux partitions under the server.
Just a side note: With WDSC6 (a demonstrably slower product), the initial prompt comes up on the behemoth in a little over a second, and the workspace then loads in two seconds flat. What I wouldn't give to see WDSC 7 running on that machine. But the artificial limitation of the video adapter makes it no longer worth the hassles. It's time to put the machine to pasture as a headless server, as IBM intended.
Joe Pluta is the founder and chief architect of Pluta Brothers Design, Inc. and has been extending the IBM midrange since the days of the IBM System/3. Joe uses WebSphere extensively, especially as the base for PSC/400, the only product that can move your legacy systems to the Web using simple green-screen commands. He has written several books, including E-Deployment: The Fastest Path to the Web, Eclipse: Step by Step, and WDSC: Step by Step. Joe performs onsite mentoring and speaks at user groups around the country. You can reach him at


 Business users want new applications now. Market and regulatory pressures require faster application updates and delivery into production. Your IBM i developers may be approaching retirement, and you see no sure way to fill their positions with experienced developers. In addition, you may be caught between maintaining your existing applications and the uncertainty of moving to something new.
 IT managers hoping to find new IBM i talent are discovering that the pool of experienced RPG programmers and operators or administrators with intimate knowledge of the operating system and the applications that run on it is small. This begs the question: How will you manage the platform that supports such a big part of your business? This guide offers strategies and software suggestions to help you plan IT staffing and resources and smooth the transition after your AS/400 talent retires. Read on to learn:
LATEST COMMENTS
MC Press Online