It's important to know what your options are.
I have long been a fan of hardware virtualization, so when I purchased a new server to replace an aged one, I decided that it would be advantageous to make it a virtual host. The benefits of virtualization are now well-known to the IT community, and for my purposes, the biggest win is the ability to deploy new virtual servers quickly, while not having to make the two-hour trip to the co-location facility. What the heck? If hardware virtualization is good enough for cloud providers, then it should be good enough for me too!
I have a long history with virtualization, having employed the first version of VMWare Workstation for Linux way back around the beginning of the year 2000. I remember how entranced I was with that first installation. It was amazing to see another operating system running as a guest of Linux, particularly on a CPU that had no special provisions to keep virtual machines safe from one another. Virtualization has become an irreplaceable tool in my toolkit, as I'm sure it has yours.
My primary virtualization software over the years has been produced by VMWare, not because it's what I started with (we techies are not immune to the "imprinting" phenomena that plagues non-technical users) but because it has consistently provided a stable, reliable platform for my experimentation. I just wish that VMWare would have had a naming scheme for its products that was as stable and sane as its products have been. Ditto for the schizophrenic configuration and control schemes, with the company switching from custom applications that would run on Linux or Windows, to browsers, to custom applications that would run only on Windows. That move really perturbed me. As a result of this incessant upheaval, I flirted with some of the other virtualization options available, such as VirtualBox (a freebie that competes with Workstation) and the Linux native options Xen and KVM. VirtualBox has an easy-to-use interface and works well, but as I already had a license for Workstation, I found no compelling reason to switch. And Xen? Well, at the time I took it for a test drive, the GUI user interface was barely usable and the documentation required for configuring it via a text-base file wasn't quite ready for prime time, nor was the software itself. I've never been one to shy away from RTFM, but I'm not willing to invest large amounts of time for a product not yet fully baked when a perfectly good product is already available. I felt the same about KVM as I did Xen.
Given my preference for VMWare products, it would seem a slam dunk that I would use it for my new hardware. Normally, I would just reach for my VMWare install DVD and get going. But a recent encounter with Red Hat's virtualization offering at a client's company gave me pause to reconsider my choice. The last time I looked at it was on RHEL 5, and it was pretty polished then. Red Hat's RHEL 6, however, takes it to a new level. While my company uses the "real-deal" Red Hat, for my purposes on this server, I chose instead to use the premiere Red Hat respin, CentOS.
For my host partition, I want the absolute minimum needed to act as the host, so I installed a minimum CentOS 6. This is done by deselecting all packages during installation except "base system." Once the base is installed and booting, it becomes necessary to add additional packages and do some minimal configurations manually. Instructions can be found at HowToForge. I did note that those instructions assume that you have done a full desktop installation. Since my plans call for a minimal base system that will be operated headless, I issued the following commands to give me the necessary X11 tools and fonts:
yum groupinstall 'X Window System', yum install xorg-x11-fonts-100dpi.noarch xorg-x11-fonts-75dpi.noarch xorg-x11-fonts-ISO8859-1-100dpi.noarch xorg-x11-fonts-ISO8859-1-75dpi.noarch xorg-x11-fonts-ISO8859-14-100dpi.noarch xorg-x11-fonts-ISO8859-14-75dpi.noarch xorg-x11-fonts-ISO8859-15-100dpi.noarch xorg-x11-fonts-ISO8859-15-75dpi.noarch xorg-x11-fonts-ISO8859-9-100dpi.noarch xorg-x11-fonts-ISO8859-9-75dpi.noarch, yum xorg-x11-fonts-misc, yum install xorg-x11-fonts-misc, yum install xorg-x11-fonts-Type1
By going through all of this extra work, I can maintain my server remotely, via ssh. I have plenty of experience doing this kind of thing; for me it's no big deal. Newbies to Linux may wish to just bite the bullet and install a complete GUI system. It all depends upon your comfort level.
Once you've completed your installation and configuration per HowToForge, you're ready to create a guest instance and install the operating system. For demonstration purposes, I'll be installing a virtual instance of CentOS 5.
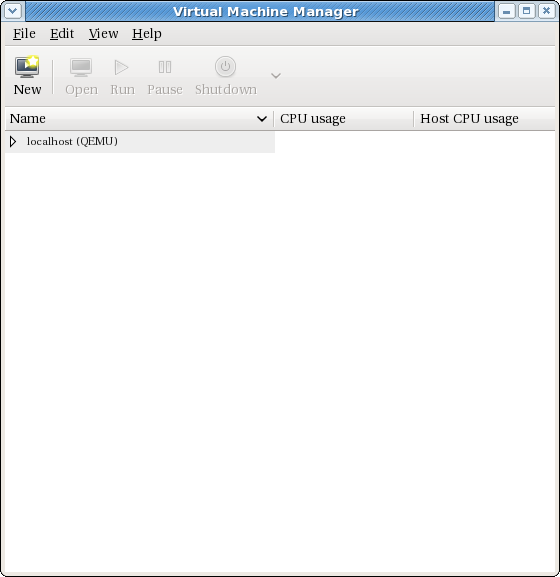
Figure 1: You start with the Virtual Machine Manager. (Click images to enlarge.)
Once you've fired up virt-manager, you get the screen that allows you to select "New" to create a new instance.
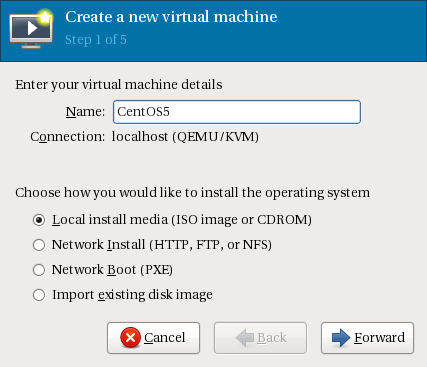
Figure 2: Create a new virtual machine.
Assign the instance a name. This will be the basis for the configuration file names stored on your system. In this case, I've chosen to use local install media for the installation.
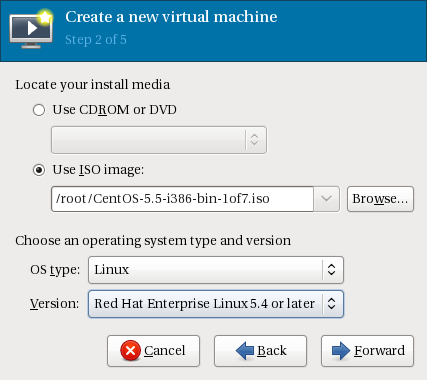
Figure 3: Indicate the source for your installation as well as the OS type.
I chose to use an ISO image that I downloaded from the Internet. I could have just as easily used a DVD, but the image file was handy when I was writing this article. The possible OS types include Generic, Linux, Windows, Unix, Solaris, and Other. The list of versions you'll get depends upon your OS selection, but of interest is that "Other" OSes include Novell Netware 4, 5, and 6 and MS-DOS.
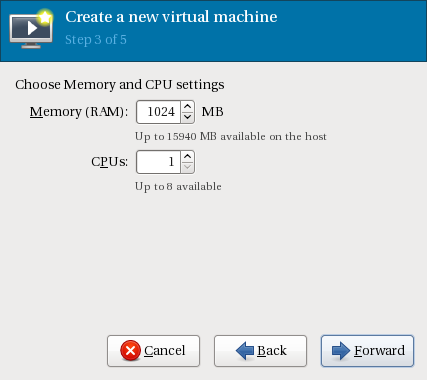
Figure 4: Indicate the amount of memory and CPUs you'll be giving to the machine.
This is pretty self-explanatory. The server I'm using has 16G of memory and a single quad-core processor with hyperthreading.
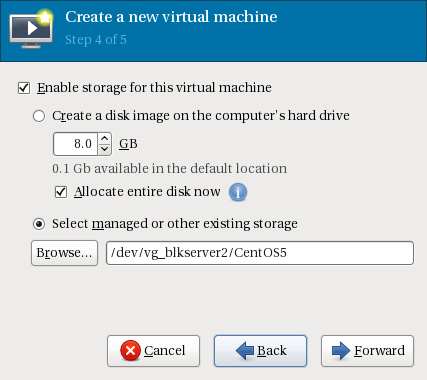
Figure 5: Now determine where the files representing your virtual machine will be stored.
You have a number of options for selection the location where your virtual machine will be stored. You can create a disk image as a file on the host system, pick a storage volume that can be created on a separate screen, or, as I did in this case, choose a raw partition. I created a logical volume for this purpose for reasons I'll discuss later.
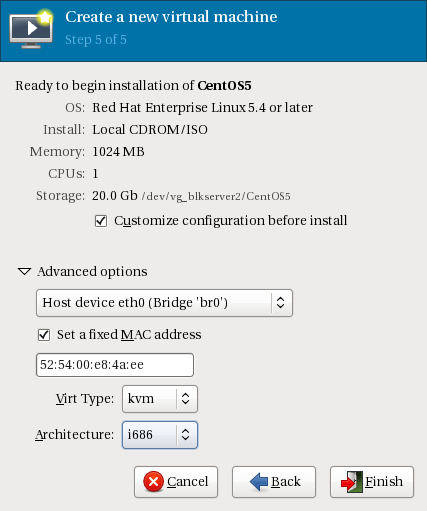
Figure 6: Choose network connections, virtual machine type, and processor architecture.
The last screen allows you to choose your network connections, the virtual machine type (QEMU or kvm), and the processor architecture that will be emulated. This example shows i686 (I was playing when I took the screen shot), but the default is X86_64. That's it! A new virtual machine is born.
Figure 7: This screen offers finer control over the configuration than does the wizard.
If you open the properties for the virtual machine, you'll see that you have complete control over its configuration. This screen should seem familiar to anyone who has used the VMWare configuration tools.
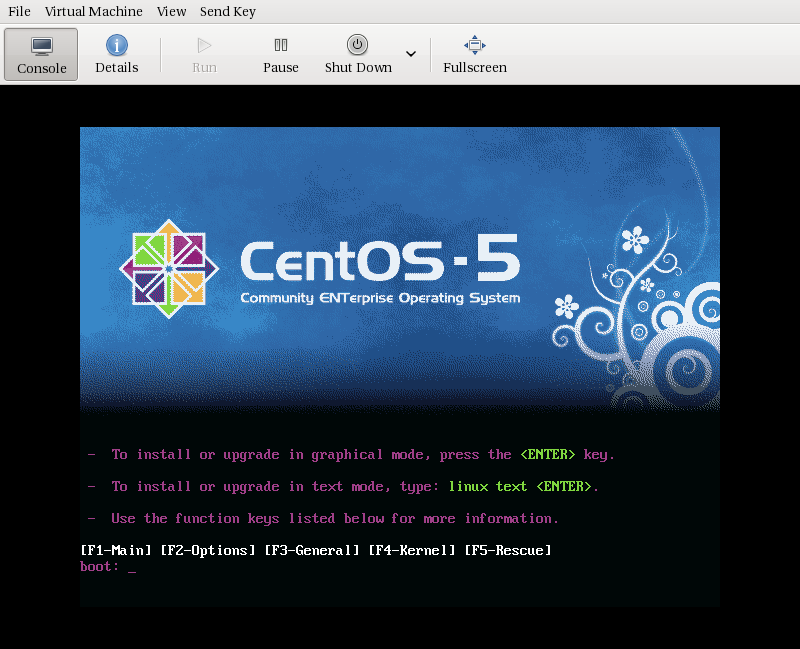
Figure 8: On the console table of the Virtual Machine Manager is the expected CentOS 5 screen.
Once I clicked "Begin Installation," I found myself looking at the boot screen for CentOS 5. I went on to install the operating system, and as expected, things went normally with no surprises.
Figure 9: Eye candy for the performance graph junkie!
Once the system was installed, I went back to the virtual machine manager and was presented with the screen shown at the left. Additional virtual machines will populate the list as they are installed. I enabled the all of the monitors to show that you can readily see the CPU usage, Host CPU usage, Disk I/O, and Network I/O stats for the newly created system.
I have to admit that it took me about an hour more to install and configure CentOS 6 as a base virtual host than it would have for me to do the equivalent VMWare server installation. And it makes sense as the difference is essentially between a generalized Linux distribution that needs to be configured to be a virtual host, and a product whose sole purpose in life is to be one. Also, some of the extra effort was due to my desire to really make the host partition as lean as possible. Had I just installed a full GUI host installation, things would have gone faster. For the ultimate in express-route installations, a real Red Hat distribution would have provided the necessary mascara and lipstick to make it as painless as possible. Whatever the reason, future installations will go much faster for me now that I've done it once. And it's not something I do frequently, so within a month or so, that extra hour will mean little.
Having spent some time now working with KVM, I've decided that I'm going to stay with it and eschew VMWare server. Don't get me wrong. I still think that VMWare server is a superb product. The capabilities one gains by purchasing a suite of its products, such as pooling servers and thus being able to move virtual machines between physical systems, makes it worthwhile for companies that have the cash to buy in. For my little server, I think I'm best served with a full Linux-based solution since I can use the tools I'm extremely familiar with to manage it. Using logical volume manager (LVM) allows me to use snapshots for backups instead of having to purchase a VMWare-specific tool to do the same. Accessing and protecting the host is by now second nature, so I don't have to worry about making potential fatal mistakes as I would using VMWare, since my only experience using it is with servers sitting behind corporate firewalls. My server is going to be connected directly to the Internet at the co-location facility.
Those who are just starting their sojourn into virtualization and who have already bought in to the Red Hat product line may want to take a serious look at KVM before spending large amounts on the VMWare solution. The cost savings may be more than enough to keep you there. If nothing else, having Red Hat and other alternatives to VMWare keeps that company honest and holds prices down, which is always a good thing.





 Business users want new applications now. Market and regulatory pressures require faster application updates and delivery into production. Your IBM i developers may be approaching retirement, and you see no sure way to fill their positions with experienced developers. In addition, you may be caught between maintaining your existing applications and the uncertainty of moving to something new.
 IT managers hoping to find new IBM i talent are discovering that the pool of experienced RPG programmers and operators or administrators with intimate knowledge of the operating system and the applications that run on it is small. This begs the question: How will you manage the platform that supports such a big part of your business? This guide offers strategies and software suggestions to help you plan IT staffing and resources and smooth the transition after your AS/400 talent retires. Read on to learn:
LATEST COMMENTS
MC Press Online