Use Sencha Touch and JSON/JSONP to talk to your RPG programs.
In my previous article on distributing mobile apps within your enterprise, we opened by discussing the difference between web-based mobile apps—essentially websites optimized for use on smartphones—and "native" apps that can be installed directly onto a smartphone. We then walked through the steps of registering with Apple, creating a standalone iPhone app using Sencha Touch and Phone Gap, and then installing the app onto an iPhone.
Today we'll take this concept a step further by getting our generic Sencha Touch-based smartphone app (which we called "MyFirstApp") to talk to an RPG program on IBM i and retrieve customer data. To do this, we'll pick up where we left off with the following steps:
- Prepare the IBM i for communication with our smartphone app.
- Set up an RPG program to "serve" data to the app.
- Adjust the app to ask for and retrieve data from the RPG program.
Step 1: Prepping Your IBM i
Up to now, our attention has been focused on the front-end app and hardware/software. Now that we're looking to communicate with an RPG program, we need to take a look at the back-end, the IBM i piece.
Since we'll be using IBM i's built-in Apache Server to serve up our data here, for sake of simplicity I'm going to assume you have installed the free Valence Framework (which you can download from here). The Valence installation routine automatically configures and initiates an Apache server instance on your IBM i called VALENCE32. It also installs a collection of test data (in our case, a sample customer master file called DEMOCMAST) and a service program we can use in any RPG program to send and receive data through the Apache Server. This will save us a lot of prerequisite setup and coding for this exercise.
Once your Apache server instance is set up, you'll need to tell the Apache Server it's okay for certain RPG programs to be called directly from external devices or web pages. Note that what we're doing for this example is not necessarily the approach you'd want to take for all your programs. I wouldn't generally recommend giving your Apache Server a long list of RPG programs for external access, but rather just a limited one or two programs that serve to verify a user's authority and then call other programs, essentially working as RPG-based traffic cops. This, by the way, is essentially how the Valence Portal works.
To edit the Apache server instance, you should be able to get to the configuration page by navigating your browser to http://192.168.1.1:2001/HTTPAdmin (replacing 192.168.1.1 with the address of your IBM i). If this doesn't appear to be working, verify the Apache Administration instance is running by typing this command at a command line:
STRTCPSVR SERVER(*ADMIN)
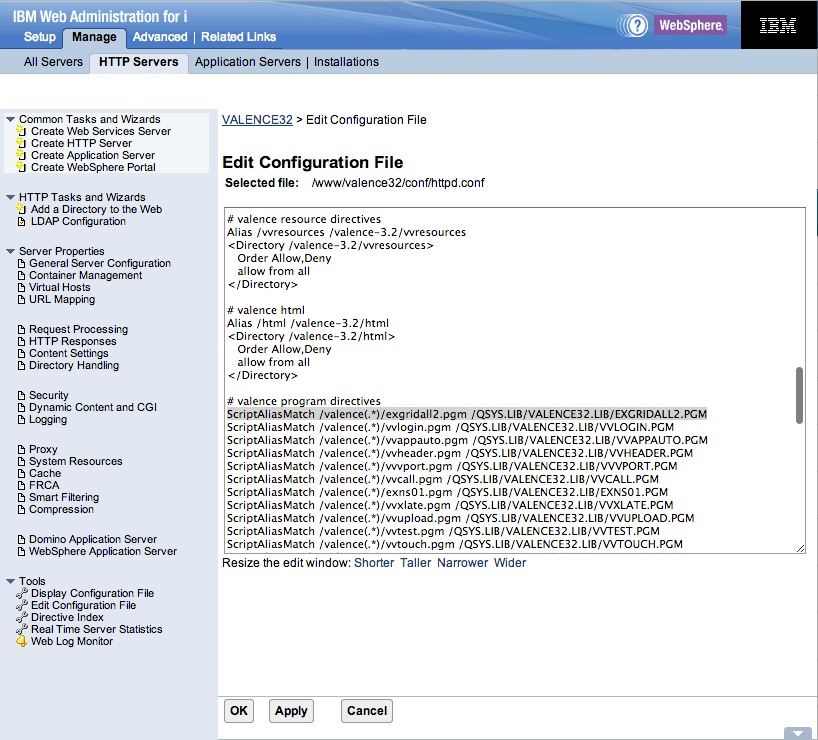
After you've successfully logged in with your IBM i user and password, click on the "Manage" tab, select the "VALENCE32" server instance, click the "Manage Details" button at the bottom, and then click the "Edit Configuration File" at the bottom left. Scroll down to the section labeled "# valence program directives" and add the following line:
ScriptAliasMatch /valence(.*)/exgridall2.pgm /QSYS.LIB/VALENCE32.LIB/EXGRIDALL2.PGM

Figure 1: See the Apache Server configuration changes.
This tells Apache to route any calls to "exgridall2.pgm"—which we'll be doing in Step 3—to a program in the VALENCE32 library called EXGRIDALL2, an RPG program we'll be creating in Step 2.
Save these changes, and then restart the VALENCE32 instance by hitting the red stop button followed by the green play button. Alternatively, you could also restart the server instance from a command line by executing this command:
STRTCPSVR SERVER(*HTTP) RESTART(*HTTP) HTTPSVR(VALENCE32).
Step 2: Set Up an RPG Program to Provide Data
Now that we've got the Apache Server set up, we're ready to create an RPG program to communicate with our smartphone app. To keep this simple, we're going to take one of the example apps included with Valence and make a one-line modification so it will work with our smartphone app.
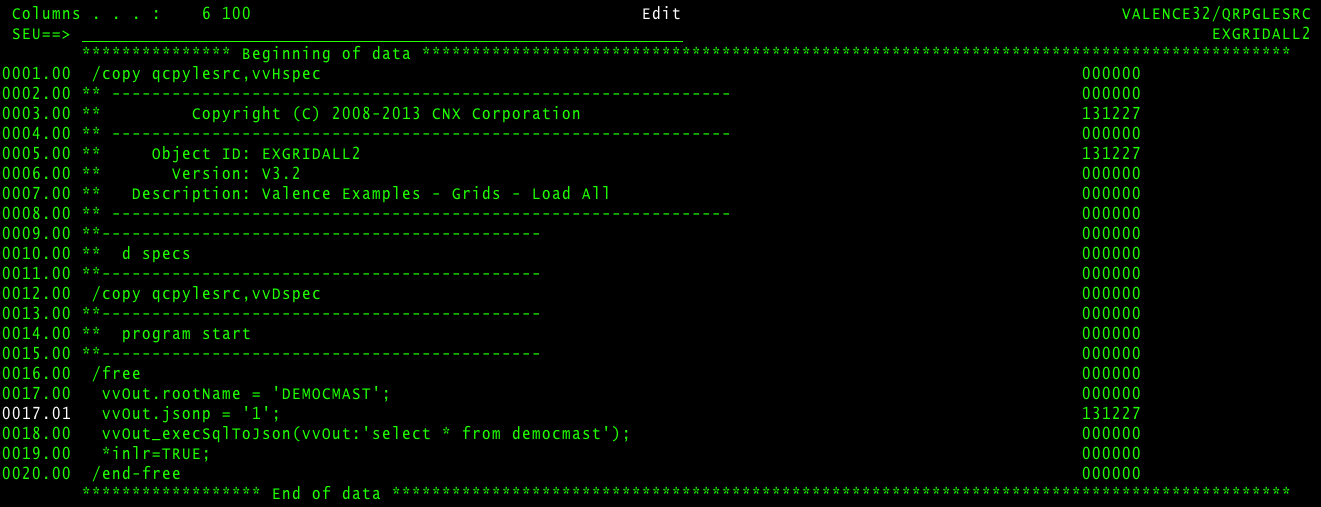
Using PDM, RDi, or your favorite RPG source editor, make a copy of source member EXGRIDALL (located in library VALENCE32, file QRPGLESRC) and call it EXGRIDALL2 (matching what we specified in the Apache configuration in Step 1). Then go into the source and, just prior to the "vvOut_execSQLtoJSON" procedure call, add the following line:
vvOut.jsonp = '1';

Figure 2: The RPG program EXGRIDALL2 shows the Javascript Object Notation with Padding (JSONP) addition.
Save this change. Then, with VALENCE32 in your library list, compile the program. With this program created, you're ready to set up the smartphone app to call it. But before we do that, let's talk about what we're doing in this program, its sole purpose being to use the VVOUT Valence service program procedure to send data to the web. The first line after "/free" sets a root name for the set of data, which we'll be looking for in Step 3. The third line executes the VVOUT_ExecSQLtoJSON procedure that takes the results of an SQL statement and sends them, in JSON format, to a device on the web (in this case, to our smartphone app).
The second line, the one we just added, tells the VVOUT procedure to encode the response in a format called JavaScript Object Notation with Padding (JSONP). This is needed for development and testing purposes. When we're making changes to our app and testing it, we're using our own PC's local web server to execute it. In order for the app running in this domain (your PC's local web server) to communicate with another domain (your IBM i), we must use JSONP instead of standard JSON. Without getting too deep in the weeds here, JSONP is essentially JSON with a little extra code. It allows you to specify what's referred to as a "callback function" that is passed on with your JSON object, so the JSON code is transported and then "executed" from a different domain. Don't worry if this seems a little confusing right now. The bottom line is that JSONP allows you to run AJAX across different domains, something browsers normally prohibit as a violation of Same-origin policy.
Step 3: Adjust the Smartphone App
The final step is to add some code to the app so it can pull in data from our IBM i. To do this, we'll add some logic to the "MyFirstApp" we created in the previous article so that it calls our RPG program and shows the response in a simple list format. For sake of example, we'll also throw in some code to listen for a tap event so that touching on any customer record will bring up a window with some additional info on that customer. The JavaScript code we're working with here is using Sencha Touch APIs, the syntax of which goes beyond the scope of this article, but you can read about how it all works in the API documentation located here.
Using your favorite source editor, open up the front-end JavaScript source file Main.js (located in the app/view folder) and make the following changes:
(1) Replace the "requires" section with the following code:
requires: [
'Ext.TitleBar',
'Ext.dataview.List',
'Ext.data.Store'
],
This tells Sencha Command to include these components when packaging up the app.
(2) Remove the "Get Started" section of code, 17 lines total, beginning with the line containing a single open bracket ({). We're going to replace this button entirely.
(3) Add the following code in place of what was removed in (2) above:
{
title: 'List Custs',
iconCls: 'list',
items: [
{
docked: 'top',
xtype: 'titlebar',
title: 'Customers'
},
{
xtype: 'list',
itemTpl: '{CUSNO} - {CNAME}',
height: '100%',
store: Ext.create("Ext.data.Store", {
fields: ['CUSNO', 'CNAME', 'CADDR1', 'CADDR2', 'CCITY', 'CSTATE', 'CZIP'],
proxy: {
type: 'jsonp',
url: 'http: //192.168.1.1:7032/valence/exgridall2.pgm',
reader: {
type: 'json',
rootProperty: 'DEMOCMAST'
}
},
autoLoad: true
}),
listeners: {
itemtap: function(me, i, t, r){
Ext.Msg.alert('Customer '+r.get('CUSNO'),
r.get('CNAME')+'<br>'+r.get('CCITY')+' '+r.get('CSTATE')+' '+r.get('CZIP'));
}
}
}
]
}
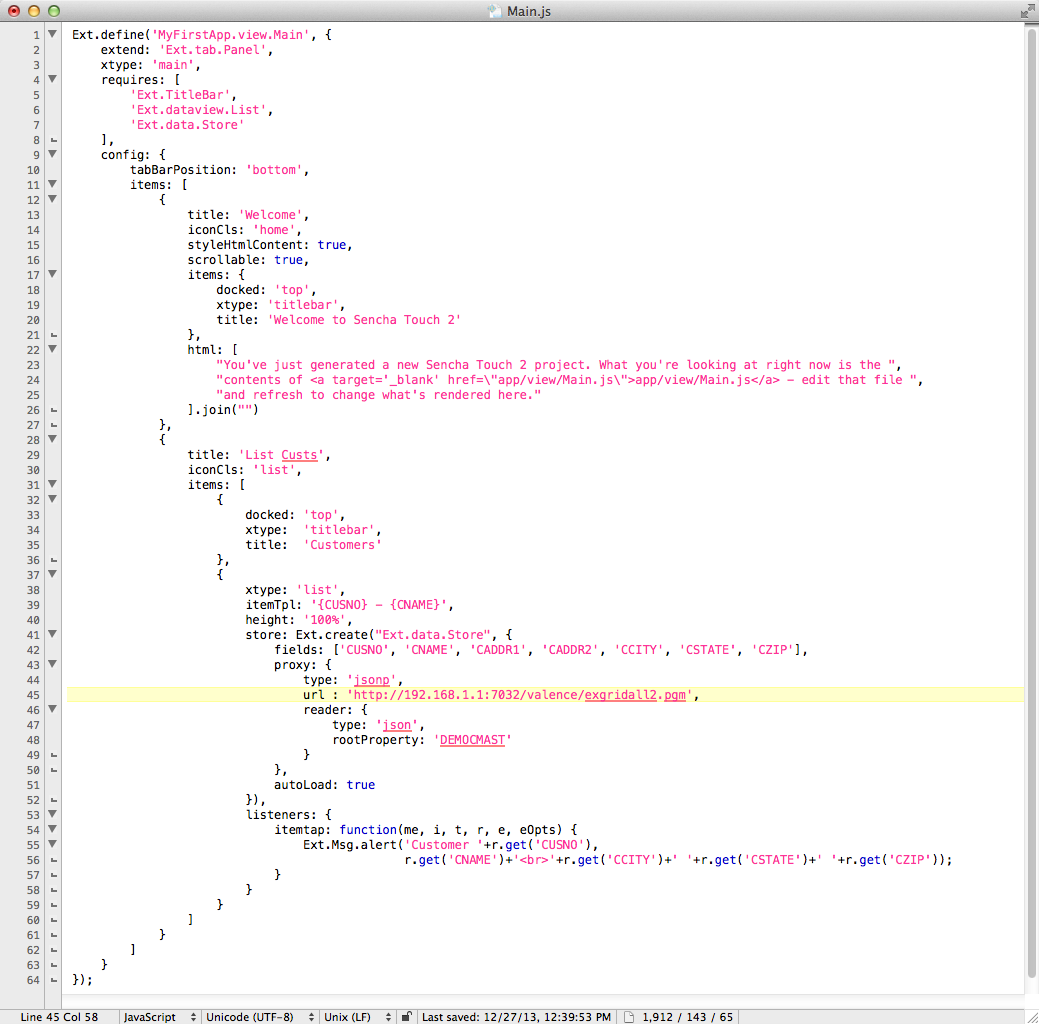
Be sure to replace the 192.168.1.1 section with the IP address of your own IBM i. This new code adds a button labeled "List Custs" that, when hit, calls your modified EXGRIDALL2 program from Step 2. It looks for a response with a root of "DEMOCMAST" (as set in the RPG program) and then lists the customer numbers and names in a list. Tapping on any record in the list will bring up additional details about that record. The modified front-end code should look like this:

Figure 3: The Sencha Touch source file Main.js shows new code for listing customers.
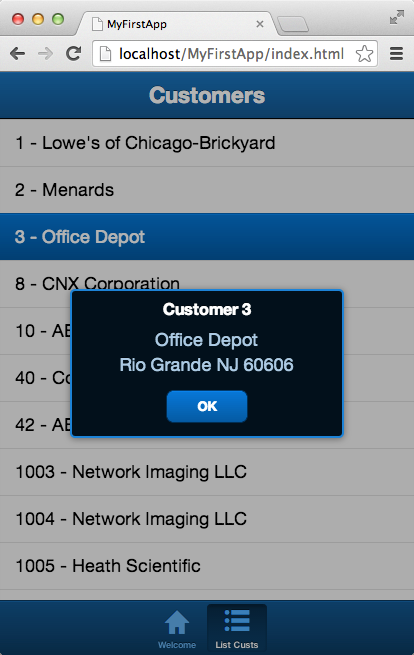
Save these changes and you should be able to test the new code by running the app from your PC via http://localhost/MyFirstApp/index.html. The resulting page should resemble what shows in Figure 4. The last thing to do is rebuild and redeploy the app using Phone Gap Build, as explained in the previous article steps 2 through 4.

Figure 4: The modified MyFirstApp shows customers from RPG program EXGRIDALL2.
And with that under your belt, you're on track to creating your own smartphone apps that interact with RPG programs on your IBM i. Try not to be dissuaded if some of the front-end code seems a bit foreign to you as an RPG programmer. There is indeed much to learn in the world of web and mobile app development, but I've found the best way to get the hang of this is to simply dive in and get the rote process down through practice, trying slightly different variations as you go. The more you do this, the sooner you'll start to pick up on the mechanics and syntax of this type of programming—a skill set that will ultimately make for a fantastic complement to your RPG repertoire.


 Business users want new applications now. Market and regulatory pressures require faster application updates and delivery into production. Your IBM i developers may be approaching retirement, and you see no sure way to fill their positions with experienced developers. In addition, you may be caught between maintaining your existing applications and the uncertainty of moving to something new.
 IT managers hoping to find new IBM i talent are discovering that the pool of experienced RPG programmers and operators or administrators with intimate knowledge of the operating system and the applications that run on it is small. This begs the question: How will you manage the platform that supports such a big part of your business? This guide offers strategies and software suggestions to help you plan IT staffing and resources and smooth the transition after your AS/400 talent retires. Read on to learn:
LATEST COMMENTS
MC Press Online