Use the IFS and NetServer to safely and securely provide file access to users.
The IBM i is an extremely reliable system that is an excellent resource for your company's most crucial information. Many PC-centric applications use critical files that may be stored locally on the client's hard drive. When proper backups are neglected and the client's hard drive fails, you may be left with disastrous results. What better way to provide the most reliable support, backup, and accessibility than to store files on and access files from the IBM i? IBM supports this capability with the IFS in collaboration with NetServer.
The IFS is the IBM i's directory structure. NetServer provides access to the IFS from a PC or a Mac without the need for additional software to be installed on the client PC. If the client is going to perform administration on shares, the System i Navigator must be installed. Starting with V5R2, NetServer has integrated support for the Samba client on Linux. There are also PTFs available for V5R1.
Configuring NetServer
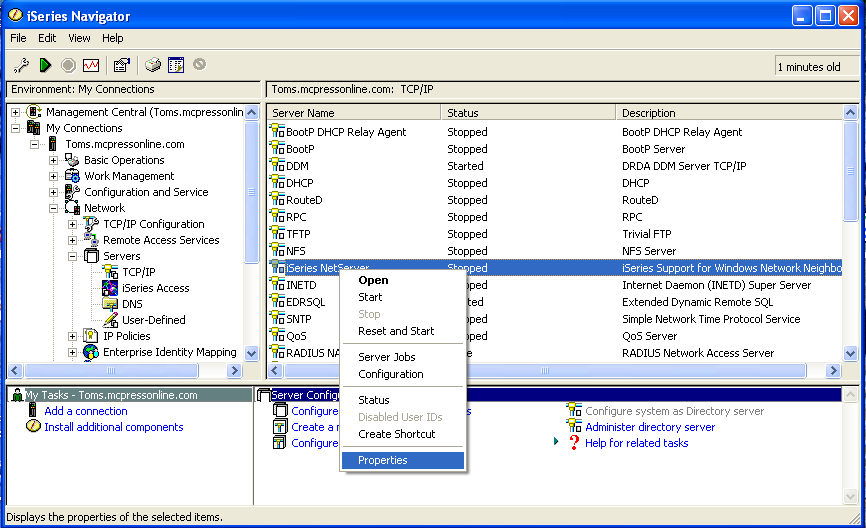
A prerequisite to starting NetServer is to have the QSERVER subsystem started and to have the TCP/IP server running. Once you have ensured that these two serves are running, you can start NetServer by going into My Connections. Select the iSeries that you wish to start NetServer on and then select Network > Servers > TCP/IP and you will see iSeries NetServer listed as one of the servers. You can set the server name and domain by right-clicking on iSeries NetServer and selecting Properties.
Figure 1: Start NetServer by going into My Connections. (Click images to enlarge.)
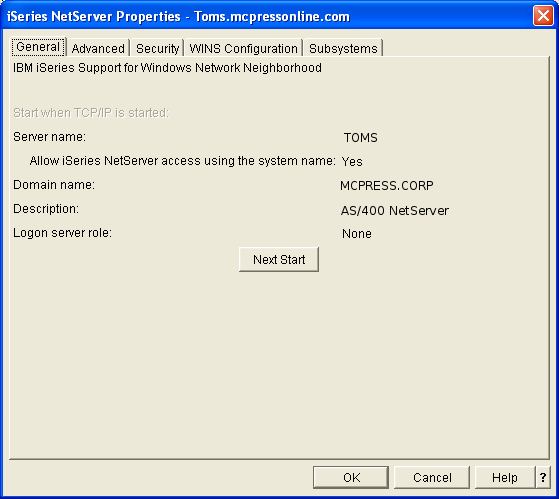
You will then see the Properties window for NetServer. It is recommended that the server name be set to the system name and that you use the domain name that your Windows user belongs to. To change the NetServer properties, click on the Next Start button (see Figure 2).
Figure 2: Set the properties.
After you have changed the settings, you need to restart the NetServer by right-clicking on the iSeries NetServer and selecting Stop. When the NetServer is completely stopped, select Start to apply the new settings.
During the backups, you may want to restart NetServer to ensure that there are no file locks. The restart will also disconnect any bad connections. End NetServer with the ENDTCPSVR *NETSVR command prior to the backup commands and then start NetServer back up with the STRTCPSVR *NETSVR command after everything is saved. You may also want to modify your startup procedure after an IPL to automatically start the NetServer. As you migrate users over to the iSeries file server, this will become more of a business-critical service.
Exploring and Creating Directories on the IFS
To explore the IFS directories, you can use the WRKLNK command, which lists all of the existing directories on the IFS.
To create a directory on the IFS, you can use the MKDIR command on the command line.
Securing the Directory on the IFS on the User Level
When the directory is initially created, it will assume the authorization of its parent directory. If you create the directory tree structure from scratch from the root, it will give full read and write authority to Public users and the owner of the directory. This is the behavior if you execute the MKDIR command specifying only the new link and leaving the rest of the parameters at the default values. You can change the authorities set on the directory by using option 9 while viewing the directory/file using the WRKLNK command.
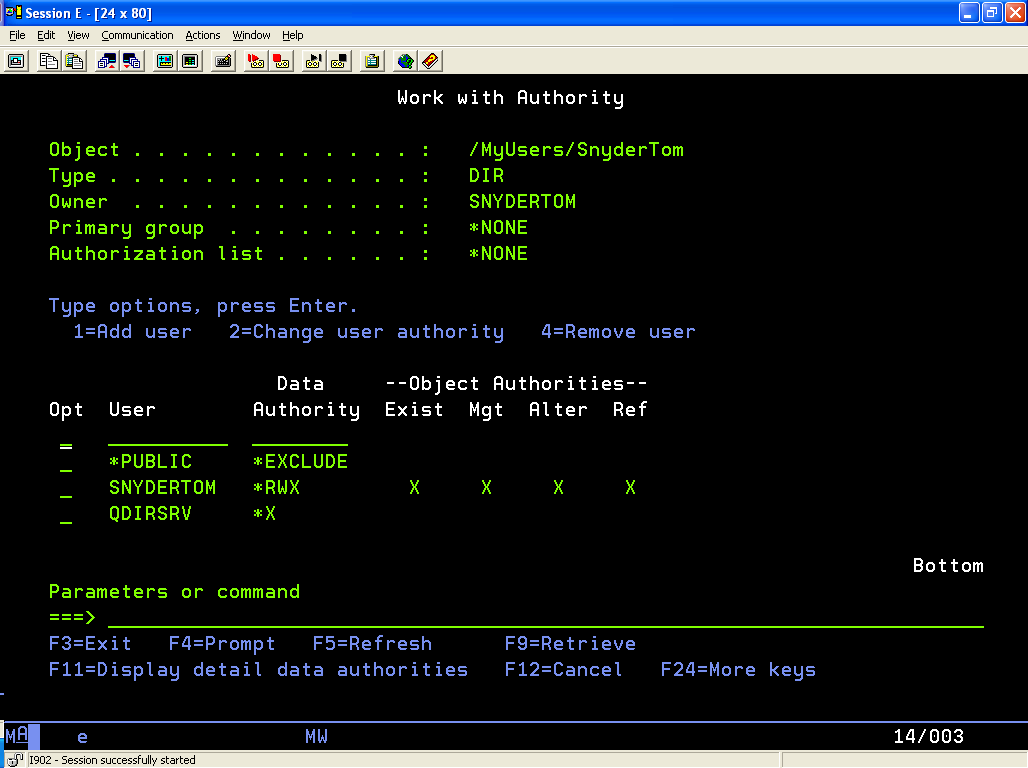
If you want to allow anyone to have access to the contents of the directory, you do not have to change anything. If you want to secure the folder, you must change the *PUBLIC user data authority to *EXCLUDE. To allow the specified user to access the folder, add the user profile to the list with *RWX data authority (Figure 3).
Figure 3: Manage user authorities.
Securing the Directory on the IFS Using an Authorization List
Securing the directory on the user level is good if you plan to have only one user accessing the folder. But if you plan to have a group of users accessing the folder, I recommend using an authorization list. The reason is that when you create objects in a directory, each object is created with a specific list of users who have access to it. Then, if you add another user after some objects have already been created, the new user will not have access to the previously existing items and will have access only to newly created objects. But, if you use an authorization list, the authorization reference will remain the same and users can be added and deleted; the authorization of all of the objects in the directory will be changed.
Providing Shares to Allow Network Drives to Be Mapped to the IFS
Now that you have the directory created and secured, you need to make it visible to the network by creating a share. You do this in the iSeries Navigator File Systems option, where you can open the iSeries NetServer.
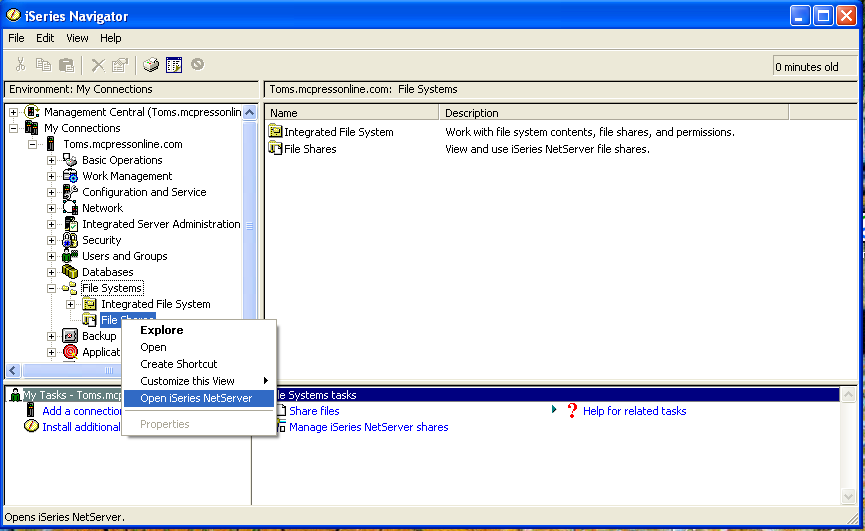
In iSeries Navigator, open My Connections, select File Systems, right-click on File Shares, and select Open iSeries NetServer.
Figure 4: Open iSeries NetServer.
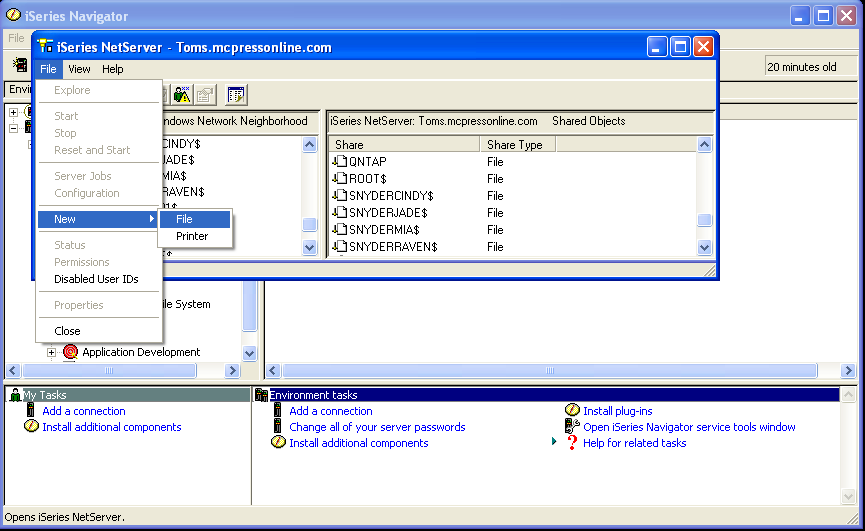
To create a new share in the iSeries NetServer, click on File > New > File.
Figure 5: Create a share.
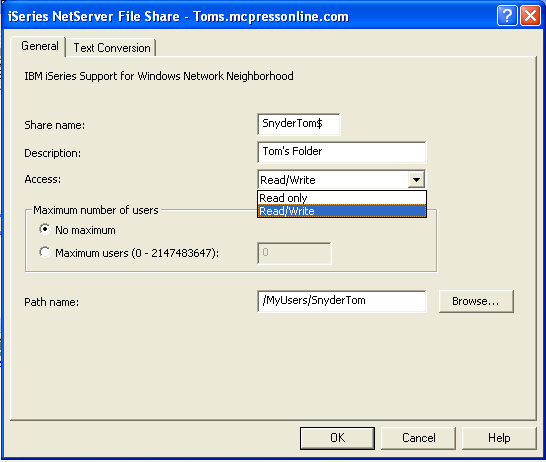
Specify the attributes of the share:
•· Share name is what you will see on the network.
•· Description is also seen on the network but is not used for mapping.
•· Access defaults to Read Only. You can change it to Read/Write to allow file modifications.
•· Maximum number of users specifies the number of users allowed to access the share concurrently.
•· Path name will match the directory name created with the MKDIR command.
Figure 6: Specify the share's attributes.
The dollar sign ($)in the share name has a special purpose. If you put a $ at the end of the share name, the file will not be visible when someone is browsing the network. There may be times that you will want it to be visible, such as a shared folder where people can access instructional documentation. In this case, you would probably want to make the access read-only and not use the $ sign. But, in this example, where we are setting up a secure directory for a specific user to store sensitive documents that are business-critical, you would want to use the $ at the end of the share name to secure the folder and hide it from people browsing the network.
Mapping the Network Drive from the Client to the Server
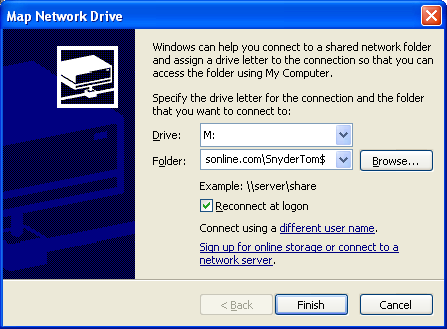
Your network drive is now accessible! On your Windows Client, you will map a network drive to the iSeries server with the new share name that you created. The server name is specified to be either the DNS name that is provided for your iSeries or the IP address of the iSeries. So, to map a drive to the SnyderTom$ share on toms.mcpressonline.com, you will format the name as oms.mcpressonline.comSnyderTom$.
Figure 7: Map a drive to the share.
Congratulations! You now have a secure and reliable place to store your crucial documents!




 Business users want new applications now. Market and regulatory pressures require faster application updates and delivery into production. Your IBM i developers may be approaching retirement, and you see no sure way to fill their positions with experienced developers. In addition, you may be caught between maintaining your existing applications and the uncertainty of moving to something new.
 IT managers hoping to find new IBM i talent are discovering that the pool of experienced RPG programmers and operators or administrators with intimate knowledge of the operating system and the applications that run on it is small. This begs the question: How will you manage the platform that supports such a big part of your business? This guide offers strategies and software suggestions to help you plan IT staffing and resources and smooth the transition after your AS/400 talent retires. Read on to learn:
LATEST COMMENTS
MC Press Online