Setting up an HTTP server to use Secure Sockets Layer (SSL) tends to be a bit complex, primarily because of the involvement of a third party that provides the digital certificate that makes the whole process work. Digital Certificate Manager (DCM) on the AS/400 does exactly what its name implies: It manages the digital certificates you choose to install and use on your AS/400 for use in SSL or other applications. Early in its life, DCM on the AS/400 picked up a reputation for being a bit difficult to operate, but, like a fine wine, DCM has improved with age.
Much of the information about DCM and about getting SSL up and running is located in the AS/400 Information Center, available on either a CD-ROM or the Internet (http://publib.boulder.ibm.com/html/as400/infocenter.htm). The HTTP Server for AS/400 Webmaster’s Guide V4R4 also contains a chapter on DCM, but the Information Center articles contain some very useful step-by-step setup instructions.
The article presents step-by-step instructions for configuring your HTTP server to use SSL in V4R4. The following example secures the *ADMIN HTTP server instance; securing other instances is fairly straightforward once the first is done.
Step 1: Start the *ADMIN Server Instance
DCM is configured by using the administrative instance of the HTTP server. The server can be started with the following command:
STRTCPSVR SERVER(*HTTP) HTTPSVR(*ADMIN)
The instance uses port 2001 instead of port 80, the HTTP default. You can access the AS/400 Tasks page from your browser by appending :2001 to the server name or address (i.e., http://myas400:2001). The browser will prompt for a valid AS/400 user name and password. The user ID for these tasks must have *SECADM and *ALLOBJ authority.
The initial page, AS/400 Tasks, presents two options: IBM HTTP Server for AS/400 and Digital Certificate Manager. Selecting the DCM link displays the DCM home page (Figure 1). The left side of the DCM home page contains a menu. If an item on the menu can be expanded to provide more options, there will be a drop-down arrow ( ) to the left of that item.
Step 2: Create a Certificate Authority
The first configuration task is to create a certificate authority (CA). Although a local authority is not required if you will be acquiring a certificate from a well-known CA, the creation task creates several files in the AS/400 Integrated File System (AS/400 IFS) that make up a certificate store, the place where the system stores and manages certificates. Certificate stores were known in previous releases of OS/400 as key ring files.
The create CA task also walks you through all the steps required to get at least one application completely configured, which is a useful way to get started.
Expand the Certificate Authority (CA) menu item and select Create a Certificate Authority to create the form shown in Figure 2. Fill out the required fields and click on the OK button. The Key size field should be left at its default unless you have a reason to change it; the contents of the rest of the required fields are self-explanatory.
Each certificate store requires a password when it is created. Remember it! If the password is misplaced, it will be impossible to conduct maintenance tasks on the certificate store, such as adding a new certificate or renewing one that expired. If the password is misplaced, however, all is not lost. The IBM AS/400 Support Line Technical Document
“R440 DCM and SSL Basics” (document number 17261258) details which AS/400 IFS files you can delete to clean up and start over. Of course, you will lose any certificate information you previously stored and configured.
A confirmation page indicating that the CA was created will be displayed. Be patient; this step may take a minute or so to complete, and part of what is happening is the creation of the *SYSTEM certificate store. There is a link on the page to download the CA certificate to your browser. You do not need to select the link now; there will be opportunities later. Simply click OK to continue.
Next, the CA Policy Data page is displayed. You should change the default setting for Allow creation of user certificates from No to Yes. The balance of the field defaults is fine, so click OK.
Step 3: Associate an Application with the CA
DCM now allows the association of one or more applications with the newly created CA. Applications need to “trust” a CA and to be associated with a system certificate, which is accomplished later. Figure 3 is an example of the page that has the default applications displayed. The applications listed will be those installed on your system that support SSL encryption. A typical list will include the Client Access servers and Telnet, among other applications. The process for enabling SSL for each of those applications varies somewhat, so you will need to look at the appropriate documentation.
Check the box next to QIBM_HTTP_SERVER_ADMIN and click OK. A page is displayed that indicates the application will now trust the CA. Click OK.
Step 4: Create a System Certificate
The form in Figure 4 is now shown. Complete the form, but pay special attention to the Server name value. This value is compared with the name or address used to access the server, and, if it is not the same as what a user is using, the browser will display a message indicating there may be a problem with the certificate. Click OK once you’ve filled out at least the required fields.
Step 5: Associate an Application with the Certificate
A list of applications similar to the one you saw previously is displayed to allow the association of the newly created certificate with the application. Again, check the box next to QIBM_HTTP_SERVER_ADMIN and click OK. A status page indicating the association was successful is displayed. Click Done.
At this point, the CA and one system certificate have been created and associated with the ADMIN instance of the HTTP server. Just a couple of tasks remain, and you should be ready to go.
Step 6: Assign a Default Key to the Certificate Store
A default key must be associated with the *SYSTEM certificate store after it is first created. Expand the System Certificates menu option on the left side of the DCM page. Enter the certificate store password (did you remember it?) and click OK. Select Work with certificates from the menu. Choose the *DFTSVR certificate if it isn’t already selected and click Set default. The page will update, indicating the default key has been set.
Step 7: Set the HTTP Configuration to Use SSL
Go back to the AS/400 Tasks page and select the IBM HTTP Server for AS/400 link. Select Configuration and Administration from the menu on the left. Expand the Configurations option in the menu. Use the drop-down list to select the ADMIN configuration and select Security configuration. The form shown in Figure 5 is displayed. Make sure Allow SSL connections is checked. For the sake of demonstration, leave the SSL port setting default, 443. (Port 443 is the well-known port for SSL connections, just as port 80 is the default for nonsecure connections.) Remember that only one active server instance can use a port at any given time; you ultimately will want to change this setting so your production application can use port 443.
You could uncheck Allow HTTP connections, which prevents any unsecured connections to server instances that use this configuration. When set this way, all browser communications with the server instance will be encrypted and any attempt to connect without SSL will be rejected. A site with extreme security requirements might use this option.
Now stop and start the *ADMIN HTTP server instance. Your AS/400 should now be ready for secure communications.
Will the Lock Close?
To see if everything is working properly, try to access the AS/400 Tasks page by using the URL you used to get into the HTTP configuration manager, but, this time, enter https: in the browser URL area instead of http: (i.e., https://myas400). Do not append a port number, since you’ve chosen port 443, the default secure port.
If all is well, the browser should display a message indicating that the certificate the server is using is not from an authority it knows. Accept the certificate in whatever manner the browser requires, and the next thing you should see is the AS/400 Tasks page with the padlock or key closed. Congratulations! You are now communicating securely.
What’s Next?
Other HTTP server configurations can be configured to use SSL with the same procedure outlined in step 7. Remember the issue with port 443, though. After you click Apply on the form, an application ID is displayed. This application ID will now appear in DCM, where you can associate it with a CA and a server certificate.
If you don’t need a certificate from a well-known authority, simply return to DCM, expand the System certificates menu option, and select Work with secure applications. Select the application ID you saw in the HTTP Server configuration and click Work with certificate authority. Select *CERTAUTH(1), which is your internal CA, and click Trust.
Return to the Work with secure applications page, select the application ID again, and click Work with system certificate. Select the appropriate certificate and click Assign new certificate. The server instance is now ready to go once it has been stopped and restarted.
Once SSL is set up and running, very little maintenance is required other than an occasional renewal of the certificate. Certificates are issued for a specific period of time and do expire. (Remember to pay your bill.)
With the experience you’ve acquired setting up SSL in the HTTP Server, it should be relatively easy to set up other supported AS/400 applications. The key (pun intended) to it all is DCM and the digital certificate.
REFERENCES AND RELATED MATERIALS
• HTTP Server for AS/400 Webmaster’s Guide V4R4 (GC41-5434-04, CD-ROM QB3AEO04)
• IBM AS/400 Information Center Web: publib.boulder.ibm.com/html/as400/infocenter.htm
• IBM AS/400 Support Line Technical Document “R440 DCM and SSL Basics”: as400service.ibm.com (Select Search All AS/400 Databases and search for 17261258.)
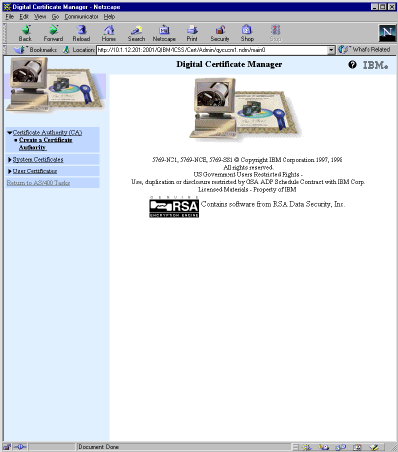
Figure 1: DCM contains a menu on the left side of each page.
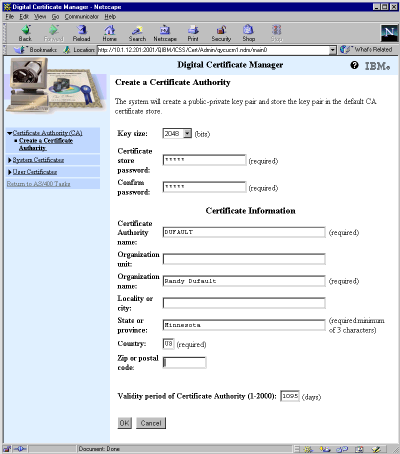
Figure 2: Creating a certificate authority requires just a few fields.
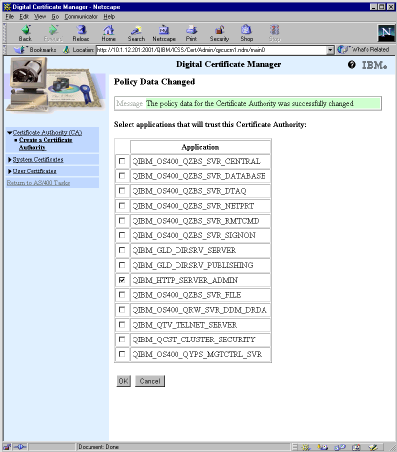
Figure 3: Applications are associated with CAs and certificates using an application ID.
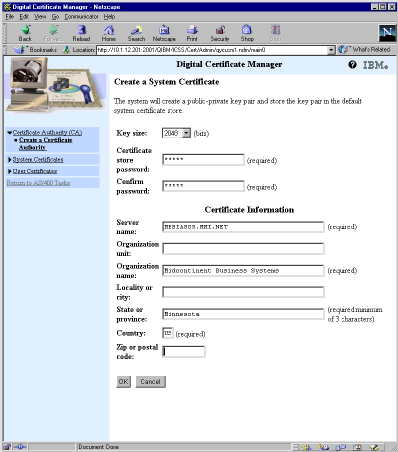
Figure 4: The server certificate is issued for a specific server name.
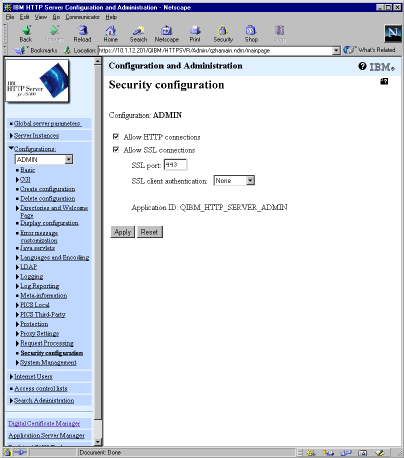
Figure 5: An HTTP server configuration can accept both secure and unsecure connections.


 Business users want new applications now. Market and regulatory pressures require faster application updates and delivery into production. Your IBM i developers may be approaching retirement, and you see no sure way to fill their positions with experienced developers. In addition, you may be caught between maintaining your existing applications and the uncertainty of moving to something new.
 IT managers hoping to find new IBM i talent are discovering that the pool of experienced RPG programmers and operators or administrators with intimate knowledge of the operating system and the applications that run on it is small. This begs the question: How will you manage the platform that supports such a big part of your business? This guide offers strategies and software suggestions to help you plan IT staffing and resources and smooth the transition after your AS/400 talent retires. Read on to learn:
LATEST COMMENTS
MC Press Online