Editor’s note: In this article and “Using System Administration Policies with CA/400 V3R2” by Shannon O’Donnell on page 7, we present techniques for updating your Windows Registry to control desktop access to Client Access/400 functions. Is it very important to backup your Windows Registry before you make any changes to it. When you edit the Registry, there is always a chance that you might damage your Registry files and disable your computer. A good backup will help your restore your Windows installation in case of disaster. For information on backing up your Windows Registry, see your Microsoft documentation.
In “Using System Administration Policies with CA/400 V3R2,” Shannon O’Donnell gave us some valuable tips on using Microsoft’s System Policy Editor (the POLEDIT.EXE program) to control Client Access for Windows 95/NT applications V3R2 on your user desktops. But how do you get started with the Policy Editor and how do you work with the dang thing? I’ll give you a quick tour on installing and using the System Policy Editor on a Windows 9x system. It’ll only take 15 minutes to start using the program and then, with Shannon’s information, you’ll be controlling your users’ desktops better than ever.
Installing the System Policy Editor on a Windows 95/98 Computer
1. Check if the Policy Editor is present on your system. You can find it in the System Tools folder. (Click Start, Programs, Accessories, then System Tools.) If you don’t find a System Policy Editor icon there, run a Windows File Find and look for the POLEDIT.EXE file.
2. If POLEDIT.EXE is not found, find your Windows installation media to install it, or download the latest version at www.microsoft.com/windows95/downloads/contents/wuadmintools/s_wumanagementtool s/ w95policyeditor/default.asp. Be warned that Microsoft explicitly states on its Web site that this download is only intended for Windows 95 computers. If you are running Windows 98 or Windows NT, do not download this upgrade.
3. Go into your Control Panel folder and click on Add/Remove programs.
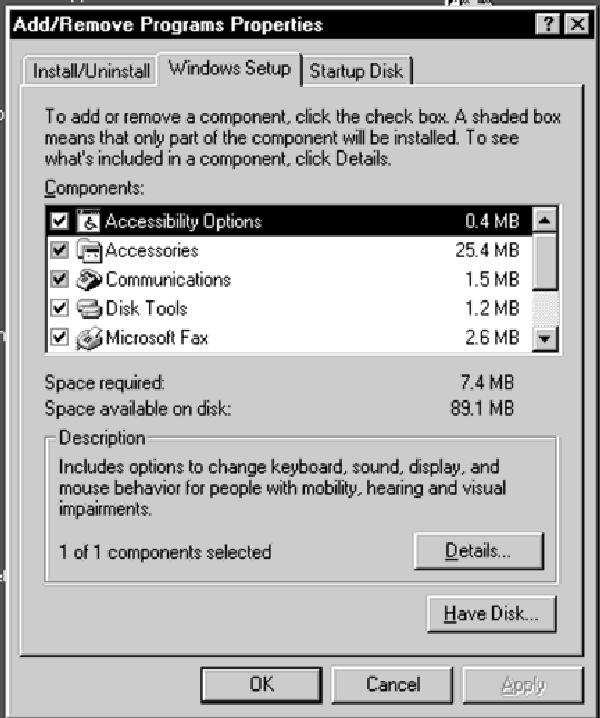
4. Click on the Windows Setup tab as shown in Figure 1. Click on the Have Disk button.
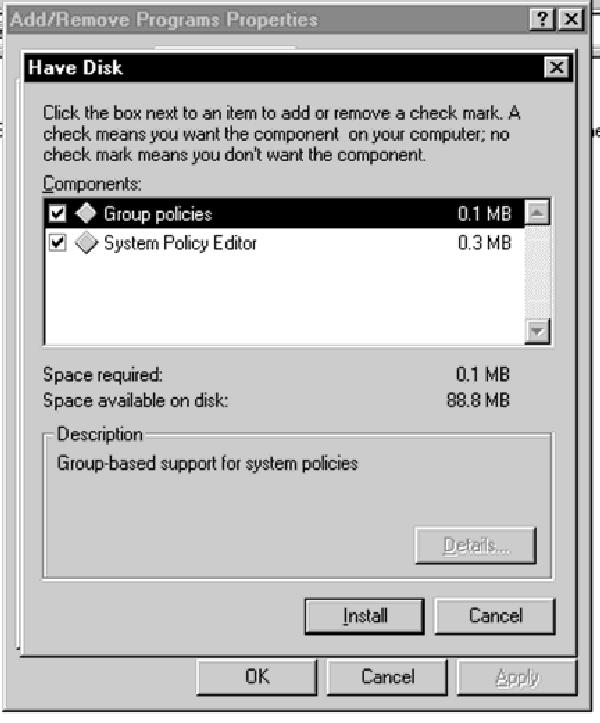
5. Browse your Windows installation media and search for the POLEDIT.INF file. Generally, you will find POLEDIT.INF in the /ADMIN/APPSTOOL/POLEDIT folder. Bring this folder location back to the Have Disk screen, as shown in Figure 2. Click on the System Policy Editor check box. You can also click on the Group Policy check box if you want to administer policies for groups of users. Click on the Install button and Windows will install the System Policy Editor
Creating Policy Files from Policy Editor Templates in Windows 95 and 98
Policy templates can only be opened when there are no open policy files and the system Registry is closed for policy editing. Use the following drill for using policy templates to create and update policy files:
1. Open the System Policy Editor.
2. If you have an open policy file or you have the Windows Registry open, close it by clicking on File and then Close from the Policy Editor menu bar.
3. Click on Options from the System Policy Editor menu bar and select Template. This brings up the screen in Figure 3.
4. Click on the Open Template button and select the policy template you want to use. Policy templates always end in an .ADM extension. For MS Windows configuration, the template is located at C:WINDOWSINFADMIN.ADM. For Client Access V3R2, your policy templates are generally stored in the C:Program FilesIBMClient AccessMRIxxxx directory (xxxx is IBM’s language number). Click on Open to bring it back to your screen. The file you selected will now be shown in the Active Template section of the Template Options screen (Figure 3).
5. To create a new policy file from this template, click on File and then New File from the menu bar. To update an existing policy file, click on File and Open File from the menu bar. To make your policy changes directly to the Registry, click on File and then Registry.
6. If you’re creating a new policy file or updating an existing file, you can modify that file for a particular user, a group of users, or a computer. If you’re updating the Registry with your policy changes, you can only make changes for the local user or local machine. Edit the user’s policy entries by expanding the tree and clicking on the options you want to select. These options will be based on the policy template file you selected in step four.
7. Save your changes. For policy file changes, you can specify the location the policy file should be saved to by using the Save and Save As options on the File pull-down menu. (See Shannon’s article for information on saving the file to a remote system.) For Registry policy changes, you can only save your settings to the Windows Registry, so there will only be a Save option available to you.
8. At this point, you’re finished with your policy editing. To enable system policies on your Windows 9x desktops with the policy file you just created, follow the procedure in “Using System Policies with CA/400 V3R2.”
At this point, you have enough information to start working with system policies in Windows 95/98. Obviously, there’s more to this process than what I have presented here, but this is the basic scenario you will use for creating, modifying, and updating your users’ and computers’ system policies. As you become more comfortable with the System Policy Editor, you can start exploring other functions.

Figure 1: Start installing the System Policy Editor by pressing the Have Disk button in the Windows Setup tab of the Add/Remove Programs panel.

Figure 2: Specify that Windows should install Group Policies along with the System Policy Editor if you want to make group policy files.

Figure 3: Always select the policy template you want to use before you edit your policy file.


 Business users want new applications now. Market and regulatory pressures require faster application updates and delivery into production. Your IBM i developers may be approaching retirement, and you see no sure way to fill their positions with experienced developers. In addition, you may be caught between maintaining your existing applications and the uncertainty of moving to something new.
 IT managers hoping to find new IBM i talent are discovering that the pool of experienced RPG programmers and operators or administrators with intimate knowledge of the operating system and the applications that run on it is small. This begs the question: How will you manage the platform that supports such a big part of your business? This guide offers strategies and software suggestions to help you plan IT staffing and resources and smooth the transition after your AS/400 talent retires. Read on to learn:
LATEST COMMENTS
MC Press Online