The development of TCP/IP has revolutionized the functionality of network computing. Although TCP/IP has provided a standardized method for connecting network clients to the AS/400, it has also spawned many new challenges, especially in the area of dynamic address assignment. In this article, I discuss the AS/400 implementation of the Dynamic Host Configuration Protocol (DHCP) and how you can use it to automatically connect your network clients to your AS/400 and the Internet.
The Origin of Automatic IP Addressing
In the 1980s, TCP/IP was making the transition from college campuses to the business computing world. Around the same time, a new technology that used diskless, stripped- down computers was being investigated as a way to reduce the cost of maintaining large computer networks. These two technologies were based on IP addressing, and it became apparent that a simple TCP/IP network administration mechanism was needed to automatically distribute IP addresses, allowing organizations to easily use diskless workstations. The Internet Engineering Task Force (IETF) proposed the first automatic IP address distribution system: the Reverse Address Resolution Protocol (RARP). This protocol used a RARP server containing a table that linked LAN addresses with corresponding IP addresses.
Although RARP was limited in its abilities and was never implemented on the AS/400, RARP technology led to the introduction of a more flexible standard: the Bootstrap Protocol (BOOTP). BOOTP also aided administrators in IP address configuration and the automatic loading of computer operating systems. Like RARP, BOOTP used a client IP address link table, but unlike RARP, the table could also contain subnet masks, gateway addresses, Domain Name System (DNS) information, and boot file names and paths.
While RARP solved IP address distribution problems, BOOTP advanced the model by allowing the automatic configuration of several attributes. The BOOTP table used the media access control (MAC) address of the client as its key. The MAC address was a
unique address that was “burned” into the communications hardware of every network interface card. BOOTP used the MAC address to locate the corresponding client IP address (which was manually maintained in the server table). When properly configured, one BOOTP server could handle an entire network’s configuration demands (redundant servers could be configured to ensure service availability). BOOTP’s main drawback was its reliance on manual preconfiguration of host information matching the MAC address to a specific IP address in a server database. Every time you added a new network client, you also had to enter a new BOOTP table entry.
To further automate IP address distribution, the IETF defined another technique, DHCP, which allowed for the dynamic allocation of network client addresses and configurations. DHCP clients and servers could also use existing BOOTP relay agents.
DHCP: The Cadillac of IP Addressing?
DHCP was designed to conserve IP addresses through a recovery and reallocation system called leasing. With leasing, an IP address is temporarily leased to a DHCP client that must periodically broadcast a renewal request to keep that address. This process, which is invisible to end users, facilitates the efficient use of limited IP addresses. If the lease is permanent, the client retains the IP address until manual intervention occurs. If the lease is temporary, when it expires and is no longer needed, the IP address returns to the address pool for reassignment to other new network clients.
You can configure one or more DHCP servers on a network. Similar to BOOTP, DHCP clients obtain IP addresses and other information through the following process:
1. The client broadcasts a network message (DHCPDISCOVER message) containing its client ID to request an IP address and other options such as a subnet mask and DNS servers.
2. Any DHCP server receiving the message can send a DHCPOFFER message to the client, offering an IP address that is either static (fixed) or dynamic (different IP addresses available from a pool of unused addresses), according to the DHCP configuration file.
3. The client accepts offer messages from all attached servers and selects the most appropriate offer (not all clients have this capability).
4. The server whose offer is accepted marks the corresponding IP address as This is a simplification of a fairly complex process, but it provides the basic idea behind the DHCP request cycle. The number of DHCP servers you need depends on the number of subnets configured on your network and the number of clients you support. Since DHCP clients broadcast requests within a discrete subnet, this technique was designed to function within one subnet. A BOOTP/DHCP relay agent must be configured to allow broadcast messages to cross to different subnets.
Although many routers can act as a BOOTP/DHCP relay agent, preliminary plans for implementing DHCP must include a detailed study of your most efficient DHCP server usage method. Using a single DHCP server on a subnet saves money, but a failure prevents new clients from joining the network, and any lease expirations disable leasing clients. Configuring multiple DHCP servers on the same subnet reduces the risk of network failure, but because two DHCP servers cannot serve the same IP addresses, you must divide the available addresses between the two servers (which increases the complexity of the IP configuration). Only good planning can determine the best course of action for your installation.
V4R2: When OS/400 Met DHCP
Beginning with OS/400 V4R2, the AS/400 can host a DHCP server. Native OS/400 DHCP support requires V4R2 and program product 5769-SS1 option 3 (OS/400—Extended Base Directory Support) and option 12 (OS/400—Host Servers needed to run TCP/IP). You
leased.
must also have 5763-XD1 (V3R1M3) of Client Access for Windows 95/NT or higher (or Client Access Express for Windows) to perform DHCP administration. IBM Network Station Manager for AS/400 Release 3 provides the necessary support to allow IBM Network Stations to use the AS/400 DHCP server (see the IBM Network Station Manager Installation and Use manual for hardware requirements). For PC clients, Windows includes DHCP support.
Implementing DHCP demands a thorough understanding of the issues involved, including hardware, software, design efficiency, and cost. In this article, I can give you only the basics of setting up an AS/400 DHCP server. For advanced DHCP techniques, consult the OS/400 TCP/IP Configuration and Reference V4R3 manual.
AS/400 DHCP supports three methods of operation:
• Automatic allocation assigns a permanent address to a host.
• Dynamic allocation assigns a leased IP address to a client for a specific amount of time, enabling IP address reuse. Once the lease period expires, the address is available to the next client request.
• Manual (static) allocation allows network administrators to assign a specific IP address to a host or client.
DHCP installation creates an AS/400 Integrated File System (AS/400 IFS) folder named /QIBM/UserData/OS400/DHCP. It also creates several configuration and log files required to run DHCP from this folder. Several DHCP severs can be configured in the same network with each containing a table of IP addresses and leases. With multiple servers, a client broadcasting an address assignment request can select the best address from responding servers.
DHCP server jobs run in the QSYSWRK subsystem. QTODDHCPS is the name of the server job that runs when the DHCP mode run attribute is set to *SERVER. This job functions as a regular DHCP transaction server and uses ports 67 and 68. QTODDHCPR is the name of the job started by DHCP when the mode attribute is set to *RELAY; this is a relay agent than runs on port 67.
You have several options when you are performing a BOOTP-to-DHCP migration (but remember that you can’t run BOOTP and DHCP servers simultaneously on the same system, because both servers use the same ports). I suggest migrating your existing BOOTP clients to DHCP, which can use existing BOOTP client data on the server to service those clients. If you want to run both server types in your network on different hosts, turn off BOOTP support in your DHCP server, make sure your BOOTP and DHCP servers are assigning unique IP addresses, and configure any relay agents to forward broadcasts to the appropriate BOOTP and DHCP servers.
The DHCP Superstructure
Until OS/400 V4R2, BOOTP was the recommended method for attaching IBM Network Stations to the AS/400. This has obviously changed since the introduction of DHCP. Not only is DHCP more flexible than BOOTP, IBM has made AS/400 Operations Navigator (OpsNav) the only configuration interface that is available to set up and administer DHCP. With OpsNav’s graphical interface, DHCP is more intuitive to configure than using the command line. However, if you do choose to use the green-screen, note that there are only three AS/400 commands you can use to administer
DHCP. The Change DHCP Attributes (CHGDHCPA) command can be either reached from the GO CMDDHCP menu or entered on any command line:
CHGDHCPA AUTOSTART(*YES) MODE(*SERVER)
CHGDHCPA sets basic DHCP attributes. (It updates the attributes in the /QIBM/UserData/OS400/DHCP/dhcp.attrib file.) The AUTOSTART parameter is self- evident. If you set it to *YES as shown, the DHCP server will start automatically when
you start TCP/IP with the Start TCP/IP (STRTCP) command. If you set it to *NO, you must start DHCP manually with the Start TCP/IP Server (STRTCPSVR) command:
STRTCPSVR SERVER(*DHCP)
This command starts the DHCP server, regardless of the AUTOSTART attribute. The MODE parameter in CHGDHCPA determines whether the server will function as a DHCP server (this is the attribute shown) or as a DHCP relay agent by replacing *SERVER with the *RELAY attribute. When functioning as a relay agent, DHCP will forward either BOOTP or DHCP requests. To stop the DHCP server using the command line interface, you can use the End TCP/IP Server (ENDTCPSVR) command:
ENDTCPSVR SERVER(*DHCP)
The functionality of these commands can be accessed from Operations Navigator, so you can bypass the AS/400 command line unless you prefer using this method. DHCP also provides the following three exit points, from which user-written programs can be called for security validation of client requests and notification when an IP address is assigned:
• QIBM_QTOD_DHCP_REQ
• QIBM_QTOB_DHCP_ABND
• QIBM_QTOB_DHCP_ARLS See the System API Programming manual for detailed information on using DHCP exit programs. You also need to ensure that your DHCP files are properly saved on a regular basis using the SAV command. I suggest saving all files in the /QIBM/UserData/OS400/ DHCP directory.
Graphical DHCP Configuration Made Easy
After you’ve gathered all the planning information you need for DHCP server configuration (network structure including subnet information) and decided exactly what you want your DHCP server to do, you’re ready to configure DHCP. Although I can’t review every configuration option, I can discuss how to perform initial DHCP configuration using the DHCP configuration wizards.
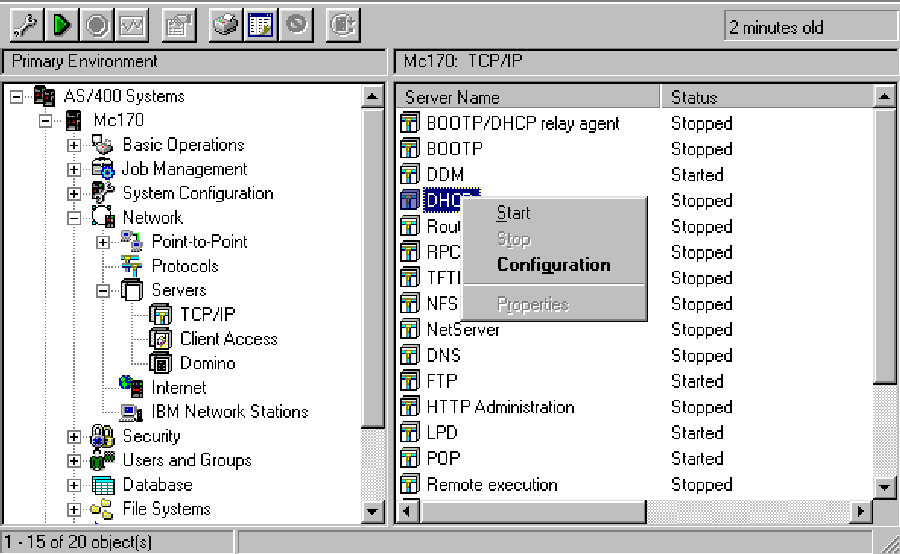
First, open OpsNav and select the Network/Servers/TCP/IP icon on your target AS/400 to display your AS/400 TCP/IP servers (see Figure 1). If you right-click on the DHCP server, a pop-up menu similar to that shown in Figure 1 appears, giving you the options to start, stop, or display server properties or to configure your DHCP server. If you select the Configuration option, you will first see a welcome panel that informs you whether you already have BOOTP configured on the system and, if you do, recommends that BOOTP be migrated to DHCP during the configuration process. Click on the Next button, and another panel appears where you can specify whether you want to perform a BOOTP-to-DHCP migration and the IP address of the bootstrap server your network clients will use (in most cases the DHCP server). Click on Next again, and the wizard prompts for the default lease time your subnet clients will use. Another click on Next displays a panel asking if you’d like to add a new subnet to the DHCP server. If you choose Yes, a series of panels are displayed:
• The first panel asks if this subnet will manage twinaxial devices (I answered No).
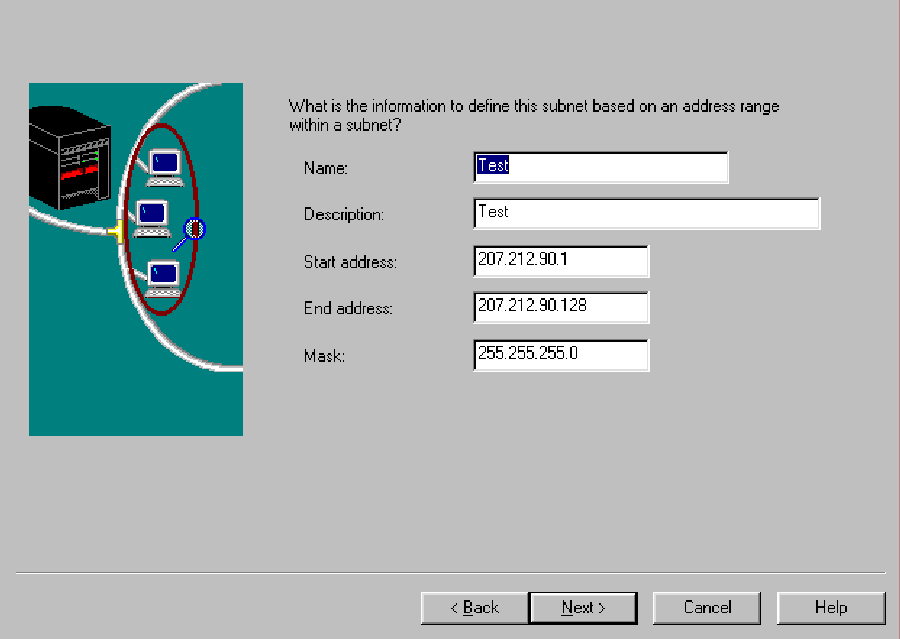
• The second panel asks whether you’d like to define the subnet as an entire subnet or define it based on an address range (I opted to define the subnet based on an address range).
• The third panel is where you define the subnet itself, as shown in Figure 2.
• The fourth panel asks if you’d like to exclude any addresses, such as routers or gateways.
• The next seven panels are yes-or-no questions pertaining to lease time, gateways, domain names, and several other subnet options.
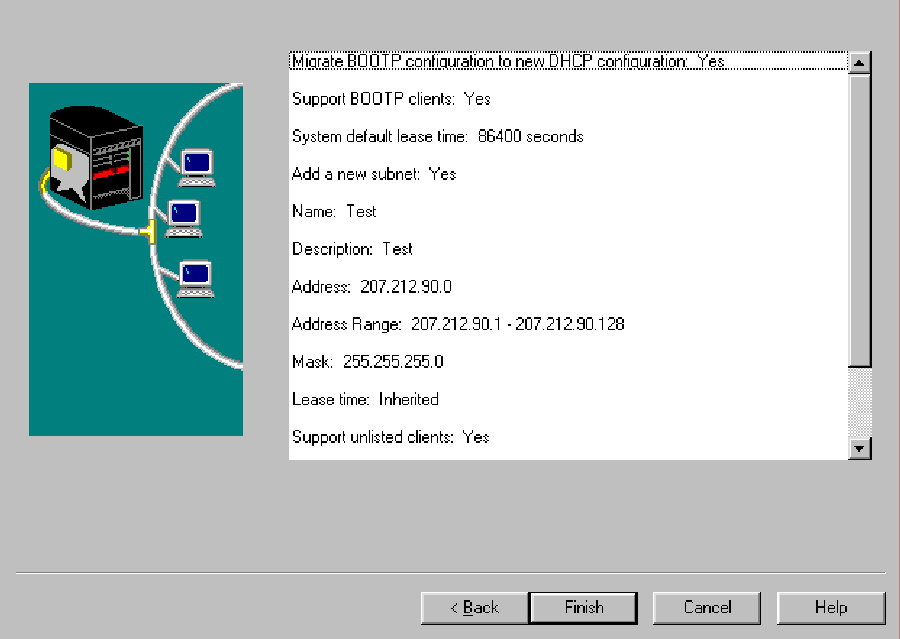
• The final panel (Figure 3) shows you all the DHCP configuration choices you selected.
If you’d like to change any options, click on the Back button until you return to the appropriate panel. Click Finish to display the DHCP Configuration panel shown in Figure
4. This panel will now appear when you choose the configuration option again from the DHCP icon in OpsNav. Then, to start your DHCP server, click on the Start option on the drop-down menu (or use the STRTCPSVR *DHCP green-screen command). Using the file drop-down menu (see Figure 4), you can add or change subnets, add new configurations, change the DHCP server’s global properties, and create user-defined option templates. Although the process of setting up DHCP subnets, properties, and templates can be complex, the OpsNav wizards make this task, if not easy, at least understandable. Detailed help is available on all screens to make the task even easier.
The Payoff
Once you have your DHCP server up and running, configuring network stations to use the server is a fairly straightforward task. Consult the AS/400—IBM Network Station—Getting Started manual to help you configure your network stations. After you have set up your DHCP server(s), your network computers (NCs) can basically boot and configure themselves with no operator intervention. The information that is sent from the server to the client may vary depending on the NC vendor, but the sequence of events remains essentially the same for all NC implementations.
References
(All redbooks are available on the Web at www.redbooks.ibm.com. All manuals are available on the AS/400 online library at publib.boulder.ibm.com/pubs/html/as400/online/homeeng1.htm.)
• AS/400—IBM Network Station—Getting Started, Redbook (SG24-2153-00)
• IBM Network Station Manager Installation and Use (SC41-0664)
• OS/400 TCP/IP Configuration and Reference V4R3 (SC41-5420-02, CD-ROM B3ANL02)
• System API Programming (SC41-5800)
Related Materials
• AS/400 IBM Network Station: Techniques for Deployment in a WAN, Redbook (SG24- 5187-00)
• AS/400 TCP/IP Autoconfiguration: DNS and DHCP Support, Redbook (SG24- 5147-00)
• Exploring the IBM eNetwork Communications Suite, Redbook (SG24-2111-00)
• “Technology Spotlight: Technology Standards: Who Makes the Rules?” D. Ellis Green, MC, February 1999
 |
 |
 |
 |


 Business users want new applications now. Market and regulatory pressures require faster application updates and delivery into production. Your IBM i developers may be approaching retirement, and you see no sure way to fill their positions with experienced developers. In addition, you may be caught between maintaining your existing applications and the uncertainty of moving to something new.
 IT managers hoping to find new IBM i talent are discovering that the pool of experienced RPG programmers and operators or administrators with intimate knowledge of the operating system and the applications that run on it is small. This begs the question: How will you manage the platform that supports such a big part of your business? This guide offers strategies and software suggestions to help you plan IT staffing and resources and smooth the transition after your AS/400 talent retires. Read on to learn:
LATEST COMMENTS
MC Press Online