Eliminate the need for that old twinax device by using the PC you use for Operations Navigator as your console to the AS/400. This article shows you how.
Do you need to manage multiple AS/400e systems from a single console? Do you want to use PCs to interact with your AS/400 and forget about those "dumb" 5250 terminals? Do you want a single PC to act as both your system console and a graphical workstation for common AS/400 operations tasks? This article gives you an overview of these scenarios and more using the new IBM AS/400 Operations Console.
With Version 4 Release 3 of OS/400 and IBM's AS/400 Client Access for Windows 95/NT V3R2M0, you can connect and use a PC as the AS/400 system console. You can set up your PC to be a local controlling system (LCS) or a remote controlling system (RCS). Using your PC as an RCS, you dial in to an LCS and operate your AS/400 system console from a remote location. And an RCS can dial in to multiple LCSs connected to different AS/400 systems, so you can use one RCS as the console for several different AS/400 systems. With the proper cable connection between the AS/400 and the LCS, you can also set up a graphical control panel application for your AS/400 operations that can be used on either the local or remote controlling system.
What Is the AS/400 Operations Console?
On AS/400 systems, the system console is a "privileged" device, meaning that there are certain tasks that can be performed only from this device. These tasks include full system saves, service tasks, reclaim storage, and manual-mode IPL. By default, the system console is the only device that a security officer can sign on to when the system is first started. All normal or nonprivileged tasks, which are traditionally handled by a dumb 5250 twinax-connected terminal without any PC capabilities, can also be performed from the console.
The AS/400 Operations Console is a software solution that
allows a Windows- based PC to act as a fully functional 5250 system console or
as a graphical AS/400 operations control panel or as both. The console and
control panel applications can be used together or separately. Operations
Console supports dial-in connections from remote workstations that can also
function as an AS/400 system console, a graphical control panel, or both.
Operations Console extends OS/400's system console capability by allowing you to use local and remote PCs to manage your AS/400 in a restricted mode (including IPLs) from anywhere.
AS/400 Operations Console uses the 5250 emulation provided by IBM Personal Communications (if installed on the PC) or the PC5250 emulation support program provided with Client Access. The graphical control panel application supports functions such as power up/power down, re-IPL, and mode changes (for example, changing to Normal mode for the next IPL).
Operations Console allows you to use a Windows PC with a direct cable connection to the AS/400 as your AS/400 system console. This same PC can also be connected via a LAN to the AS/400 so that it can be used as a workstation. Using one device for both functions can eliminate the need for a dedicated twinax system console device or an additional PC. Figure 1 illustrates a typical Operations Console connection; Figure 2 illustrates a single RCS connected to two different AS/400 systems.
System Requirements
In order for AS/400 Operations Console to run, there are several hardware and software components that must be installed on your AS/400 and your LCS and RCS clients.
On your AS/400, you need to have OS/400 V4R3 or later installed, along with IBM Client Access for Windows 95/NT, V3R2M0 and above (licensed program 5763-XD1), and any applicable PTFs. Although the graphical control panel that comes with Operations Console can be used with OS/400 V3R0M5 or above, you need OS/400 V4R3 to use the actual Operations Console program. Operations Console will also work with the new IBM AS/400 Client Access Express for Windows product (Express client). Figure 3 shows the valid combinations of hardware and OS/400 versions.
In addition to the software, Operations Console requires a cable to connect from your LCS client to the console adapter on your AS/400 system. The cable is indicated by a specify code when the system is ordered. Figure 4 shows the cable part numbers and ordering specify codes for the Operations Console cables.
The control panel application is part of the Operations Console software. However, an additional cable must also be ordered to enable the control panel connection to your AS/400. The cable order numbers are shown in Figure 5.
Your LCS client PCs have the following hardware and software requirements:
? For Windows 95 and Windows 98 computers, you must have Windows Dial-Up Networking installed and the client must be configured for Windows TCP/IP support. For Windows 95 clients only, you must also install the Dial-Up Networking Update version
1.2 patch or later. This update is available from the Microsoft Web Site (www.microsoft.com). The Dial-In Networking update is part of the base Windows 98 package, so it needs to be applied only to Windows 95 clients.
? For Windows NT LCS clients, you must have the Windows NT service pack 3 or later installed. You can download the latest service pack from the Microsoft Web site.
? For any LCS (Windows 95, Windows 98, or Windows NT clients), you must have one available COM port for the Operations Console cable and (if you are planning on using the optional graphical control panel) a second available COM port for your graphical control panel interface. You must also install IBM Personal Communications (Version 4.1 or later) or the PC5250 Display and Printer Emulation program provided with Client Access. (Note: You do not need a license to use 5250 Display and Printer Emulator just for Operations Console.)
If you are planning to use RCS support, the LCS must be a
Windows NT system. You must also have 9600 bps or higher modems installed on
both the LCS and RCS systems. The connection between a remote and a
direct-attach Operations Console (RCS and LCS) uses the Windows dial-up
networking point-to-point protocol (PPP) with the LCS using Windows NT Remote
Access Service (RAS) to accept dial-in calls from the RCS. The RAS software is
included on your Windows NT CD-ROM and can be installed from that media (for a
complete description of how to configure a Windows NT RAS for AS/400 access, see "Dialing Up Your AS/400 Network Through a Windows NT RAS Server" in the January/February 1999 issue of AS/400 Network Expert).
Setting Up Operations Console
To set up AS/400 Operations Console on your LCS, you need to connect the cables to the AS/400 and the PC and install the needed software on the PC. Cabling differs, depending on the AS/400 model you are using. Basically, you are connecting the cable (see Figure 4 for the cable part numbers) from the console port on the AS/400 to the COM port on the PC. The LCS must always be connected to the AS/400 using this cable. With the Operations Console modem support, this cable becomes a TCP/IP communications link between your AS/400 and the PC.
As an example of the cabling, Figure 6 shows how the Operations Console cable is connected from the PC to an AS/400 Model 170. In the figure, cable A is the Operations Console cable, and cable B is the Graphical Control panel cable.
Installing Operations Console on the LCS PC
Operations Console support is an optionally installable component of Client Access for Windows 95/NT V3R2M0 and the new Express client product. It is not available with any lower versions of Client Access.
To install AS/400 Operations Console when you install Client Access, select the Custom Install option from the Installation Wizard (see Figure 7). On the Component Selection panel (Figure 8), the following components must be specified:
? Base support
? 5250 Display and Printer Emulator (if you are not using IBM Personal Communications V4.1 or later). Note: You do not need a license to use 5250 Display and Printer Emulator just for Operations Console, even though the screen says that you do.
? Operations Console
? Operations Navigator (optional; this provides a powerful GUI to AS/400 functions). If you have a LAN attachment between your PC and the AS/400 in addition to the Operations Console connection, you can use Operations Navigator to manage your AS/400 (see "Technology Spotlight: Charting a Powerful Course with AS/400 Operations Navigator," MC, January 1999).
After specifying these components, complete the installation, and Operations Console will be installed on your LCS.
If you have previously installed V3R2M0 of Client Access for Windows 95/NT but did not install Operations Console, use Client Access' Selective Setup function to complete the installation. Do this by opening the IBM AS/400 Client Access folder, select Accessories, and then select Selective Setup. Inside Selective Setup, select Next until the Component Selection panel appears (see Figure 8). Check the AS/400 Operations Console component and complete the installation.
Setting Up Console Support
Once you have connected the cables and installed the Operations Console component, you are ready to set up the applications. Setup procedures differ depending on whether you are setting up an LCS, an LCS with dial-in support, an RCS, or a Graphical Control panel.
The next step is to install the modem driver for your
Operations Console cable. Open the Windows Control panel and double-click on the Modems icon. If you see an entry for the AS/400 Operations Console Connection, you already have the null modem driver installed; otherwise, install a driver by clicking on the Add button. You will be installing the modem driver from the folder C:Program FilesIBMClient AccessAocInf.
Don't let Windows detect the modem; go to the above directory (or to the folder path in which you installed Client Access) and click on Open. The AS/400 Operations Console Connection should be listed. Complete the modem installation by selecting the communications port that the Operations Console cable is connected to on the PC (such as COM1). When you return to the modems display, make sure the AS/400 Operations Console Connection is selected, click on Properties, and verify that the maximum speed is set to 115200.
Once the Operations Console component is installed, the cable is attached, and the Operations Console Connection driver is installed, you're ready to set up the console on the PC using the Connection Wizard.
Setting Up an LCS to Support Dial-in Connections Is Tricky
Only a Windows NT system can be used as the LCS when you expect to dial in to it from an RCS. In addition to setting up the connection between the LCS and the AS/400, you also need to set up the connection for the dial-in communications from the remote PC.
To support dial-in, you must have RAS and a standard modem installed and configured on the Windows NT LCS. Once RAS is set up, you can configure Windows NT communications support by clicking on Services, Remote Access Services, and Properties. In that window, select the AS/400 Operations Console Connection and click Configure. Select Dial Out Only and click OK. Then, open Network, select TCP/IP, click on OK, select your modem, and click Configure. Set the modem to Receive Calls only. Click OK, then click on the Network button to set the following:
? Allow remote clients running: Select TCP/IP and deselect any others.
? Encryption settings: Select Allow any authentication including clear text. Click the Configure button that goes with TCP/IP and set the following:
? Allow remote TCP/IP clients to access: Select This computer only.
? Select Use static address pool.
? Type this address in the Begin: field: 192.168.000.005
? Type this address in the End: field: 192.168.000.024
? Check Allow remote clients to request a predetermined IP address. Click OK twice and then click Continue. If you get the message "Remote Access Service has been successfully installed" (this message does not appear for all installs), click OK. Finally, click on Close.
Operations Console Connection Wizard
You use the Operations Console Connection Wizard to set up a specific connection to an AS/400. Use the wizard to specify the type of support you will be using (console only, graphical control panel only, or both) and the properties of the connection. You need to run the Connection Wizard from the LCS and from any RCS that will be dialing in to the LCS.
Operations Console connects to the AS/400 during an AS/400 system IPL. For the first connection, IPL the system in manual mode. Look at the Function/Data display on your AS/400 system control panel and verify that it is set to manual (the Function/Data display light should show BM). Make sure that there are no active jobs running and then IPL the system (press the power button).
Open the Operations Console icon on your LCS PC desktop (found inside the Client Access folder). Go through the wizard, making choices appropriate for the type of controlling system you are setting up. During this process, you'll be specifying the AS/400 system name you want to connect to. The wizard will attempt to automatically detect the communications port on the PC that the LCS cable is attached to. If this detection fails, you must manually specify the port within the wizard.
After Operations Console connects to your AS/400, you will be prompted for
the Dedicated Service Tools (DST) security user ID and password. Select Use
Dedicated Service Tools from the initial display. Sign on using the
security-level user ID and password (as shipped, these values are QSECOFR and
QSECOFR). Note: If the remote console does not start, use the graphical control
panel or the control panel on the AS/400 to select function 21, and then press
the Enter button. Complete the following steps:
? Select Work with DST environment.
? Select Work with system devices.
? Select Work with console mode.
? Select Operations Console.
? Press F3.
? Select Start a service tool.
? Select Power the system down.
? Press F10 to confirm the power down.
? Wait for the power light to turn off.
? Re-IPL the AS/400 in normal mode. (The Function/Data display should show You can set up either a Windows NT or Windows 95/98 PC as an RCS. This PC will dial in to an LCS (which must be a Windows NT PC) and connect to the AS/400 through the LCS.
Once again, open the Operations Console icon in the Client Access folder on the desktop. On the Configure AS/400 Operations Console Connection panel (see Figure 9), select Remote control panel only. Click Next and then specify the system name for the AS/400 you want to connect to and the name of the LCS you will be dialing in to. On the next panel, click on the Dial-up Networking button and configure your PC to dial out to the LCS. You'll need to specify the telephone number of the LCS and verify that the correct modem is shown for the dial out connection. Click on OK. Complete the dial-up networking definition. Finally, click Next and then Finish in the Configure AS/400 Operations Console Connection panel.
If the LCS you are dialing in to is available for a connection, you can verify proper operation. Highlight the resource name and click the Connect icon on the toolbar. When the modems finish making a connection, you will receive a sign-on panel. Sign on to the LCS. When your user ID and password are validated by the LCS, you will receive an emulator session and the status will show as Connected.
To use only the Graphical Control panel, open the Operations Console icon in the Client Access folder and select Local Controlling System (LCS) to AS/400 System. On the next panel, enter the name of the AS/400 you want to connect to. On the next panel, select the Graphical Control panel. When you click Next, the system will detect the Graphical Control panel communications port and automatically select it. If this detection fails, you can manually select the communications port. When you click Next, the Graphical Control panel starts (see Figure 10).
The Graphical Control panel allows you to perform those functions normally done from the AS/400 system unit operator's control panel. Being able to perform these functions from a remote location gives you more flexibility in managing your system-you don't need to have someone on site at all times. Figure 11 defines the functions that can be performed from the Graphical Control panel. The Graphical Control panel looks a lot like the panel on the system unit. Instead of pressing buttons on the panel, you click on the graphical representation of the button.
Using the Operations Console is as simple as connecting to the AS/400. From an LCS, the connection occurs directly between the AS/400 and the LCS; for an RCS, the connection first is made to the LCS and then to the AS/400 through the LCS.
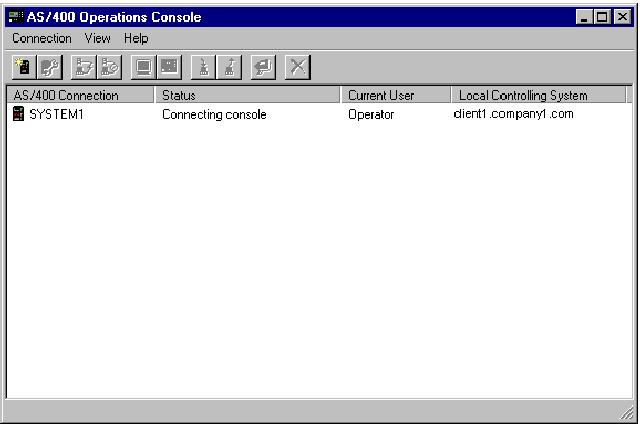
To start a console session from the LCS, simply open the Operations Console icon; you are automatically connected to the AS/400 (see Figure 12). From an RCS, open the Operations Console icon, select the AS/400 connection you want to use and, from the File
BN.)
pull down, select Connect. If you are connecting from an RCS, you must enter your user ID and password for the LCS. When the connection completes, you'll get an emulation session to the AS/400.
Everything's Gone Graphical
With the support provided by the AS/400 Operations Console, you can do the following:
? Eliminate the need for a twinax workstation as your AS/400 system console
? Use one PC as both the console and a workstation
? Use a remote PC as a console to manage your system With the support offered in V4R3, you can start using a PC as your primary controlling station for console actions (using the Operations Console), actions requiring system panel input (using the Graphical Control panel), and day-to-day management of your system (using the AS/400 Operations Navigator program included with Client Access for Windows 95/NT).
In addition, there is also a new EZ-Setup program that works with Operations Console that you can use to perform initial system setup with an easy-to-use graphical setup wizard (see "Simplifying New System Setup-EZ-Setup Wizard and Welcome Center," MC, September 1998).
AS/400
Figure 1: This is illustrative of a typical single-system AS/400 Operations Console connections.
Local Area Network
Direct Attached Console
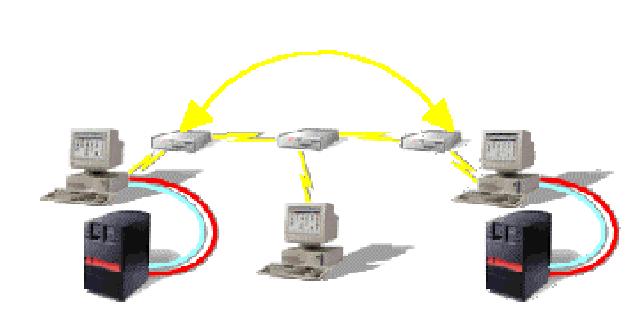
Figure 2: Here is a single RCS controlling multiple AS/400 systems.
Application OS/400 Version Client Access Version AS/400 Models
5250 console V4R3M0 and above V3R2M0 150/170/6xx/Sxx device emulator
Graphical Control V3R0M5 and above V3R2M0 50/170/Sxx/2xx/3xx/ panel 4xx/5xx
Figure 3: Here is a list of the valid combinations of hardware and OS/400 versions.
AS/400 Models I/O Features Part Number Specify Code Description
640/650/S30/S40/SB1 2699 97H7556 0328 36-pin square 150/170/600/620/S10/S20 2721/2745 97H7557 0367 36-pin PCI
Figure 4: Here are the Operations Console cables.
AS/400 Models Part Number Specify Code Description
150/170/600/620/S10/S20/4xx/5xx 97H7591 0381 Connects to 9-pin
D-shell labeled MI/J19 640/650/S30/S40/SB1 97H7584 0380 Connects to 9-pin
D-shell on lower left side of HW panel
Figure 5: These are the Graphical Control panel
cables.
Figure 6: This shows model 170e AS/400 Operations Console cable connections.
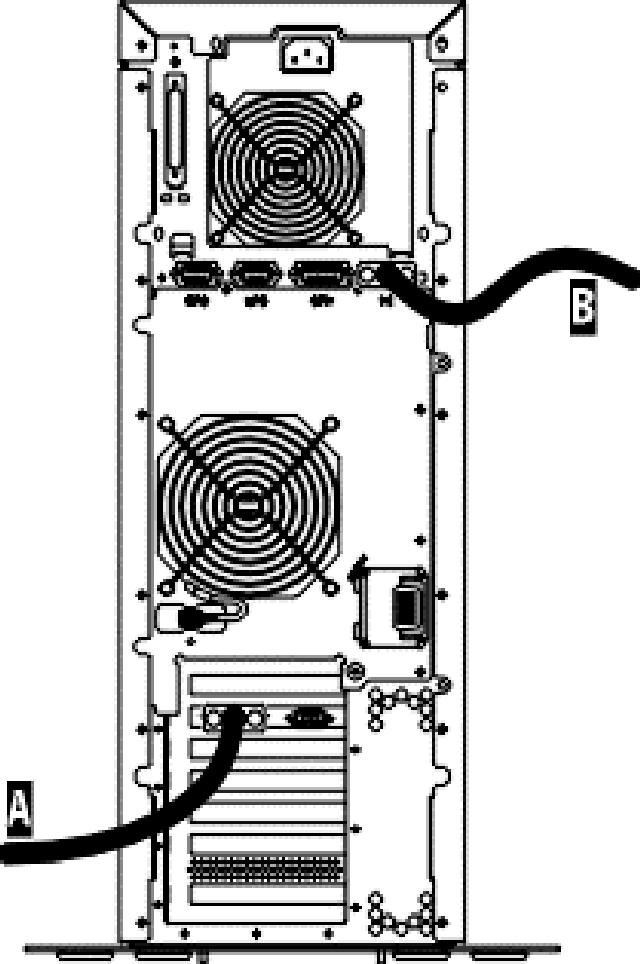
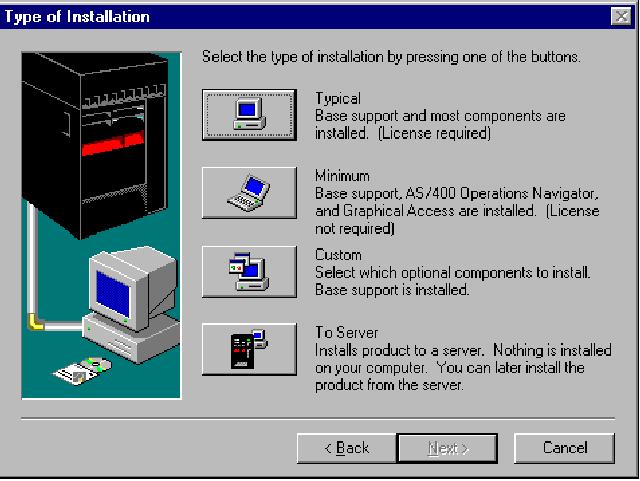
Figure 7: To run Operations Console, install the base version of Client Access along with PC5250 emulation and the Operations Console program itself.
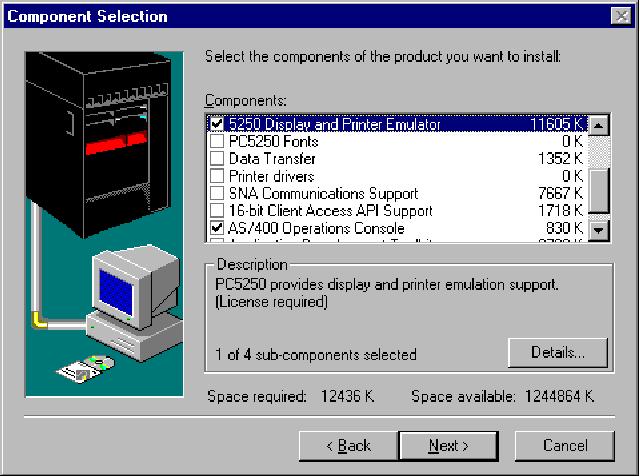
Figure 8: Specify components on the Component Selection panel.
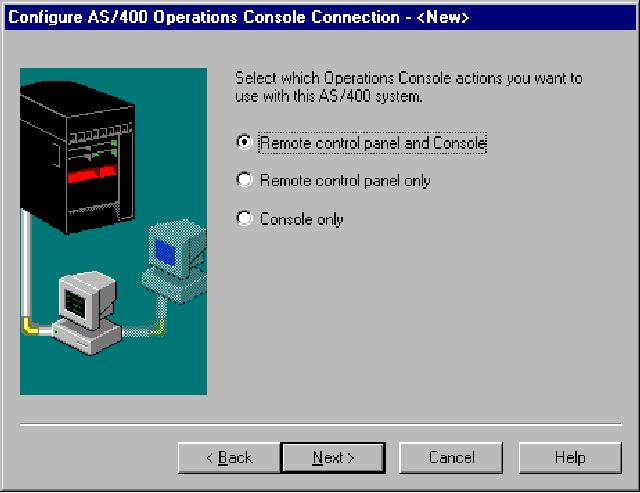
Figure 9: This is the Configure AS/400 Operations Console Connection Panel.
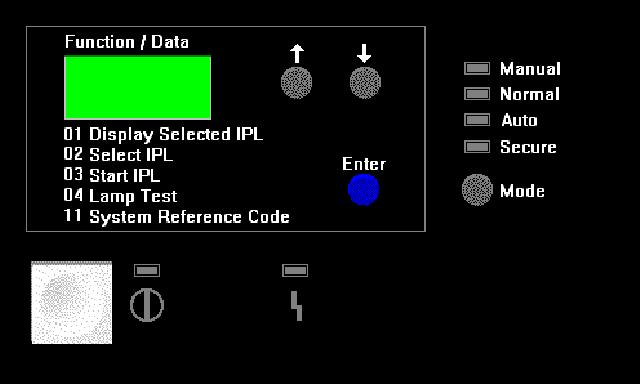
Figure 10: Here's an example of what the Graphical Control panel looks like.
Function Number Description Function Number Description
1 Display IPL type and mode 50 System processor stop 2 Select IPL type and mode 51 System processor status 3 Start IPL 52 System processor start 4 Lamp test 53 Reset SP and control panel communication
5 SPCN SRC 54 Display configuration table
6 Disable CPM 55 Display SP log buffer
7 SPCN function (only 56 Display SP code area subfunction 1 supported)
8 Fast power off 57 Display IPL message area 11-19 Display SRCs 58 Display IPL parameter area 20 Display machine 63 System status SRC trace type/model info
21 Enter DST 64 Diagnostic status SRC trace 22 Dump main store 65 Deactivate remote service 25-26 Enable functions 50-70 66 Activate remote service
33 reorder SPCN addressing 70 MFIOP dump
34 Retry MSD or CPM IPL
Figure 11: Here is a table listing AS/400 Operations Console control panel functions.
Figure 12: Start an LCS session from Operations Navigator.


 Business users want new applications now. Market and regulatory pressures require faster application updates and delivery into production. Your IBM i developers may be approaching retirement, and you see no sure way to fill their positions with experienced developers. In addition, you may be caught between maintaining your existing applications and the uncertainty of moving to something new.
 IT managers hoping to find new IBM i talent are discovering that the pool of experienced RPG programmers and operators or administrators with intimate knowledge of the operating system and the applications that run on it is small. This begs the question: How will you manage the platform that supports such a big part of your business? This guide offers strategies and software suggestions to help you plan IT staffing and resources and smooth the transition after your AS/400 talent retires. Read on to learn:
LATEST COMMENTS
MC Press Online