Learn how to set up iSeries Access to create PDF print-screen booklets.
In December, Sam Lennon wrote a useful TechTip about iSeries Access. It made me remember a problem I had to solve for a customer who wanted to do some printing but did not want to spend a lot of money having me create a program.
The customer wanted to have some "print screens" of a subfile list from iSeries Access. He wanted multiple copies, and he wanted to export them to some kind of office package. The solution needed to be easy for the user, and it needed to be inexpensive (downright cheap actually), but besides that, he had no real demands.
My first thought was that it couldn't be done. No way, José! But then I started to look into the toolbox inside my head. "CutePDF," I mumbled. "iSeries Access Print Screen Collection combined with a few macros," I said to myself, knocking my head against the wall. Voila! The solution was right in front of me!
So let me show you how to create a cheap iSeries Access PDF booklet.
Creating PDF Files Instead of Printing
The first thing I had to be able to do was create PDF files. You can find various solutions: OpenOffice has a built-in PDF creator, you can do it using your System i, or maybe your shop has some other solution that works with Office or something totally different.
I have CutePDF and have been using it for quite a long time. Briefly, it works like this:
- Download the free version.
- Install it.
- Start using it.
Not that hard really, huh?
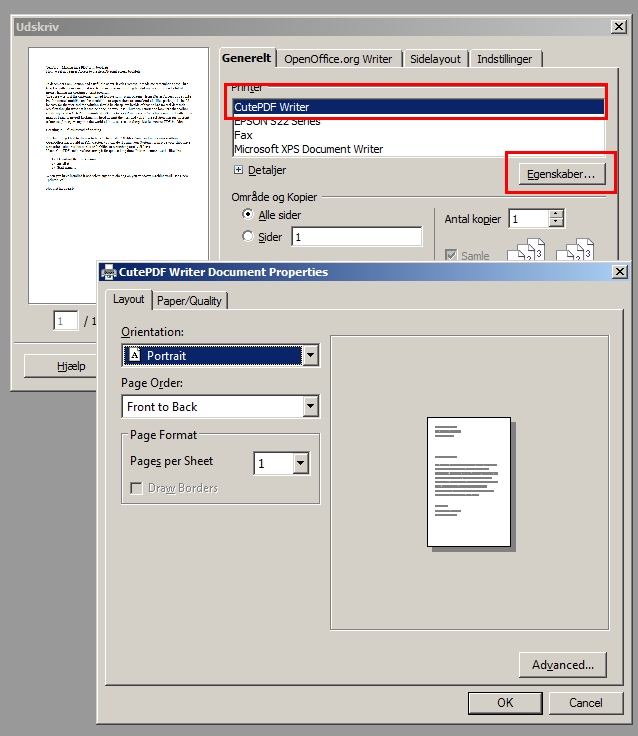
Once you've installed it, you can select any print dialog on your Windows machine and you'll see a new "printer" named CutePDF Writer.
Figure 1: The CutePDF Writer print dialog looks like this. (Click images to enlarge.)
By selecting this, you will be prompted for a file name and a path, and your print will be saved as a PDF file. Simple and easy.
So point your browser to www.cutepdf.com/ and use www.cutepdf.com/download/CuteWriter.exe to download the writer. Download, execute, and follow the instructions on the screen. Also, when prompted to install Ghostscript, do that if it's not already installed on your PC.
Well, that was the first part.
What Is iSeries Access Print Collection?
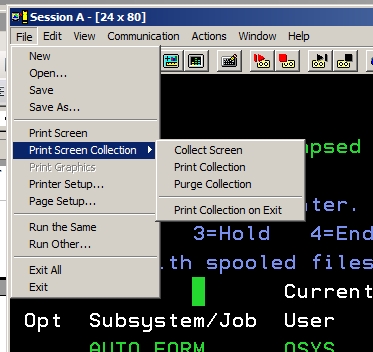
Until recently, I never noticed the iSeries Access Print Screen Collection option hidden away under File>Print Screen Collection. This feature lets you save and file screen shots until you want to print them.
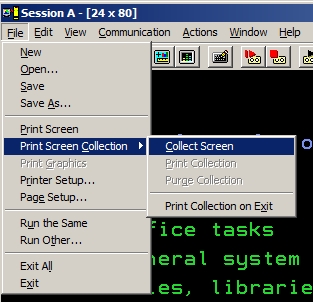
In Figure 2, you can see the options before selecting any screens to print. Figure 3 shows the options you have after you have selected one or more print screens.
Figure 2: No prints have been selected.

Figure 3: One or more prints have been selected.
You can collect screens, print collections, and even purge a collection if you want to start over again.
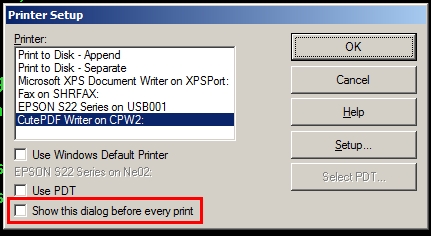
One more thing before we give it a test: Under File>Printer Setup, be sure to de-select the "Show this dialog before every print" as shown in Figure 4. Also, be sure to select CutePDF Writer as the printer.

Figure 4: Choose your printer setup.
You are now ready for the first test, so let's give it a try.
Here is what you do:
- Place yourself on some screen.
- Select File>Print Screen Collection>Collect Screen.
- The first time, you'll see the printer setup dialog. Select CutePDF Writer.
- Change your screen and Select File>Print Screen Collection>Collect Screen.
- Repeat steps 2 and 4 a few times.
- Select File>Print Screen Collection>Print Collection.
- Click on the Printer Setup, and fill in a name for the PDF file when prompted. Click OK.
You now have a nice PDF file with the screens you have collected. Easy!
Let's Make It Really Fast
To speed up the various steps, we will use the macro functions built into iSeries Access to create two macros and connect these to some key combinations.
The first one we will create is the "Collect screen."
- Choose Edit>Preferences>Keyboard.
- On the keyboard dialog, select Customize. The screen in Figure 5 will be displayed.

Figure 5: Attach Collect Screens to Alt+C.
In this example, we will connect the Collect Screen to the Alt+C key combination, which means that every time you press Alt+C, the display on your screen will be collected.
On the Function dropdown list (at A), choose the Collect Print Screens option. Then click once on the letter C on the keyboard (as shown at B). And, finally, click the arrow button at Alt (as shown at C). Select File>Save, and you are done with the collecting part.
Now, we only need the print collection part.
We will connect the print collection to the Alt+P key combination. See Figure 6.

Figure 6: Attach Print Collection to Alt+P.
On the Function dropdown list (at A), choose the Print Collected Screens option. Then click once on the letter P (as shown at B). Now click the arrow button at Alt (as shown at C). Select File>Save. You're done with the print collection part. Close the dialog using File>Exit and return to your iSeries Access screen.
Putting It All to Work
Now we're ready to create our first cheap and easy iSeries Access PDF booklet.
Let's create a WRKSPLF booklet. Place yourself on the main screen and press Alt+C, type WRKSPLF, press Alt+C again, show the content of some print file using option 5, and press Alt+C again.
Now, we'll print the collection. Press Alt+P and select a name for your PDF file. Open the saved file in the Adobe reader (and don't tell me this is not useful!).
I know that this might not be the most impressive tool to create PDF files, so maybe you'd like to go to CutePDF.com to look at the professional version of CutePDF, which can do all kinds of fancy things.


 Business users want new applications now. Market and regulatory pressures require faster application updates and delivery into production. Your IBM i developers may be approaching retirement, and you see no sure way to fill their positions with experienced developers. In addition, you may be caught between maintaining your existing applications and the uncertainty of moving to something new.
 IT managers hoping to find new IBM i talent are discovering that the pool of experienced RPG programmers and operators or administrators with intimate knowledge of the operating system and the applications that run on it is small. This begs the question: How will you manage the platform that supports such a big part of your business? This guide offers strategies and software suggestions to help you plan IT staffing and resources and smooth the transition after your AS/400 talent retires. Read on to learn:
LATEST COMMENTS
MC Press Online